Introduction
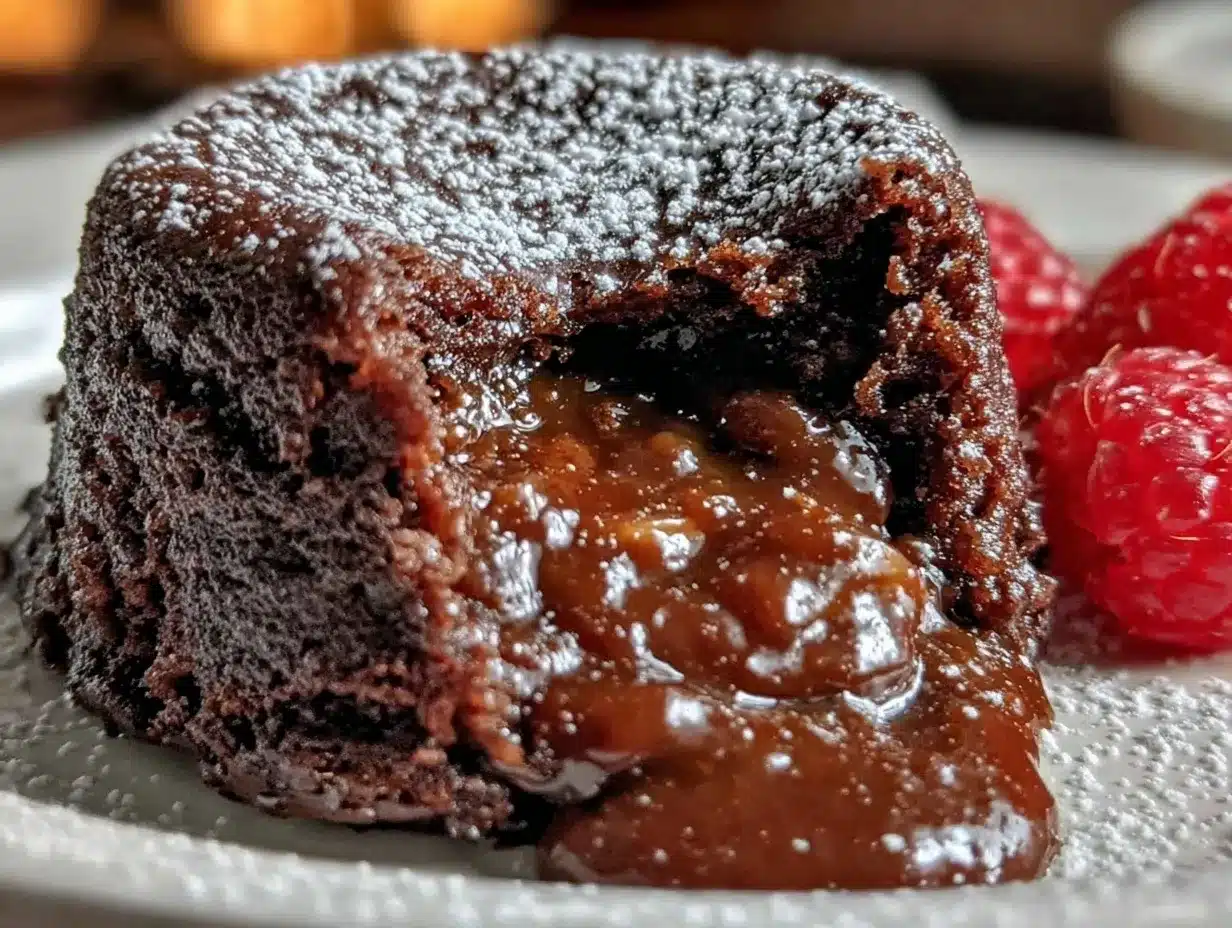
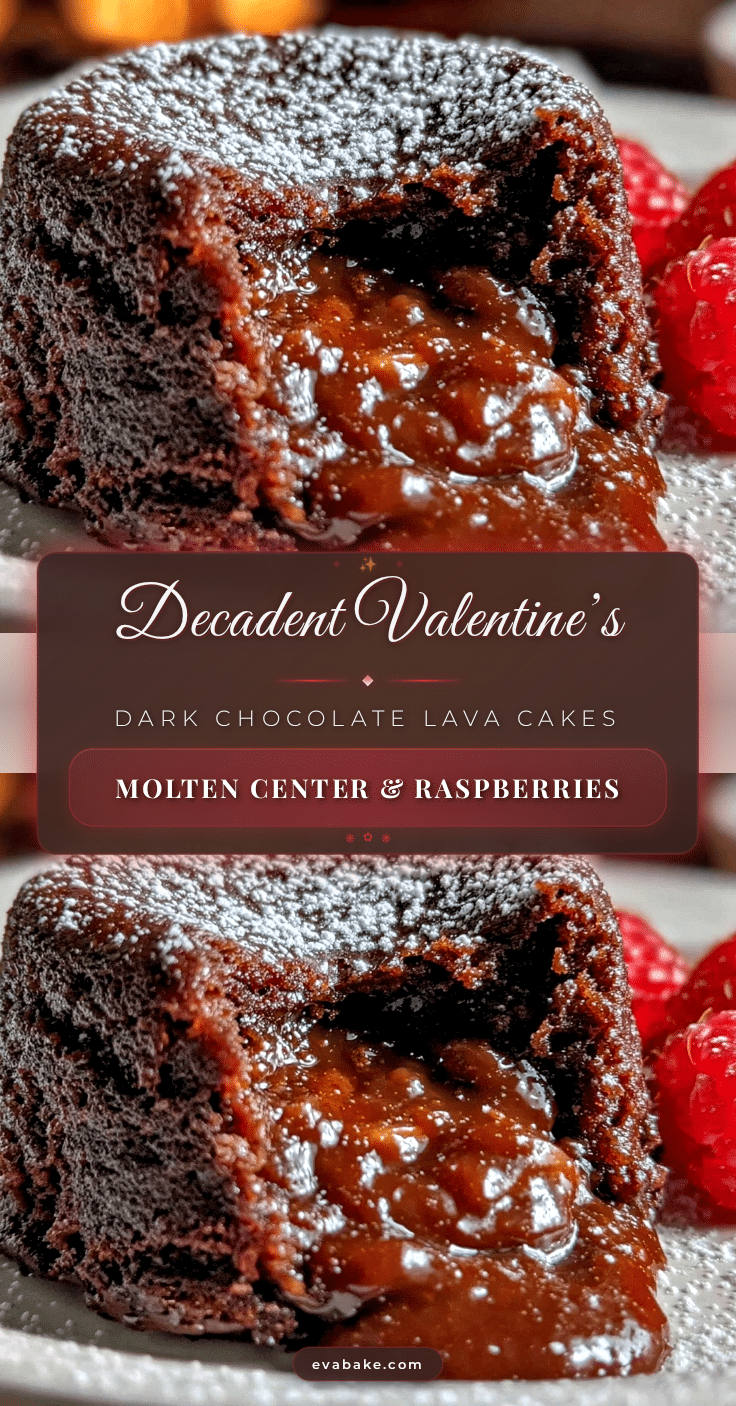
Imagine the moment when the scent of rich, dark chocolate fills the kitchen—warm, deep, and just a touch mysterious. You pull a tray of petite chocolate lava cakes from the oven, their edges perfectly firm, while the center promises a molten surprise. The first time I made these Dark Chocolate Lava Cakes for Valentine’s, the anticipation was almost too much. That feeling right before you cut into the cake and watch the gooey chocolate flow—honestly, it’s a showstopper every single time.
I stumbled onto this recipe years ago, after a rainy February afternoon when all I wanted was a little bit of romance and a whole lot of chocolate. Back then, I was knee-high to a grasshopper (well, not quite, but you get the idea), and my grandma would make her famous chocolate pudding cakes. I wanted to recreate that feeling, but with a grown-up twist—something that would make my partner pause, smile, and say, “Wow, you made this?” You know those rare recipes that deliver pure, nostalgic comfort with a touch of elegance? This is it.
My family couldn’t stop sneaking bites off the cooling rack (the evidence was all over their chocolate-smeared faces). My friends now request these lava cakes for every Valentine’s dinner or cozy get-together. These cakes are dangerously easy to whip up, yet they feel so special—perfect for impressing your sweetheart or treating yourself after a long day. I’ve tested this recipe more times than I care to admit (in the name of research, of course!), and it’s become a staple for romantic evenings, gifting, and even just “I deserve this” moments. If you crave a dessert that feels like a warm hug and tastes like pure chocolate heaven, you’re going to want to bookmark this one.
Why You’ll Love This Recipe
Let’s face it, everyone wants a dessert that’s both impressive and achievable—especially on Valentine’s Day. Over the years, I’ve tested loads of lava cake recipes, and this one gets it just right. Here’s what makes these Dark Chocolate Lava Cakes stand out, based on real-life kitchen adventures and plenty of taste tests.
- Quick & Easy: These come together in under 30 minutes—no elaborate prep, perfect for last-minute romantic gestures or when you’re short on time.
- Simple Ingredients: You probably have everything you need in your kitchen already—no fancy chocolate, just good dark chocolate, butter, eggs, and a few pantry staples.
- Perfect for Valentine’s: Whether it’s a candlelit dinner or a cozy night in, these cakes add a touch of luxury to any celebration. They look gorgeous on a pretty plate, with a dusting of powdered sugar or a few fresh berries.
- Crowd-Pleaser: Kids love the gooey center, adults love the deep chocolate flavor—honestly, it’s hard to go wrong.
- Unbelievably Delicious: The texture—firm on the outside, molten in the middle—makes every bite a little adventure. It’s the kind of dessert that makes you close your eyes and savor the moment.
Here’s the real kicker: the secret is in the balance of ingredients and baking time. By using good quality dark chocolate and not overbaking, you get that oozy center every time. I use a tried-and-true technique: a quick whip of the eggs and sugar for a bit of lift, and a gentle fold so the cakes stay tender. That’s what separates this lava cake from the rest. It’s not just any dessert—it’s comfort food reimagined for grown-up romance, but still easy enough for a beginner.
I’ve served these at dinner parties, holiday brunches, and even as weeknight treats. They always disappear fast, and the compliments roll in. If you want a dessert that’s reliable, swoon-worthy, and guaranteed to make memories, this Dark Chocolate Lava Cake recipe is your ticket.
What Ingredients You Will Need
This recipe uses simple, wholesome ingredients to deliver bold chocolate flavor and a satisfyingly gooey texture. Most are pantry staples, and you can easily swap things to suit your preferences or dietary needs.
- For the Lava Cake Batter:
- Dark chocolate (70% cocoa is ideal)—6 oz / 170 g (choose a good-quality brand for the richest flavor; I love Ghirardelli or Lindt)
- Unsalted butter—½ cup / 115 g (softened; adds richness and a silky texture)
- Granulated sugar—⅓ cup / 65 g (balances out the bitterness of the chocolate)
- Large eggs—2 (room temperature; helps with structure and the molten center)
- Large egg yolks—2 (room temperature; extra yolks make the cake extra luscious)
- All-purpose flour—¼ cup / 30 g (just enough for structure, but not too much so it stays gooey)
- Pinch of salt (boosts the chocolate flavor, trust me)
- Pure vanilla extract—1 tsp (adds warmth and depth)
- For Serving:
- Powdered sugar (for dusting; optional but makes them look bakery-worthy)
- Fresh berries (raspberries, strawberries, or blackberries—your choice; adds color and a sweet-tart contrast)
- Whipped cream or vanilla ice cream (for serving; optional but highly recommended!)
If you’re dairy-free, swap the butter for coconut oil or a vegan margarine. For gluten-free folks, a 1:1 gluten-free baking mix works well—just keep an eye on the texture. You can use bittersweet chocolate if you like less intensity, or milk chocolate for a sweeter twist (though you’ll lose some of that classic dark chocolate oomph). In summer, fresh berries are a must; in winter, a spoonful of raspberry coulis is just divine. I’ve even snuck a teaspoon of espresso powder into the batter for an extra grown-up touch—try it if you’re a coffee lover!
Most of these ingredients are easy to find, and they come together in a flash. If you want your cakes to have that deep, rich flavor, don’t skimp on the chocolate. You’ll taste the difference!
Equipment Needed
- 6-ounce ramekins (you’ll need 4; ceramic or glass both work fine)
- Mixing bowls (one medium, one small; I usually use glass for easy cleanup)
- Whisk (for blending eggs and sugar)
- Silicone spatula (gentle folding is key for texture)
- Microwave or double boiler (for melting chocolate and butter)
- Baking sheet (to make transferring ramekins easier)
- Nonstick spray or butter (for greasing ramekins)
- Optional: fine mesh strainer (for dusting powdered sugar)
If you don’t have ramekins, you can use a muffin tin—just keep a close eye on the bake time. I’ve tried both, and while ramekins give the best results, muffin tins work in a pinch if you adjust the timing. Maintenance tip: soak your ramekins in warm water before washing to make cleanup a breeze. For budget-friendly options, I’ve found thrift stores often carry sturdy ramekins for just a couple bucks each.
Honestly, you don’t need fancy gadgets—just reliable basics. If you love making desserts, investing in a good whisk and a set of ramekins is totally worth it. They last forever and make you feel like a pro!
Preparation Method
- Prep the Ramekins: Grease 4 x 6-ounce (175 ml) ramekins thoroughly with butter or nonstick spray. (Don’t skimp! It helps the cakes release easily.) Place them on a baking sheet for easy handling.
- Melt Chocolate and Butter: Combine 6 oz (170 g) dark chocolate and ½ cup (115 g) unsalted butter in a microwave-safe bowl. Heat in 30-second bursts, stirring each time, until smooth and shiny. (Alternatively, use a double boiler over gentle heat.) The mixture should be glossy, no lumps—smells amazing!
- Mix Eggs and Sugar: In a separate bowl, whisk together 2 large eggs, 2 large egg yolks, and ⅓ cup (65 g) granulated sugar. Whisk until pale and slightly thickened—about 2 minutes. (This step adds lift to the cakes.)
- Combine Chocolate and Egg Mixture: Slowly pour the melted chocolate mixture into the eggs, whisking constantly to avoid scrambling. (Go slow; patience here pays off!) Add 1 tsp vanilla extract and a pinch of salt. Mix till just combined.
- Add Flour: Sift in ¼ cup (30 g) all-purpose flour. Using a silicone spatula, fold gently until just incorporated—don’t overmix, or the cakes will be dense instead of gooey.
- Fill the Ramekins: Divide the batter evenly among the prepared ramekins. Each should be about ¾ full. (If you want extra drama, push a chocolate truffle or piece of dark chocolate into the center.)
- Bake: Bake at 425°F (218°C) for 12-14 minutes. The edges should be set, the tops just firm, but the center still slightly jiggly. (Don’t overbake—molten center is the goal!) If using a muffin tin, check after 8-10 minutes.
- Cool Briefly: Let the cakes rest for 1 minute out of the oven. Carefully run a small knife around the edge, then invert onto plates. (If they stick, gently tap the ramekin—the cakes should pop right out.)
- Serve: Dust with powdered sugar, add fresh berries, and a dollop of whipped cream or scoop of vanilla ice cream. Enjoy immediately—molten centers wait for no one!
Troubleshooting tips: If your cakes are too firm, reduce bake time by 1-2 minutes next round. If they collapse when unmolded, let them set slightly longer before turning out. The batter can be made ahead and refrigerated for up to 24 hours—just bring to room temp before baking. My favorite shortcut: melt chocolate and butter together, then let cool a bit before mixing with eggs—helps keep things smooth.
The most important sensory cue is the jiggle test. The sides should look set, but the center will wobble just a little when you tap the ramekin. That’s when you know you’ve nailed it!
Cooking Tips & Techniques
Over the years, I’ve learned a few tricks (and made plenty of mistakes) with lava cakes. Here’s what can make or break your Valentine’s Dark Chocolate Lava Cakes, straight from my kitchen to yours.
- Use Quality Chocolate: Don’t go for bargain bars—good dark chocolate makes a huge difference in flavor and texture.
- Don’t Overmix: Once you add flour, fold gently. Overmixing leads to tough cakes—been there, done that!
- Watch the Bake Time: Every oven is a little different. Start checking at 12 minutes. The center should be soft, not runny, and the edges should look set.
- Room Temperature Eggs: Cold eggs can make the batter seize—trust me, I’ve rushed this step and regretted it. Let them sit out for 30 minutes, or place in warm water for 5 minutes.
- Grease Ramekins Well: A generous coat of butter or spray makes unmolding smooth and drama-free. If you forget, you’ll be scraping bits out, and that’s just sad.
- Serve Immediately: These cakes are best right out of the oven. The molten center sets quickly as they cool.
One time, I baked a batch a little too long while distracted by a phone call—no molten center, just cake! Lesson learned: set a timer and stay close. Multitasking works if you prep everything first: have ramekins ready, chocolate melted, and eggs whisked. Assembly is quick, and you can even prep the batter ahead for stress-free baking.
If you want consistency, use the same size ramekins and fill them evenly. I also recommend baking all cakes on the same rack position for even heat. These simple steps make lava cakes a recipe you’ll nail every time.
Variations & Adaptations
What I love about these Dark Chocolate Lava Cakes is how flexible they are—you can tweak them to suit all kinds of preferences and occasions. Here are some favorite variations I’ve tried (and loved):
- Gluten-Free: Swap the all-purpose flour for a 1:1 gluten-free blend. The texture stays gooey and decadent—no one will know the difference.
- Dairy-Free: Use coconut oil or vegan butter in place of regular butter. I’ve done this for friends with allergies, and the cakes still turn out rich and moist.
- Mocha Lava Cakes: Add 1 tsp espresso powder to the batter for a grown-up coffee kick. This is my personal favorite for winter nights!
- White Chocolate Center: Push a piece of white chocolate into the center before baking—when you cut in, you get a surprise swirl of creamy sweetness.
- Berry Burst: Add a few fresh raspberries to the batter for a tart twist. Works especially well for spring and summer gatherings.
For different cooking methods, you can bake these in a muffin tin or even small oven-safe cups—just adjust bake time down by a few minutes. If you’re avoiding eggs, you can try flaxseed egg replacements, though the texture is more cake-like than gooey.
My tried-and-true adaptation is tossing in a pinch of sea salt on top before baking. It’s a simple change, but that salty hit against dark chocolate is out of this world!
Serving & Storage Suggestions
These Dark Chocolate Lava Cakes are best served fresh and piping hot—right out of the ramekin, with the molten center still flowing. For presentation, invert onto a pretty plate, dust with powdered sugar, and scatter a few bright berries. Add a scoop of vanilla ice cream or a cloud of homemade whipped cream for extra flair. If you’re feeling fancy, drizzle with raspberry sauce or a quick caramel swirl.
For drinks, I love pairing these cakes with strong espresso, rich hot chocolate, or even a glass of red wine. They make a gorgeous centerpiece for a romantic dinner or an indulgent brunch spread.
If you have leftovers (rare, but it happens), store the unbaked batter in the refrigerator for up to 24 hours. Baked cakes can be wrapped and refrigerated for 2-3 days. To reheat, pop in the microwave for 15-20 seconds—just enough to warm the center. The flavors deepen overnight, but the molten effect is best fresh.
For freezer storage, wrap baked cakes tightly and freeze up to 1 month. Thaw overnight and reheat gently. The texture may change slightly, but the flavor stays rich and chocolatey.
Nutritional Information & Benefits
Each Dark Chocolate Lava Cake (serving size: 1 cake) contains approximately:
- Calories: 350
- Fat: 22g
- Carbohydrates: 35g
- Protein: 6g
- Sugar: 22g
The star ingredient—dark chocolate—is packed with antioxidants and minerals like magnesium and iron. Eggs provide protein, while butter adds a satisfying richness. If you opt for gluten-free flour or dairy-free substitutes, the nutritional profile shifts slightly but remains indulgent.
These cakes are naturally nut-free (unless you add nuts or nut-based toppings), but do contain eggs, dairy, and gluten unless you adapt. My personal wellness tip: enjoy these as an occasional treat—they’re rich and satisfying, so a little goes a long way!
Conclusion
If you’re searching for the ultimate romantic dessert, these Dark Chocolate Lava Cakes are absolutely worth trying. They combine simplicity, elegance, and pure chocolate indulgence in every bite. Customize them with your favorite flavors, serve them however you like, and let the magic happen at your table.
I love this recipe because it never fails to create those “wow” moments—whether for a Valentine’s celebration or just a cozy night in. It’s the kind of dessert that brings people together and sparks happy memories. Honestly, you’ll want to make it again and again.
Give these lava cakes a shot, and let me know how you adapt them for your family or special someone. Drop your tips, tweaks, and lava cake love in the comments below—sharing is what keeps the kitchen fun! Wishing you a sweet, chocolate-filled Valentine’s Day!
FAQs
Can I make Dark Chocolate Lava Cakes ahead of time?
Yes! You can prepare the batter up to 24 hours in advance and refrigerate it. Just bring to room temperature before baking for best results.
What type of chocolate works best for lava cakes?
Use high-quality dark chocolate (at least 70% cocoa) for the richest flavor and perfect gooey center. Brands like Ghirardelli or Lindt are great choices.
How do I know when the lava cakes are done?
Bake until the edges are set but the center is still slightly jiggly—usually 12-14 minutes. Overbaking will lose the molten center.
Can I use a muffin tin instead of ramekins?
Absolutely! Grease the muffin tin well and reduce the bake time to 8-10 minutes. Keep a close eye for that signature jiggle in the center.
Are these lava cakes gluten-free?
They can be! Substitute the all-purpose flour with a gluten-free blend. The texture will still be gooey and delicious.
Pin This Recipe!
Dark Chocolate Lava Cakes
These Dark Chocolate Lava Cakes are the ultimate romantic dessert—rich, gooey, and deeply chocolatey with a molten center. Quick to make and always impressive, they’re perfect for Valentine’s Day or any special occasion.
- Prep Time: 10 minutes
- Cook Time: 14 minutes
- Total Time: 24 minutes
- Yield: 4 servings 1x
- Category: Dessert
- Cuisine: American
Ingredients
- 6 oz dark chocolate (70% cocoa, such as Ghirardelli or Lindt)
- 1/2 cup unsalted butter (softened)
- 1/3 cup granulated sugar
- 2 large eggs (room temperature)
- 2 large egg yolks (room temperature)
- 1/4 cup all-purpose flour
- Pinch of salt
- 1 tsp pure vanilla extract
- Powdered sugar (for dusting, optional)
- Fresh berries (raspberries, strawberries, or blackberries, optional)
- Whipped cream or vanilla ice cream (for serving, optional)
Instructions
- Grease 4 x 6-ounce ramekins thoroughly with butter or nonstick spray. Place them on a baking sheet.
- Combine dark chocolate and unsalted butter in a microwave-safe bowl. Heat in 30-second bursts, stirring each time, until smooth and shiny. Alternatively, melt using a double boiler.
- In a separate bowl, whisk together eggs, egg yolks, and granulated sugar until pale and slightly thickened, about 2 minutes.
- Slowly pour the melted chocolate mixture into the eggs, whisking constantly. Add vanilla extract and a pinch of salt. Mix until just combined.
- Sift in the all-purpose flour. Using a silicone spatula, fold gently until just incorporated. Do not overmix.
- Divide the batter evenly among the prepared ramekins, filling each about 3/4 full. (Optional: push a chocolate truffle or piece of dark chocolate into the center.)
- Bake at 425°F for 12-14 minutes, until edges are set and tops are just firm but centers are slightly jiggly. (If using a muffin tin, check after 8-10 minutes.)
- Let the cakes rest for 1 minute out of the oven. Run a small knife around the edge, then invert onto plates.
- Dust with powdered sugar, add fresh berries, and serve with whipped cream or vanilla ice cream. Enjoy immediately.
Notes
Use high-quality dark chocolate for best results. Do not overbake—the center should remain molten. Batter can be made ahead and refrigerated for up to 24 hours; bring to room temperature before baking. For gluten-free, use a 1:1 gluten-free flour blend. For dairy-free, substitute coconut oil or vegan butter. Serve immediately for the best molten effect.
Nutrition
- Serving Size: 1 cake (1/4 of recip
- Calories: 350
- Sugar: 22
- Sodium: 80
- Fat: 22
- Saturated Fat: 13
- Carbohydrates: 35
- Fiber: 3
- Protein: 6
Keywords: dark chocolate lava cake, molten chocolate cake, Valentine’s dessert, romantic dessert, easy chocolate cake, individual dessert, gluten-free option