Introduction
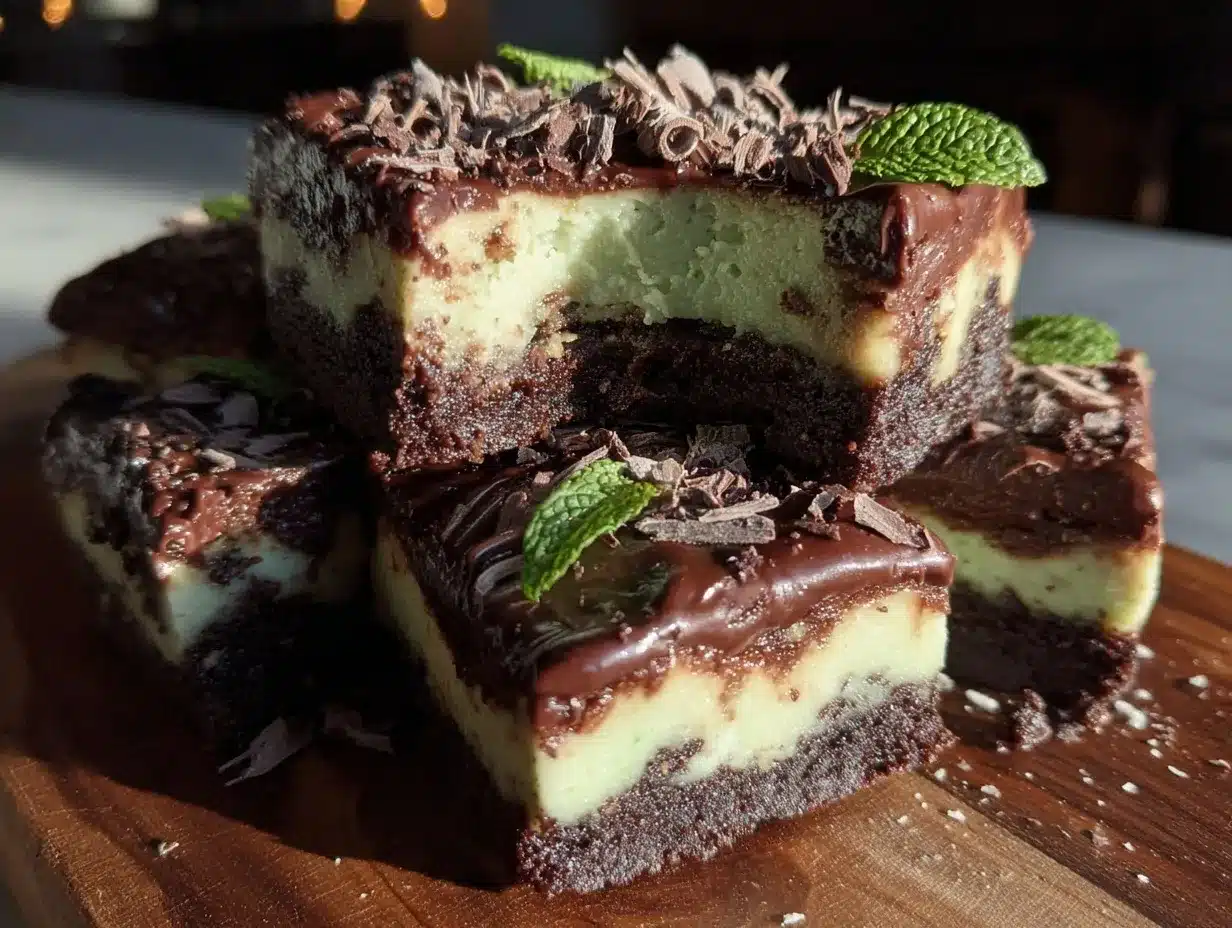
Let me tell you, the moment the aroma of melting chocolate and fresh mint hits your kitchen, you’ll know you’re about to create something downright irresistible. The vibrant green swirl against rich, creamy cheesecake—paired with a buttery chocolate cookie crust—looks almost too good to eat (almost!). The first time I baked these Creamy St. Patrick’s Mint Chocolate Cheesecake Bars, the whole house smelled like a fancy bakery and a candy shop rolled into one. I was instantly hooked—one of those moments where you pause, take a deep breath, and just smile because you know you’re onto something truly special.
It all started years ago, when I was knee-high to a grasshopper and my grandma would whip up her legendary cheesecake squares for St. Patrick’s Day. She’d let me sprinkle the mint candies on top, and honestly, I felt like a pastry chef in training. Fast forward to a rainy weekend, I got the itch to recreate those flavors with a fun twist—adding a chocolatey base and that classic green mint swirl. It’s the kind of recipe I wish I’d discovered earlier because, let’s face it, these bars bring pure, nostalgic comfort but with a party-ready edge.
My family couldn’t stop sneaking pieces off the cooling rack (with minty green crumbs trailing behind), and my friends literally begged for the recipe after our last get-together. Whether you’re making these for a St. Paddy’s celebration, a bake sale, or just to brighten up your Pinterest dessert board, you’ll see why these cheesecake bars are dangerously easy to love. Honestly, I’ve tested this recipe more times than I should admit—in the name of research, of course—and now it’s a staple for family gatherings, gifting, and those days when you need a dessert that feels like a warm hug. You’re going to want to bookmark this one!
Why You’ll Love This Recipe
You know what? After years of baking, tweaking, and (let’s be real) taste-testing, I can confidently say these Creamy St. Patrick’s Mint Chocolate Cheesecake Bars have that “wow” factor you’re looking for. Here’s why this recipe stands out in a sea of party desserts:
- Quick & Easy: Comes together in under 30 minutes of prep—perfect for busy weeknights or last-minute party plans.
- Simple Ingredients: No wild grocery hunts—just straightforward items you probably already have on hand.
- Perfect for Parties: Great for St. Patrick’s Day gatherings, potlucks, or cozy family nights in.
- Crowd-Pleaser: Always gets rave reviews—kids love the fun colors, adults swoon for the creamy, chocolate-mint combo.
- Unbelievably Delicious: The texture is dreamy—soft, creamy cheesecake with a subtle mint zing and a cookie crunch.
What makes these bars different? For starters, blending the cream cheese with mint extract and a hint of green food coloring gives that ultra-smooth, festive filling. The chocolate cookie crust adds just enough richness without overpowering the mint. Honestly, I’ve tried dozens of cheesecake bar recipes, but this one nails the balance—no grainy texture, no artificial aftertaste, just pure, decadent flavor.
If you’re after a dessert that’ll make people close their eyes after the first bite, this is it. It’s comfort food reimagined for St. Paddy’s Day—faster, easier, but still with that soul-soothing, creamy satisfaction. Whether you need to impress guests (without breaking a sweat) or just want to turn a regular Tuesday into a mini celebration, these bars are your ticket. Trust me, once you try them, you’ll find excuses to make them again and again!
What Ingredients You Will Need
This recipe uses simple, wholesome ingredients to deliver bold flavor and satisfying texture without the fuss. You’ll find most of these are pantry staples, and a few easy swaps make it perfect for everyone at the party.
- For the Chocolate Crust:
- Chocolate sandwich cookies (like Oreos), crushed (about 2 cups / 220g)
- Unsalted butter, melted (1/4 cup / 60g) (adds richness and helps the crust hold together)
- For the Mint Cheesecake Filling:
- Cream cheese, softened (16 oz / 450g) (I recommend Philadelphia for best texture)
- Granulated sugar (2/3 cup / 135g) (for that classic cheesecake sweetness)
- Large eggs, room temperature (2)
- Sour cream (1/2 cup / 120g) (adds creaminess and a slight tang)
- Pure mint extract (1 tsp) (don’t use peppermint—it’s too strong!)
- Vanilla extract (1/2 tsp)
- Green food coloring (4–6 drops, or more for a bolder color)
- Salt (1/4 tsp) (balances the flavors)
- For the Chocolate Swirl & Topping:
- Semi-sweet chocolate chips (1/2 cup / 85g)
- Heavy cream (2 tbsp / 30ml)
- Crushed mint chocolates or chocolate shavings (optional, for garnish)
If you’re looking for gluten-free options, swap regular sandwich cookies for a gluten-free brand (I’ve had great results with Kinnikinnick). For dairy-free, use vegan cream cheese and sour cream, plus plant-based butter. When fresh mint is in season, you can chop some and sprinkle over the top for extra color and flavor.
Honestly, don’t stress over ingredient brands—just pick what you like. The only thing I wouldn’t skip is real mint extract (imitation never tastes as good). If you’re out of chocolate chips, try chopped dark chocolate or even white chocolate for a twist. You can make this festive any time of year by swapping the green coloring for red at Christmas or pastel for Easter!
Equipment Needed
You don’t need fancy gadgets for these Creamy St. Patrick’s Mint Chocolate Cheesecake Bars. Here’s what you’ll want to have ready:
- 8×8-inch (20x20cm) square baking pan (lined with parchment for easy lifting)
- Food processor or zip-top bag with rolling pin (for crushing cookies)
- Mixing bowls (one large, one medium)
- Hand mixer or stand mixer (makes the cheesecake filling ultra-smooth)
- Rubber spatula (for scraping every last bit of filling)
- Measuring cups and spoons
- Small saucepan or microwave-safe bowl (for melting chocolate)
If you don’t have a food processor, honestly, smashing cookies in a bag with a rolling pin works just fine (and it’s fun). For budget-friendly options, a basic hand mixer gets the job done without breaking the bank. Just be sure to wipe your mixer paddles clean before switching from the crust to the filling—trust me, a little crust in the cheesecake isn’t the end of the world, but it’s not my favorite.
Pro tip: Invest in parchment paper for hassle-free lifting and clean-up (I learned the hard way). If you bake often, a good-quality baking pan is worth it—mine’s survived years of party desserts!
Preparation Method
- Prep the Pan: Line an 8×8-inch (20x20cm) baking pan with parchment paper, leaving a slight overhang for easy removal. Preheat your oven to 325°F (160°C). (A little parchment hanging over the sides is your best friend for clean-cut bars!)
- Make the Crust: Crush chocolate sandwich cookies in a food processor or zip-top bag until fine crumbs. Mix with melted butter until evenly coated. Press firmly into the bottom of your prepared pan. Bake for 8 minutes, then let cool slightly. (Crust should look packed and slightly shiny—if it feels loose, press again with a spatula.)
- Prepare Cheesecake Filling: In a large bowl, beat softened cream cheese until smooth (about 2 minutes). Add sugar, eggs, sour cream, mint extract, vanilla, green food coloring, and salt. Mix until creamy and no lumps remain—scrape the sides of the bowl halfway through. (Filling should be pale green and glossy.)
- Pour & Swirl: Pour cheesecake filling over cooled crust, spreading evenly. In a small bowl, melt chocolate chips with heavy cream (microwave in 20-second bursts, stirring until smooth). Drizzle chocolate over cheesecake layer. Use a butter knife or toothpick to create swirls. (Don’t over-swirl, or you’ll lose those beautiful patterns!)
- Bake: Bake at 325°F (160°C) for 30–35 minutes, until edges are set but center still jiggles slightly. (If it looks too wet, add 3–5 more minutes—cheesecake firms up as it cools.)
- Cool & Chill: Remove from oven; cool to room temperature (about 1 hour). Refrigerate at least 3 hours, or overnight, for best texture. (Patience pays off—the filling sets up perfectly!)
- Slice & Garnish: Lift bars from pan using parchment. Cut into 16 squares. Top with crushed mint chocolates, extra chocolate drizzle, or fresh mint if desired. (Warm your knife under hot water for cleaner slices.)
Troubleshooting tip: If your cheesecake cracks, don’t panic—swirls and toppings hide imperfections. If the filling seems runny after chilling, try freezing for 20 minutes before slicing. For extra mint flavor, add a sprinkle of chopped fresh mint before serving.
Efficiency tip: Prep the crust while the oven preheats, and melt the chocolate while the crust cools. I always set a timer (because, let’s face it, I get distracted by the smell!).
Cooking Tips & Techniques
Alright, here’s where experience really pays off (and, honestly, where I’ve learned the hard way). Making Creamy St. Patrick’s Mint Chocolate Cheesecake Bars is pretty forgiving, but a few pro tips can make your life easier:
- Room Temperature Ingredients: Always use softened cream cheese and room-temp eggs—cold ingredients make for lumpy filling.
- Don’t Overmix: Beat the filling just until smooth; overmixing can lead to cracks.
- Low & Slow Baking: Baking at a lower temp keeps the cheesecake creamy (I learned this after a few rubbery attempts!).
- Swirling Technique: Gently swirl the chocolate—go too wild and it’ll muddy the colors. Less is more!
- Chill Time: I know it’s hard, but chilling overnight gives you the best slices. If you rush it, the bars might be soft.
Common mistakes? Overbaking is a biggie—watch for set edges and a slightly jiggly center. Don’t skip the parchment paper (trust me, prying bars from a pan isn’t fun). If your crust crumbles, add a little extra butter next time.
When multitasking, I crush cookies while the oven preheats, and whip up the filling as the crust cools. Consistency tip: Measure ingredients precisely, especially for baking. A kitchen scale makes all the difference—I used to eyeball things, but now I never skip weighing.
For guaranteed success, let the bars cool completely before slicing. If you’re serving at a party, cut bars ahead and keep chilled until just before serving. That way, every piece looks (and tastes) perfect!
Variations & Adaptations
Let’s face it—sometimes you need to switch things up! Here are a few fun ways to adapt these Creamy St. Patrick’s Mint Chocolate Cheesecake Bars for different tastes and occasions:
- Gluten-Free: Use gluten-free chocolate sandwich cookies for the crust. I’ve tried Kinnikinnick and loved the results.
- Dairy-Free: Substitute vegan cream cheese, coconut yogurt for sour cream, and plant-based butter. The bars stay creamy and flavorful.
- Flavor Twists: Swap mint extract for orange or almond extract for a whole new vibe. Add mini chocolate chips to the filling for a double-chocolate surprise.
- Seasonal Adaptation: Change the food coloring to match the holiday—red for Valentine’s, pastel blue for Easter, or skip coloring for classic cheesecake bars.
- Nut-Free Option: Skip any nut toppings and stick to classic chocolate for garnish.
For a personal favorite, I once added crushed Thin Mints on top—my kids went wild for it! If you want a lighter dessert, use Neufchâtel cheese instead of regular cream cheese. Try baking in muffin tins for mini cheesecake bites at parties (just reduce baking time to 15–18 minutes).
No matter how you adapt them, the creamy mint-chocolate combo always shines. Don’t be afraid to experiment—sometimes the best recipes happen by accident!
Serving & Storage Suggestions
Serve these Creamy St. Patrick’s Mint Chocolate Cheesecake Bars chilled for the best texture. I like to lay them out on a platter with a sprinkle of fresh mint or a drizzle of chocolate—makes them look super Pinterest-worthy!
Pair with a cold glass of milk, Irish coffee, or even a scoop of vanilla ice cream on the side for extra indulgence. If you’re serving at a party, cut the bars into small squares for easy grabbing—no forks needed!
To store, keep bars in an airtight container in the refrigerator for up to 5 days. They freeze beautifully too—just wrap tightly and freeze for up to 2 months. Thaw overnight in the fridge before serving.
For reheating, let bars sit at room temperature for 10–15 minutes, or microwave a single bar for 10 seconds (not too long; you don’t want melted cheesecake!). Honestly, the flavors deepen after a day or two—so making them ahead is a win!
Nutritional Information & Benefits
Each Creamy St. Patrick’s Mint Chocolate Cheesecake Bar (based on 16 squares) contains approximately:
- Calories: 220
- Fat: 14g
- Protein: 4g
- Carbs: 22g
- Sugar: 15g
Cream cheese provides a good source of calcium and protein, while mint extract adds a refreshing twist without extra calories. You can lower the sugar by using reduced-sugar cookies or swapping in coconut sugar.
Dietary notes: Gluten-free and dairy-free options listed above make these bars accessible for most folks. Contains dairy and eggs; watch out for cookie ingredients if you’re avoiding soy or wheat.
From a wellness perspective, I say treats like this are perfect for celebrating in moderation. They’re rich but satisfying, and the smaller bar size helps with portion control. Sometimes, you just need a sweet treat that brings joy!
Conclusion
If you’re searching for a show-stopping party dessert that’s easy to make, looks amazing, and tastes like a dream, these Creamy St. Patrick’s Mint Chocolate Cheesecake Bars are absolutely worth your time. They’re festive, fun, and have that nostalgic comfort with a modern twist.
Customize them however you like—swap flavors, change colors, or add your favorite toppings. Personally, I love how they bring people together at any gathering (and how my kids can’t wait for the green cheesecake every March!).
Give them a try, and don’t forget to leave a comment below if you have your own twist or just want to share how yours turned out! Pin, share, and spread the joy—these bars might just become your new party tradition.
Happy baking, and may your kitchen be filled with sweet memories and minty chocolate goodness!
FAQs
Can I make these cheesecake bars ahead of time?
Absolutely! In fact, chilling overnight helps the flavors develop and makes slicing easier. Just store in the fridge until ready to serve.
What if I don’t have mint extract?
You can use peppermint extract, but add less since it’s stronger. Or, try a drop of vanilla with a sprinkle of fresh mint for a milder flavor.
How do I prevent my cheesecake bars from cracking?
Don’t overmix the filling, and bake at a low temperature. If cracks happen, just cover with chocolate drizzle or garnish—no one will notice!
Can I freeze these bars?
Yes! Wrap tightly and freeze for up to 2 months. Thaw overnight in the fridge before serving for best texture.
What’s the best way to get clean slices?
Use a sharp knife warmed under hot water and wipe between cuts. Chilling the bars thoroughly helps too—no more messy pieces!
Pin This Recipe!
Creamy St. Patrick’s Mint Chocolate Cheesecake Bars

These festive cheesecake bars feature a creamy mint filling with a vibrant green swirl, a rich chocolate cookie crust, and a decadent chocolate drizzle. Perfect for St. Patrick’s Day parties or any occasion where you want a show-stopping, crowd-pleasing dessert.
- Prep Time: 25 minutes
- Cook Time: 38 minutes
- Total Time: 4 hours (includes chilling)
- Yield: 16 bars 1x
- Category: Dessert
- Cuisine: American
Ingredients
- 2 cups (about 22) chocolate sandwich cookies (like Oreos), crushed
- 1/4 cup (4 tbsp) unsalted butter, melted
- 16 oz cream cheese, softened
- 2/3 cup granulated sugar
- 2 large eggs, room temperature
- 1/2 cup sour cream
- 1 tsp pure mint extract (not peppermint)
- 1/2 tsp vanilla extract
- 4–6 drops green food coloring (or more for desired color)
- 1/4 tsp salt
- 1/2 cup semi-sweet chocolate chips
- 2 tbsp heavy cream
- Crushed mint chocolates or chocolate shavings (optional, for garnish)
Instructions
- Line an 8×8-inch baking pan with parchment paper, leaving an overhang for easy removal. Preheat oven to 325°F (160°C).
- Crush chocolate sandwich cookies in a food processor or zip-top bag until fine crumbs. Mix with melted butter until evenly coated. Press firmly into the bottom of the prepared pan. Bake for 8 minutes, then let cool slightly.
- In a large bowl, beat softened cream cheese until smooth (about 2 minutes). Add sugar, eggs, sour cream, mint extract, vanilla, green food coloring, and salt. Mix until creamy and no lumps remain, scraping the sides of the bowl halfway through.
- Pour cheesecake filling over cooled crust, spreading evenly. In a small bowl, melt chocolate chips with heavy cream (microwave in 20-second bursts, stirring until smooth). Drizzle chocolate over cheesecake layer. Use a butter knife or toothpick to create swirls.
- Bake at 325°F (160°C) for 30–35 minutes, until edges are set but center still jiggles slightly. If it looks too wet, add 3–5 more minutes.
- Remove from oven; cool to room temperature (about 1 hour). Refrigerate at least 3 hours, or overnight, for best texture.
- Lift bars from pan using parchment. Cut into 16 squares. Top with crushed mint chocolates, extra chocolate drizzle, or fresh mint if desired.
Notes
For best results, use room temperature cream cheese and eggs. Don’t overmix the filling to avoid cracks. Chill thoroughly before slicing for clean bars. Gluten-free and dairy-free adaptations are possible with ingredient swaps. Bars can be made ahead and freeze well for up to 2 months.
Nutrition
- Serving Size: 1 bar (1/16 of recip
- Calories: 220
- Sugar: 15
- Sodium: 140
- Fat: 14
- Saturated Fat: 8
- Carbohydrates: 22
- Fiber: 1
- Protein: 4
Keywords: mint chocolate cheesecake bars, St. Patrick’s Day dessert, party dessert, cheesecake squares, easy cheesecake bars, green dessert, chocolate mint bars