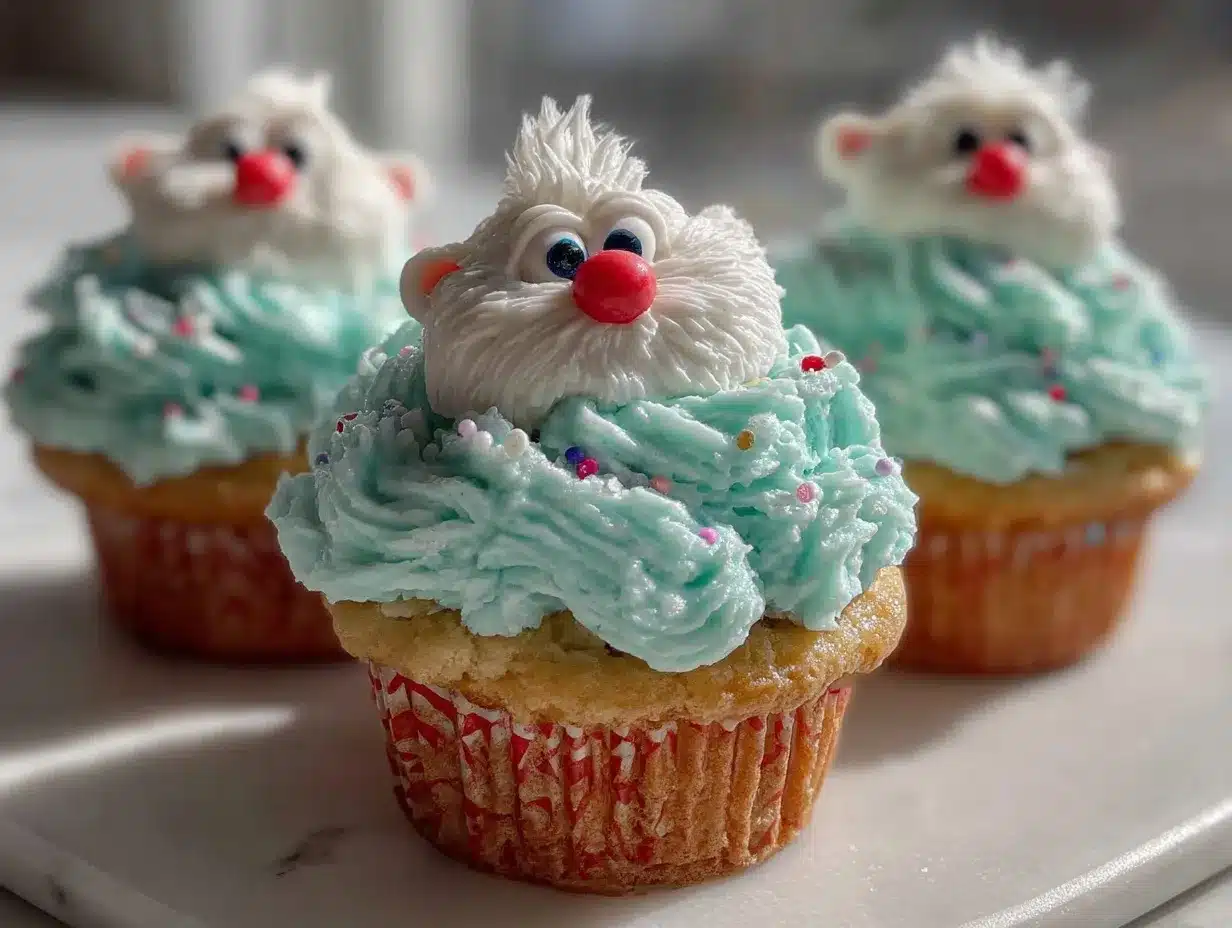
Close your eyes and picture this: you pull a tray of Dr. Seuss Thing 1 & Thing 2 Cupcakes from the oven, and the kitchen fills with that unmistakable warm vanilla aroma—the kind that instantly makes you feel like a kid again. The tops are perfectly domed, tempting you with their golden-brown promise, and the vibrant swirls of blue and red frosting look almost too fun to eat. Honestly, the first time I whipped up these cupcakes for my niece’s birthday (a full-on Dr. Seuss bash, mind you), I was more excited than the little ones. There’s pure magic in watching fluffy, sky-high frosting transform into whimsical hairdos straight from the pages of a childhood classic.
It all started during a rainy weekend, stuck indoors with a restless bunch. I grabbed my favorite cupcake recipe, a few bottles of food coloring, and the leftover cupcake toppers from last year’s party. The result? The whole house broke out in giggles, the kids’ eyes went wide, and even my skeptical brother-in-law snuck two cupcakes before dinner. That was the moment I knew these Dr. Seuss Thing 1 & Thing 2 Cupcakes weren’t just another party treat—they were a guaranteed ticket to smiles (and maybe a little frosting on the nose).
Family gatherings, school bake sales, or just a Friday night “let’s make memories” kitchen session—these cupcakes have become my trusty go-to. They’re dangerously easy to make, outrageously cute, and somehow manage to deliver pure, nostalgic comfort with every bite. You know, I wish I’d stumbled upon this idea years ago. Now, whenever I bring them out, they vanish faster than you can say “Cat in the Hat” (tested multiple times in the name of research, of course). If you’re looking for a party treat that feels like a warm hug and instantly brightens up your Pinterest board, you’re going to want to bookmark this one.
Why You’ll Love This Recipe
As someone who’s baked her fair share of party treats (and survived a couple of sugar-fueled birthday meltdowns), I can promise these Dr. Seuss Thing 1 & Thing 2 Cupcakes check all the boxes. From the first test batch right up to the final, camera-ready batch for my blog, I’ve fussed with the details so you don’t have to. Here’s why you’ll be hooked:
- Quick & Easy: These cupcakes come together in under an hour—perfect for busy parents, last-minute party planners, or anyone who’d rather be decorating than elbow-deep in flour all day.
- Simple Ingredients: No need to run all over town. Chances are, your pantry already has everything you need for soft, fluffy cupcakes and that signature two-tone frosting.
- Perfect for Parties: Whether it’s a Dr. Seuss birthday, classroom celebration, or baby shower, the whimsical look of these treats steals the show every time.
- Crowd-Pleaser: I’ve watched both kids and grown-ups light up at the sight of these cupcakes (and they always come back for seconds—trust me!).
- Unbelievably Delicious: We’re talking light, fluffy crumb, the softest vanilla flavor, and a not-too-sweet frosting that actually tastes as good as it looks.
What sets these apart? It’s the ultra-tender cupcake base (thanks to a mix of cake flour and buttermilk) and that playful, sky-high frosting. There’s no gritty texture or artificial aftertaste—just pure, sweet comfort food. I’ve toyed with piping techniques, color ratios, and even tested different brands of food coloring to get the brightest shades without staining little hands (because, let’s face it, nobody wants blue teeth in party photos).
At the heart of it, these cupcakes are more than a treat—they’re a chance to make memories. They’re the kind of dessert that gets everyone involved, whether you’re letting kids swirl their own frosting or sneaking a taste when nobody’s looking. So if you’re after a recipe that delivers big smiles, playful nostalgia, and zero stress, this is the one you’ll want to make again and again.
What Ingredients You Will Need
These Dr. Seuss Thing 1 & Thing 2 Cupcakes come together with simple, trusty ingredients that you can find at any grocery store (or maybe even your kitchen right now). Every component is there for a reason—flavor, texture, or pure fun. Here’s what you’ll need:
- For the Cupcakes:
- 1 1/2 cups (180g) cake flour (or all-purpose flour for a slightly denser crumb)
- 1 cup (200g) granulated sugar
- 1/2 cup (115g) unsalted butter, softened (adds richness and tenderness)
- 2 large eggs, room temperature (helps with structure and fluffiness)
- 1/2 cup (120ml) buttermilk (or whole milk with 1 tsp lemon juice, for that soft crumb)
- 1 1/2 tsp baking powder (for lift)
- 1/4 tsp baking soda
- 1/4 tsp salt
- 2 tsp pure vanilla extract (I like Nielsen-Massey for best flavor)
- For the Frosting:
- 1 cup (230g) unsalted butter, at room temp (for silky, spreadable frosting)
- 3 1/2 cups (420g) powdered sugar, sifted (for smoothness)
- 2-3 tbsp (30-45ml) heavy cream or milk (adjust for desired consistency)
- 2 tsp vanilla extract
- Red and blue gel food coloring (gel works best for vibrant color without thinning the frosting)
- For Decorating:
- Edible candy eyes or white chocolate chips (optional, for extra fun)
- Printable Thing 1 & Thing 2 cupcake toppers (search online for free printables, or buy on Etsy!)
- Sprinkles (totally optional, but who can resist?)
Ingredient Notes & Swaps:
If you need a dairy-free option, swap the butter for vegan baking sticks, use almond or oat milk with a splash of lemon juice, and check your food coloring for allergen info. For gluten-free cupcakes, a cup-for-cup gluten-free baking blend works well (I’ve had good luck with Bob’s Red Mill). In summer, I sometimes add a handful of fresh blueberries to the batter—it’s not traditional, but it’s delicious! Don’t stress if you’re out of buttermilk—just add 1 tsp lemon juice or vinegar to your milk and let it sit for five minutes before using.
Equipment Needed
- 12-cup standard muffin pan (Wilton and USA Pan are both reliable choices)
- Paper cupcake liners (red or blue liners look extra festive!)
- Electric mixer (stand or hand mixer—either works fine)
- Medium and large mixing bowls
- Rubber spatula (for scraping every last bit of batter)
- Measuring cups and spoons (metal ones last forever—I’ve had mine for years!)
- Ice cream scoop or spoon (for evenly portioning the batter)
- Piping bags and large star tips (Wilton 1M is my go-to for fluffy “hair” frosting)
- Toothpicks or small offset spatula (for swirling colors and smoothing out trouble spots)
If you don’t have fancy piping tips, just snip the corner off a zip-top bag—it works in a pinch for those signature swirls. I’ve even decorated these with a butter knife when all else failed (not perfect, but still adorable). Clean your piping tips right after use—dried frosting can be a pain to scrub out. And if you’re stocking up supplies for the first time, dollar store mixing bowls and spatulas get the job done without breaking the bank.
Preparation Method
- Preheat & Prep: Heat your oven to 350°F (175°C). Line a 12-cup muffin pan with cupcake liners. Set out all your ingredients to bring them to room temperature (makes mixing easier and results more consistent).
- Cream Butter & Sugar: In a large bowl, beat 1/2 cup (115g) unsalted butter with 1 cup (200g) sugar on medium speed until light and fluffy, about 2-3 minutes. If the butter isn’t soft enough, microwave for 5-7 seconds—just don’t melt it.
- Add Eggs & Vanilla: Beat in 2 eggs, one at a time, scraping the bowl after each. Add 2 tsp vanilla extract and mix until combined.
- Mix Dry Ingredients: In a separate bowl, whisk 1 1/2 cups (180g) cake flour, 1 1/2 tsp baking powder, 1/4 tsp baking soda, and 1/4 tsp salt. Mixing dry ingredients separately prevents clumps and ensures even rising.
- Combine Wet & Dry: With the mixer on low, add one-third of the dry ingredients to the butter mixture, followed by half the buttermilk (1/2 cup or 120ml). Repeat, ending with the last third of the dry mix. Mix just until combined—overmixing makes cupcakes tough.
- Fill & Bake: Scoop batter into cupcake liners, filling them about 2/3 full (an ice cream scoop is a lifesaver here). Bake for 16-18 minutes, or until a toothpick inserted in the center comes out clean or with a few moist crumbs. The tops should spring back when lightly pressed.
- Cool Completely: Let cupcakes cool in the pan for 5 minutes, then transfer to a wire rack. Don’t frost while warm—otherwise your “Thing” hair will melt!
- Make the Frosting: In a large bowl, beat 1 cup (230g) butter until creamy. Gradually add 3 1/2 cups (420g) powdered sugar, mixing on low to avoid a sugar cloud. Add 2 tsp vanilla and 2 tbsp cream or milk. Beat on high for 2-3 minutes until fluffy, adding more cream if needed.
- Color & Swirl: Divide frosting into two bowls. Tint one bowl bright red, the other blue, using gel food coloring. For best results, use a clean spoon for each color to avoid muddying the hues.
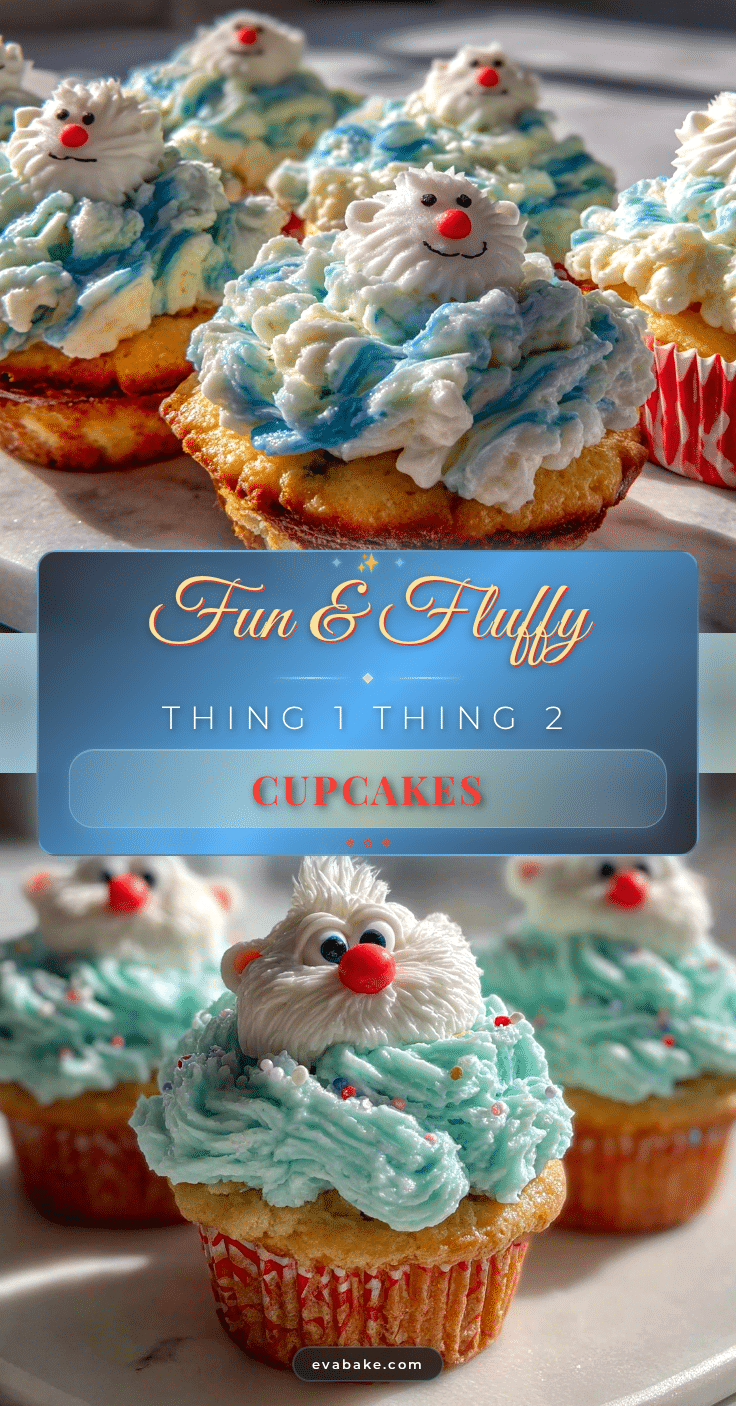
- Decorate: Fit two piping bags with large star tips (or use zip-top bags). Pipe generous dollops of red and blue frosting on each cupcake, creating a “crazy hair” effect. If you want to get fancy, fill one bag with blue, one with red, and pipe both colors at once for a wild look.
- Top & Serve: Add edible eyes or cupcake toppers, and sprinkle with a few bright sprinkles for extra party vibes. Snap a photo (they’re so cute, you’ll want to show them off!), then serve and watch them disappear.
Troubleshooting: If your cupcakes sink, they may be underbaked—add 1-2 minutes next time. If your frosting is too soft, pop it in the fridge for a few minutes before piping. Dry cupcakes? Make sure your oven temp isn’t running hot (an oven thermometer is a wise investment). And remember—nobody minds a little imperfection when you’re having fun!
Cooking Tips & Techniques
Let’s face it, baking cupcakes can go sideways if you miss a step or rush the process. Here are my best tips for consistently fluffy Dr. Seuss Thing 1 & Thing 2 Cupcakes:
- Room Temperature Ingredients: Cold butter and eggs won’t blend well. Take them out 30 minutes before you start—this makes your batter smooth and easy to mix.
- Don’t Overmix: Once you add the flour, mix only until you see no more dry streaks. Overmixing leads to tough cupcakes (and nobody wants that at a party).
- Use Gel Food Coloring: Liquid coloring can thin your frosting and make it runny. Stick with gel for vibrant color and perfect piping.
- Practice Your Piping: If you’ve never piped frosting before, practice on a piece of parchment paper. The “Thing” hair is meant to look wild and messy, so don’t stress over perfection.
- Oven Accuracy: Not all ovens heat the same. Check your cupcakes at 15 minutes—they should spring back lightly when touched.
- Chill Your Frosting: If your kitchen is warm (or if you’ve got little hands helping), pop the frosting in the fridge for 10 minutes to firm it up before decorating.
- Batch Work: Bake cupcakes first, then make frosting while they cool. This keeps the process moving and your cupcakes nice and moist.
- Clean As You Go: Trust me, a tidy kitchen makes decorating more fun—especially when food coloring is involved!
I’ve had my fair share of “frosting fails”—from sliding hairdos to streaky colors. The best fix? Just pile on more frosting and call it “Seussian style.” Cupcakes are meant to be fun, not perfect, and sometimes the messiest ones taste the best.
Variations & Adaptations
One of my favorite things about these Dr. Seuss Thing 1 & Thing 2 Cupcakes is how easily you can tweak them for different tastes, dietary needs, or party themes. Here are a few ideas to make them your own:
- Allergy-Friendly: For dairy-free cupcakes, use vegan butter and plant-based milk. Gluten-free flour blends work well (try King Arthur or Bob’s Red Mill). Always check food coloring brands for allergens if baking for someone with sensitivities.
- Flavor Twists: Swap the vanilla extract for almond, coconut, or even lemon for a zesty spin. Add mini chocolate chips to the batter for a surprise in every bite. A drop of peppermint extract in the frosting gives a cool, wintery vibe (perfect for holiday parties).
- Seasonal Swaps: In spring, top with pastel sprinkles and call them “Spring Things.” At Christmas, use red and green frosting for a Grinch-inspired look. For Halloween, orange and purple “hair” turns these into silly monsters.
- Mini Cupcakes: Make these as bite-sized minis for little hands—just reduce the baking time to 10-12 minutes, and use a smaller piping tip.
- Personal Touch: Last year I made a batch with strawberry jam swirled into the batter—total hit! Don’t be afraid to experiment with fillings or toppings.
No matter how you adapt them, the heart of the recipe stays the same: fluffy cupcakes, wild frosting, and a whole lot of fun.
Serving & Storage Suggestions
These Dr. Seuss Thing 1 & Thing 2 Cupcakes are best enjoyed fresh, but they’re also pretty forgiving if you need to make them ahead. Here’s how I serve and store them for maximum party success:
- Serving: Serve at room temperature for the softest crumb and best frosting texture. Arrange on a bright cake stand or a blue-and-red platter for full Seuss effect. Add themed napkins or some Cat-in-the-Hat confetti for extra fun.
- Pairings: These cupcakes go great with milk, lemonade, or a simple fruit punch. For adults, pair with coffee or a light sparkling wine at brunch.
- Storage: Store unfrosted cupcakes in an airtight container at room temp for up to 2 days. Once frosted, keep them covered and chilled in the fridge for up to 4 days. Bring to room temperature before serving—cold buttercream can be a bit stiff.
- Freezing: Freeze unfrosted cupcakes for up to a month; thaw overnight before decorating. Frosting can also be made ahead and kept in the fridge for up to a week—just re-whip before using.
- Flavor Note: I find the vanilla flavor deepens after a day, so sometimes I bake ahead and decorate the next morning for the softest, most flavorful cupcakes.
Nutritional Information & Benefits
Each Dr. Seuss Thing 1 & Thing 2 Cupcake (with frosting) has roughly:
- Calories: 300
- Fat: 14g
- Carbohydrates: 42g
- Protein: 3g
- Sugar: 30g
These cupcakes are a treat, no question. The real benefit comes from using quality ingredients—real butter, fresh eggs, and pure vanilla. There’s no artificial aftertaste, and you can easily swap in gluten-free or dairy-free alternatives for dietary needs. Allergens to watch: wheat, dairy, and eggs. From my own wellness journey, I believe in enjoying dessert as part of joyful celebrations—these are perfect for sharing, not stressing.
Conclusion
So, why not add a little whimsy to your next celebration? These Dr. Seuss Thing 1 & Thing 2 Cupcakes are a guaranteed hit, whether you’re baking with kids, surprising a classroom, or just needing a dose of nostalgia. The recipe is easy to follow, super adaptable, and full of color and fun (not to mention, dangerously delicious). Honestly, they’ve become a family favorite in our house, and I bet they’ll be a hit in yours too.
Don’t be afraid to put your own spin on them—swap the colors, change the flavors, or pile on the sprinkles however you like. I’d love to hear how yours turn out! Drop a comment below, share your party photos, or let me know your favorite cupcake twist. Happy baking, and remember—sometimes the messiest treats make the sweetest memories!
Frequently Asked Questions
How far in advance can I make Dr. Seuss Thing 1 & Thing 2 Cupcakes?
You can bake the cupcakes up to two days ahead. Store them unfrosted at room temperature, then frost and decorate the day of your event for the freshest results.
Can I use box cake mix for the base?
Absolutely! If you’re short on time, a good-quality vanilla cake mix works fine. Just follow the box instructions and jump right to the frosting and decorating steps.
How do I get bright blue and red frosting without staining hands?
Use gel food coloring instead of liquid—it gives a bold color with less mess. Let the frosting set for a few minutes before handling to reduce transfer.
Are these cupcakes safe for kids with allergies?
They can be! Use dairy-free butter and plant milk, and a gluten-free flour blend if needed. Always check the food coloring and decorations for potential allergens.
Can I freeze leftover cupcakes?
Yes, unfrosted cupcakes freeze well for up to a month. Thaw overnight before decorating. I don’t recommend freezing frosted cupcakes, as the texture can change.
Pin This Recipe!
Dr. Seuss Thing 1 & Thing 2 Cupcakes Easy Party Treats
These whimsical Dr. Seuss Thing 1 & Thing 2 Cupcakes feature a soft vanilla base and playful red and blue swirled frosting, making them the perfect easy party treat for birthdays, bake sales, or any celebration. They’re quick to make, outrageously cute, and guaranteed to bring smiles to kids and adults alike.
- Prep Time: 20 minutes
- Cook Time: 18 minutes
- Total Time: 38 minutes
- Yield: 12 cupcakes 1x
- Category: Dessert
- Cuisine: American
Ingredients
- 1 1/2 cups (180g) cake flour (or all-purpose flour for a slightly denser crumb)
- 1 cup (200g) granulated sugar
- 1/2 cup (115g) unsalted butter, softened
- 2 large eggs, room temperature
- 1/2 cup (120ml) buttermilk (or whole milk with 1 tsp lemon juice)
- 1 1/2 tsp baking powder
- 1/4 tsp baking soda
- 1/4 tsp salt
- 2 tsp pure vanilla extract
- 1 cup (230g) unsalted butter, at room temperature (for frosting)
- 3 1/2 cups (420g) powdered sugar, sifted
- 2–3 tbsp (30-45ml) heavy cream or milk
- 2 tsp vanilla extract (for frosting)
- Red and blue gel food coloring
- Edible candy eyes or white chocolate chips (optional, for decorating)
- Printable Thing 1 & Thing 2 cupcake toppers (optional)
- Sprinkles (optional)
Instructions
- Preheat your oven to 350°F (175°C). Line a 12-cup muffin pan with cupcake liners. Set out all your ingredients to bring them to room temperature.
- In a large bowl, beat 1/2 cup unsalted butter with 1 cup sugar on medium speed until light and fluffy, about 2-3 minutes.
- Beat in 2 eggs, one at a time, scraping the bowl after each. Add 2 tsp vanilla extract and mix until combined.
- In a separate bowl, whisk together 1 1/2 cups cake flour, 1 1/2 tsp baking powder, 1/4 tsp baking soda, and 1/4 tsp salt.
- With the mixer on low, add one-third of the dry ingredients to the butter mixture, followed by half the buttermilk. Repeat, ending with the last third of the dry mix. Mix just until combined.
- Scoop batter into cupcake liners, filling them about 2/3 full. Bake for 16-18 minutes, or until a toothpick inserted in the center comes out clean or with a few moist crumbs.
- Let cupcakes cool in the pan for 5 minutes, then transfer to a wire rack to cool completely.
- For the frosting: In a large bowl, beat 1 cup butter until creamy. Gradually add 3 1/2 cups powdered sugar, mixing on low. Add 2 tsp vanilla and 2 tbsp cream or milk. Beat on high for 2-3 minutes until fluffy, adding more cream if needed.
- Divide frosting into two bowls. Tint one bowl bright red, the other blue, using gel food coloring.
- Fit two piping bags with large star tips (or use zip-top bags). Pipe generous dollops of red and blue frosting on each cupcake, creating a “crazy hair” effect.
- Add edible eyes or cupcake toppers, and sprinkles if desired. Serve and enjoy!
Notes
For best results, use room temperature ingredients and gel food coloring for vibrant frosting. Don’t overmix the batter to keep cupcakes fluffy. Practice piping on parchment paper if you’re new to decorating. Cupcakes can be made dairy-free or gluten-free with simple swaps. Store unfrosted cupcakes at room temperature for up to 2 days, or frosted cupcakes in the fridge for up to 4 days.
Nutrition
- Serving Size: 1 cupcake
- Calories: 300
- Sugar: 30
- Sodium: 150
- Fat: 14
- Saturated Fat: 8
- Carbohydrates: 42
- Protein: 3
Keywords: Dr. Seuss cupcakes, Thing 1 Thing 2, party treats, kids cupcakes, birthday cupcakes, vanilla cupcakes, easy cupcakes, whimsical desserts