Let me tell you, the scent of golden, crispy pierogies sizzling in butter is enough to make anyone’s mouth water. The first time I made these crispy Polish pierogies with creamy potato filling, I was instantly hooked. You know that kind of moment where you pause, take a deep breath, and just smile because you realize you’re onto something truly special? That’s exactly what happened. Years ago, when I was knee-high to a grasshopper, my grandma used to make pierogies for family gatherings, but somehow I never got around to trying them myself until a rainy weekend nudged me to recreate that comfort food magic in my own kitchen.
Honestly, my family couldn’t stop sneaking these off the cooling rack (and I can’t really blame them). It’s dangerously easy to make, yet delivers pure, nostalgic comfort that brightens any potluck or cozy night in. Whether you’re craving a sweet treat for the kids or want to add something special to your Pinterest cookie board of favorites, this recipe is a keeper. I’ve tested it multiple times—in the name of research, of course—and it’s become a staple for family gatherings and gifting. Trust me, this crispy Polish pierogies recipe with creamy potato filling feels like a warm hug on a plate, and you’re going to want to bookmark this one.
Why You’ll Love This Recipe
After trying countless pierogi recipes, this version stands out because it’s both approachable and delicious. Here’s why this crispy Polish pierogies with creamy potato filling recipe will quickly become one of your favorites:
- Quick & Easy: Comes together in under 1 hour, perfect for busy weeknights or last-minute cravings.
- Simple Ingredients: No fancy grocery trips needed; you likely have everything in your pantry.
- Perfect for Gatherings: Great for potlucks, holiday dinners, or just a comforting family meal.
- Crowd-Pleaser: Always gets rave reviews from both kids and adults alike.
- Unbelievably Delicious: The crispy exterior paired with the ultra-smooth, buttery potato filling is next-level comfort food.
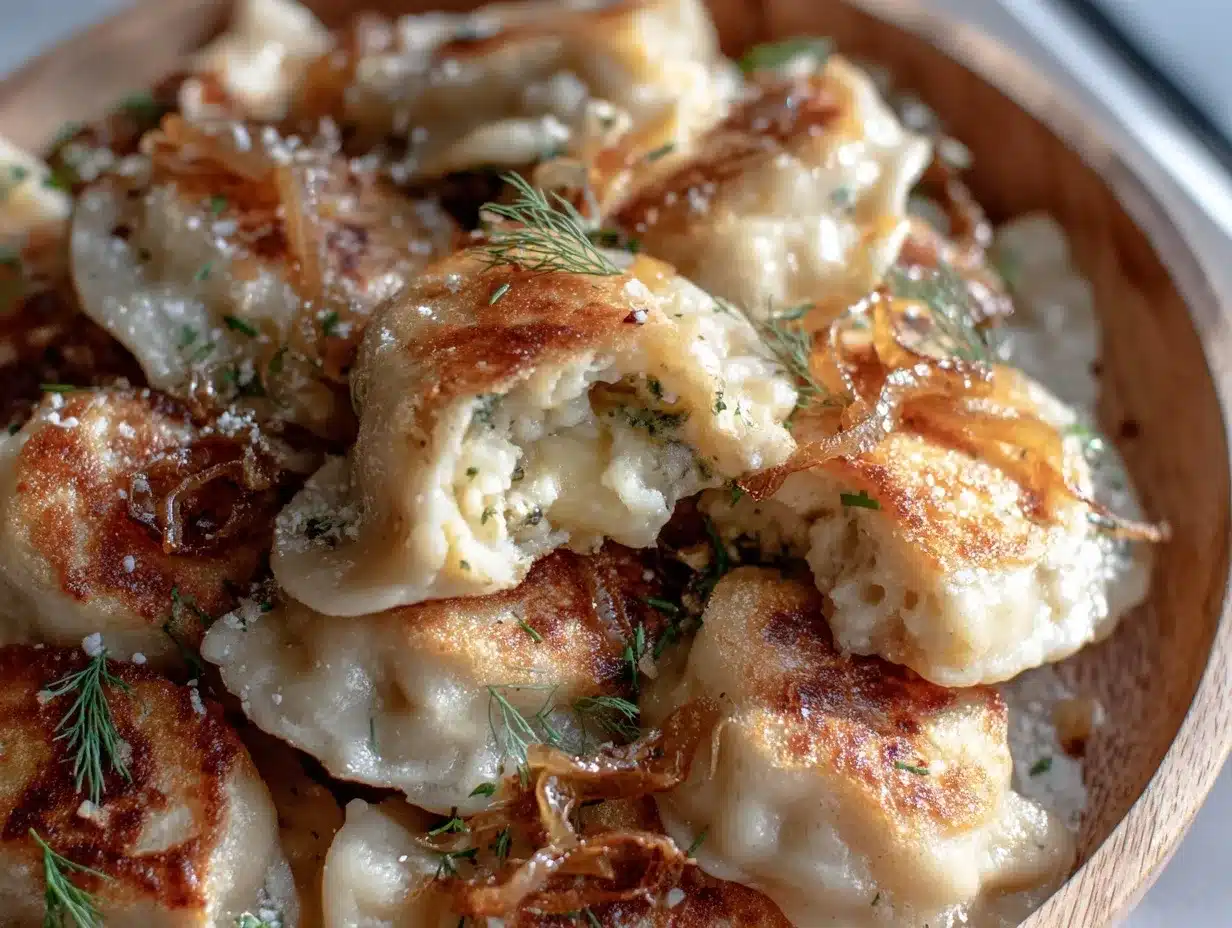
What sets this recipe apart is the perfectly balanced potato filling, whipped to creamy perfection, and the method that makes the pierogies irresistibly crispy without being greasy. You won’t find soggy pierogies here! This isn’t just another dumpling recipe—it’s your best homemade version, with that perfect golden crust that snaps just right. Honestly, it’s comfort food reimagined—simple, faster, but with all the soul-soothing satisfaction you crave. It’s perfect for impressing guests without the stress, or turning a humble meal into something memorable.
What Ingredients You Will Need
This recipe uses simple, wholesome ingredients to deliver bold flavor and satisfying texture without the fuss. The ingredients are mostly pantry staples, making it easy to whip up anytime.
- For the dough:
- 2 cups (250g) all-purpose flour, plus extra for dusting
- 1 large egg, room temperature (adds richness and helps bind)
- 1/2 cup (120ml) warm water
- 1 tablespoon vegetable oil or melted butter (for tenderness)
- 1/2 teaspoon salt
- For the creamy potato filling:
- 3 medium potatoes (about 1 lb / 450g), peeled and quartered
- 1/2 cup (120ml) sour cream or Greek yogurt (for that tang and creaminess)
- 2 tablespoons unsalted butter, softened
- 1 small onion, finely chopped and sautéed until golden (adds sweet depth)
- Salt and freshly ground black pepper, to taste
- For frying:
- 2-3 tablespoons butter or vegetable oil (or a mix for best flavor)
I recommend using Yukon Gold potatoes if you can—they’re creamy and hold their shape nicely. For the flour, I trust King Arthur for consistent texture. And if you need a dairy-free option, swap the butter for olive oil and use coconut yogurt instead of sour cream. In summer, you could even add fresh chives or herbs to the filling for a bright twist.
Equipment Needed
- Large mixing bowl for dough
- Rolling pin (a wine bottle works in a pinch!)
- Pot for boiling potatoes
- Frying pan or skillet (non-stick preferred for easy flipping)
- Slotted spoon or spatula
- Knife or round cookie cutter (about 3 inches / 7.5 cm diameter) for shaping pierogies
- Large spoon or potato masher
If you don’t have a rolling pin, you can use a clean wine bottle or even a smooth glass. For shaping, a small bowl rim or cup can substitute for a cookie cutter. Personally, I love using a cast iron skillet for frying because it gives the best crust, but any heavy-bottomed pan will do. Just be sure to keep things well-oiled so nothing sticks!
Preparation Method
- Prepare the filling: Peel and quarter the potatoes. Place them in a pot of salted water and bring to a boil. Cook for about 15-20 minutes or until tender when pierced with a fork. Drain well.
- Mash the potatoes: While still warm, mash the potatoes until smooth. Stir in the softened butter, sour cream, and sautéed onions. Season with salt and pepper to taste. Set aside to cool completely.
- Make the dough: In a large bowl, combine the flour and salt. Make a well in the center and add the egg, warm water, and oil or melted butter. Mix gently until a dough begins to form.
- Knead the dough: Turn the dough onto a lightly floured surface. Knead for about 8-10 minutes until smooth and elastic. If the dough feels sticky, sprinkle a little more flour as you go.
- Rest the dough: Wrap the dough in plastic wrap or cover with a clean towel. Let it rest for at least 30 minutes to relax the gluten, which makes rolling easier.
- Roll and cut: Divide the dough into two portions for easier handling. Roll out each portion on a floured surface to about 1/8-inch (3 mm) thickness. Use a round cutter to cut out circles.
- Fill the pierogies: Place about 1 tablespoon of the cooled potato filling in the center of each dough circle. Fold the dough over to create a half-moon shape. Press edges firmly to seal, pinching to prevent leaks.
- Boil the pierogies: Bring a large pot of salted water to a boil. Drop pierogies in batches, stirring gently to prevent sticking. Once they float to the surface (about 3-4 minutes), cook for another 1-2 minutes, then remove with a slotted spoon.
- Fry to crisp: Heat butter or oil in a skillet over medium heat. Add boiled pierogies in a single layer. Fry for 2-3 minutes per side until golden and crispy. Remove to a paper towel-lined plate to drain excess fat.
- Serve: Serve hot with sour cream or your favorite dipping sauce. Enjoy!
Pro tip: Don’t overcrowd the boiling pot or frying pan—that can cause sticking or uneven cooking. Also, when sealing pierogies, make sure there’s no air trapped inside; otherwise, they might burst during boiling. I learned this the hard way on my first try!
Cooking Tips & Techniques
Getting the perfect crispy pierogies with creamy potato filling takes a bit of practice, but here are some tips I’ve picked up over the years:
- Rest the dough well: Letting the dough rest makes it much easier to roll and shape without shrinking back.
- Don’t overfill: Use just enough filling to avoid bursting. Too much filling can make sealing tricky.
- Seal edges thoroughly: Use a little water on the edges before pressing to help them stick better.
- Boil gently: A rolling boil can be too rough—medium-high heat works best to prevent pierogies from breaking.
- Dry before frying: Let boiled pierogies drain well so the frying oil doesn’t splatter.
- Use a mix of butter and oil for frying: Butter adds flavor but burns easily; oil raises the smoke point and prevents burning.
- Make ahead: You can freeze uncooked pierogies on a baking sheet, then transfer to a bag. Boil and fry straight from frozen when ready.
One time, I tried frying without draining the pierogies well, and the oil splattered everywhere—lesson learned the messy way! Also, multitasking by prepping filling while the dough rests saves a ton of time.
Variations & Adaptations
While the classic creamy potato filling is a winner, there are plenty of ways to mix things up:
- Cheese & Potato: Add shredded cheddar or farmer’s cheese to the potato mix for a richer filling.
- Meat Filling: Swap potatoes for ground beef or pork sautéed with onions and spices for a heartier meal.
- Vegan Version: Use mashed sweet potatoes, sautéed mushrooms, and dairy-free butter and yogurt alternatives.
- Seasonal Twist: Add roasted pumpkin puree or sautéed kale to the potato filling for autumn vibes.
- Cooking Method: Instead of frying, you can bake pierogies brushed with oil at 400°F (200°C) for 15-20 minutes until golden.
I once tried adding caramelized onions and crispy bacon bits to the filling—oh, boy, that was a hit at the family brunch! Feel free to experiment with herbs like dill or parsley, or swap out the flour for gluten-free blends as needed.
Serving & Storage Suggestions
Serve these pierogies hot with a dollop of sour cream or a sprinkling of fresh chives. They pair beautifully with sautéed cabbage, pickled vegetables, or a crisp green salad. For drinks, a cold beer or a light white wine complements the richness well.
To store, place any leftovers in an airtight container in the refrigerator for up to 3 days. Reheat by pan-frying again to restore crispiness or pop them in the oven at 350°F (175°C) for 10 minutes. Pierogies also freeze wonderfully—just freeze them uncooked or cooked, then reheat from frozen, adding a few extra minutes to cooking times.
Flavors actually deepen overnight, so sometimes I make a batch ahead to enjoy the next day. Just don’t expect leftovers to last long—they tend to disappear quickly around here!
Nutritional Information & Benefits
Each serving of these crispy Polish pierogies with creamy potato filling offers a satisfying balance of carbohydrates and fats, making it a hearty snack or meal. Potatoes provide potassium and vitamin C, while the onions add antioxidants. Using sour cream or Greek yogurt adds protein and probiotics, supporting digestion.
For dietary considerations, this recipe can be adapted gluten-free by swapping all-purpose flour for almond or gluten-free flour blends. Using dairy-free substitutes can make it suitable for lactose intolerance as well. Keep in mind, pierogies do contain gluten and dairy by default, so adjust accordingly.
From my wellness perspective, this recipe is a comforting, homemade alternative to store-bought options that often include preservatives and excess sodium. Plus, you control the ingredients—nothing beats making it yourself!
Conclusion
If you’re looking for a recipe that’s easy to make, bursting with flavor, and perfect for sharing, these crispy Polish pierogies with creamy potato filling are worth every minute. Customize the filling, get creative with your toppings, and make it your own. I love this recipe because it connects me to family memories while satisfying my craving for crispy, creamy goodness.
Give it a try—you might just find yourself making it again and again. Don’t forget to drop a comment below with your tweaks or questions, and share this recipe with anyone who appreciates a little homemade comfort food. Happy cooking, friends!
FAQs About Crispy Polish Pierogies with Creamy Potato Filling
How do I prevent pierogies from sticking together?
Make sure to dust the dough and work surface with flour, and avoid overcrowding both when cutting and cooking. Also, let boiled pierogies drain well before frying.
Can I freeze pierogies before cooking?
Yes! Arrange them on a baking sheet so they don’t touch, freeze until firm, then transfer to a freezer bag. Cook directly from frozen, adding a few extra minutes to boiling and frying times.
What can I serve with pierogies?
They go great with sour cream, sautéed onions, crispy bacon, pickled veggies, or a fresh green salad. A cold beer or light wine pairs nicely, too.
Can I bake pierogies instead of frying?
Absolutely! Brush with oil and bake at 400°F (200°C) for 15-20 minutes until golden and crispy.
How long does homemade pierogi dough last?
Wrapped tightly, the dough can be refrigerated for up to 2 days. For longer storage, freeze the dough wrapped well and thaw before rolling.
Pin This Recipe!

Crispy Polish Pierogies with Creamy Potato Filling

A nostalgic and comforting homemade recipe featuring golden, crispy pierogies filled with a creamy potato mixture. Perfect for family gatherings, potlucks, or cozy nights in.
- Prep Time: 20 minutes
- Cook Time: 30 minutes
- Total Time: 50 minutes
- Yield: 4 servings 1x
- Category: Main Course
- Cuisine: Polish
Ingredients
- 2 cups (250g) all-purpose flour, plus extra for dusting
- 1 large egg, room temperature
- 1/2 cup (120ml) warm water
- 1 tablespoon vegetable oil or melted butter
- 1/2 teaspoon salt
- 3 medium potatoes (about 1 lb / 450g), peeled and quartered
- 1/2 cup (120ml) sour cream or Greek yogurt
- 2 tablespoons unsalted butter, softened
- 1 small onion, finely chopped and sautéed until golden
- Salt and freshly ground black pepper, to taste
- 2–3 tablespoons butter or vegetable oil (or a mix for frying)
Instructions
- Prepare the filling: Peel and quarter the potatoes. Place them in a pot of salted water and bring to a boil. Cook for about 15-20 minutes or until tender when pierced with a fork. Drain well.
- Mash the potatoes: While still warm, mash the potatoes until smooth. Stir in the softened butter, sour cream, and sautéed onions. Season with salt and pepper to taste. Set aside to cool completely.
- Make the dough: In a large bowl, combine the flour and salt. Make a well in the center and add the egg, warm water, and oil or melted butter. Mix gently until a dough begins to form.
- Knead the dough: Turn the dough onto a lightly floured surface. Knead for about 8-10 minutes until smooth and elastic. If the dough feels sticky, sprinkle a little more flour as you go.
- Rest the dough: Wrap the dough in plastic wrap or cover with a clean towel. Let it rest for at least 30 minutes to relax the gluten.
- Roll and cut: Divide the dough into two portions. Roll out each portion on a floured surface to about 1/8-inch (3 mm) thickness. Use a round cutter to cut out circles.
- Fill the pierogies: Place about 1 tablespoon of the cooled potato filling in the center of each dough circle. Fold the dough over to create a half-moon shape. Press edges firmly to seal, pinching to prevent leaks.
- Boil the pierogies: Bring a large pot of salted water to a boil. Drop pierogies in batches, stirring gently to prevent sticking. Once they float to the surface (about 3-4 minutes), cook for another 1-2 minutes, then remove with a slotted spoon.
- Fry to crisp: Heat butter or oil in a skillet over medium heat. Add boiled pierogies in a single layer. Fry for 2-3 minutes per side until golden and crispy. Remove to a paper towel-lined plate to drain excess fat.
- Serve hot with sour cream or your favorite dipping sauce.
Notes
[‘Rest the dough well to make rolling and shaping easier.’, ‘Do not overfill pierogies to prevent bursting during boiling.’, ‘Seal edges thoroughly using a little water to help them stick.’, ‘Boil pierogies gently at medium-high heat to avoid breaking.’, ‘Drain pierogies well before frying to prevent oil splatter.’, ‘Use a mix of butter and oil for frying to balance flavor and smoke point.’, ‘Pierogies can be frozen uncooked on a baking sheet, then stored in a bag and cooked from frozen.’, ‘For dairy-free options, substitute butter with olive oil and sour cream with coconut yogurt.’, ‘You can bake pierogies at 400°F (200°C) for 15-20 minutes as an alternative to frying.’]
Nutrition
- Serving Size: 1 serving (about 5-6
- Calories: 350
- Sugar: 3
- Sodium: 350
- Fat: 14
- Saturated Fat: 7
- Carbohydrates: 45
- Fiber: 3
- Protein: 7
Keywords: pierogies, Polish pierogies, potato pierogies, crispy pierogies, homemade pierogies, comfort food, creamy potato filling