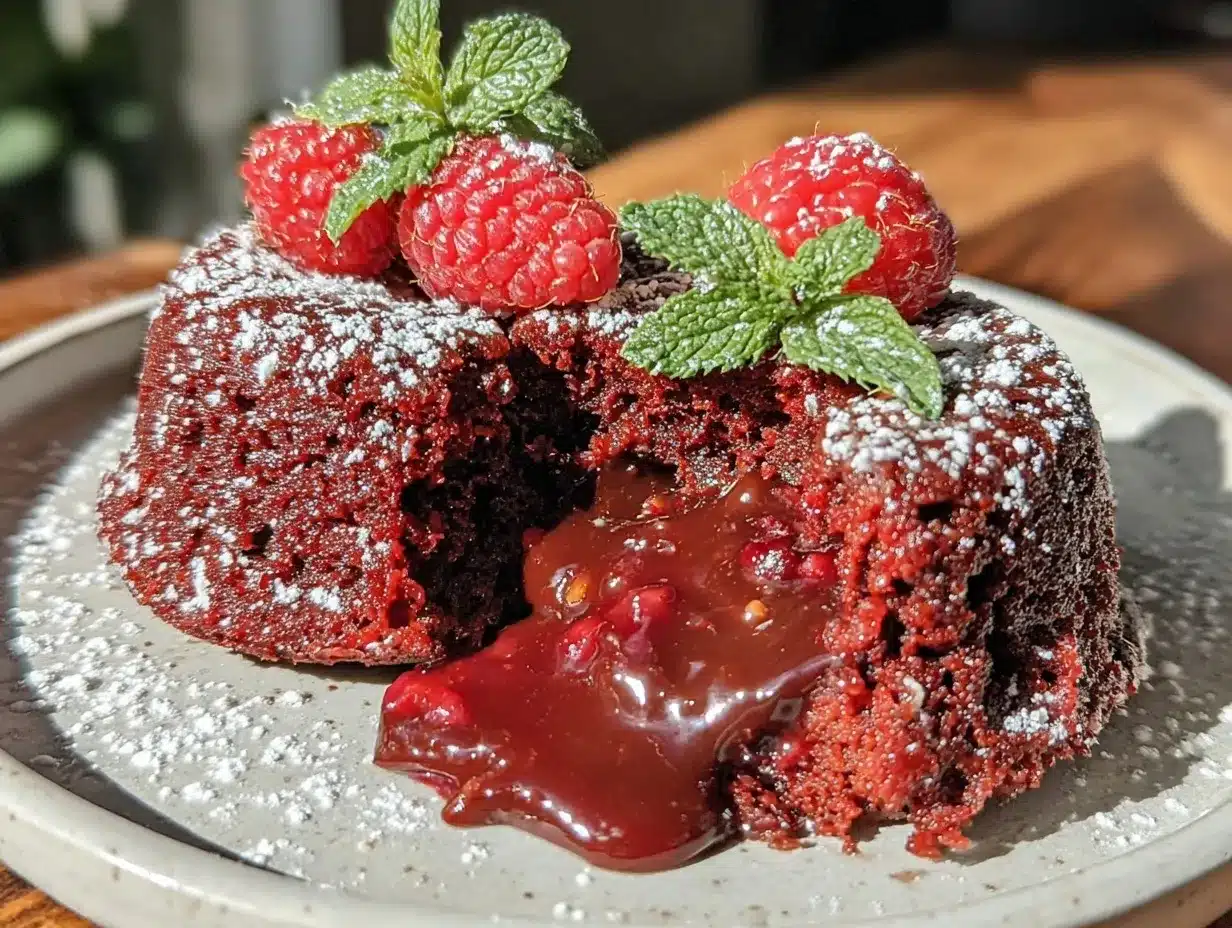
It was one of those chilly February evenings when everything felt a bit rushed and yet somehow still magical. I was fumbling through my tiny kitchen, trying to whip up something sweet for a last-minute date night at home. Honestly, I didn’t want to spend hours baking or hunting down fancy ingredients. That’s when I stumbled on this idea of making red velvet lava cakes for two—rich, indulgent, and perfectly portioned. At first, I wasn’t sure if it would work out; lava cakes have a bit of a reputation for being finicky, you know? But the moment I cracked that first cake open and saw the molten center oozing out, I was hooked. It wasn’t just dessert; it was an experience. The velvety red crumb paired with the molten chocolate inside struck a chord, making the whole evening feel effortlessly special.
There’s something quietly romantic about sharing a dessert that’s just for two. It’s intimate, a little decadent, and feels like a tiny celebration tucked away from the world. This recipe stuck with me because it’s not just about the flavors—it’s about the mood it sets. It’s the kind of treat that makes you pause, savor, and maybe even steal a spoonful from your partner’s plate. So, whether you’re planning a cozy night in or surprising someone special, these decadent romantic red velvet lava cakes for two have a way of making moments feel sweeter and slower, and honestly, that’s why I keep coming back to them.
Why You’ll Love This Recipe
Having tested this recipe countless times—sometimes late at night, sometimes in a rush before a date—I can say it truly stands out for so many reasons.
- Quick & Easy: Comes together in under 30 minutes, perfect for those spontaneous romantic evenings or when you want dessert without the fuss.
- Simple Ingredients: No need for specialty stores—most ingredients are pantry staples you probably already have, including cocoa, cream cheese, and a splash of vanilla.
- Perfect for Romantic Occasions: Whether it’s Valentine’s Day, an anniversary, or just a quiet night with your favorite person, these cakes set the mood effortlessly.
- Crowd-Pleaser: Even if you’re not usually a baker, this recipe always impresses. The rich red velvet flavor combined with molten chocolate is a hit every time.
- Unbelievably Delicious: The texture is just right—soft, moist cake with a gooey chocolate center that oozes out with each bite.
What sets this recipe apart is the little twist of adding a cream cheese center that melts just enough to complement the chocolate lava inside, creating a layered richness that feels indulgent but balanced. Plus, the red velvet base isn’t overly sweet, so it pairs beautifully with a dusting of powdered sugar or a dollop of whipped cream. This isn’t just another lava cake—it’s one that feels thoughtfully crafted to make two people feel special, without any stress or complicated steps. Honestly, I find myself making it multiple times a week when the mood calls for something that feels both casual and celebratory.
What Ingredients You Will Need
This decadent romantic red velvet lava cake recipe uses straightforward ingredients that work together to create a rich, velvety texture and that signature molten center. Most are pantry staples, which makes it an easy recipe to pull off even on a whim.
- For the Red Velvet Batter:
- All-purpose flour – 1/3 cup (40g), sifted for lightness
- Cocoa powder – 2 tablespoons (unsweetened, I prefer Hershey’s for consistent flavor)
- Baking powder – 1/4 teaspoon
- Salt – a pinch
- Unsalted butter – 4 tablespoons (56g), melted and slightly cooled (adds richness)
- Sugar – 1/2 cup (100g), granulated
- Large egg – 1, room temperature (helps with structure)
- Buttermilk – 1/4 cup (60ml), or whole milk with 1 teaspoon vinegar (adds tang and tenderness)
- Red food coloring – 1 tablespoon (gel or liquid, depending on preference)
- Vanilla extract – 1/2 teaspoon (pure for best aroma)
- White vinegar – 1/2 teaspoon (reacts with baking powder for lift)
- For the Lava Center:
- Semisweet or dark chocolate – 2 ounces (56g), finely chopped (I like Ghirardelli 60% for smooth melting)
- Cream cheese – 2 tablespoons (30g), softened (this gives a luscious, creamy center that mingles with the chocolate)
- Sugar – 1 teaspoon (to sweeten the cream cheese slightly)
- Finishing Touches:
- Powdered sugar – for dusting (optional but adds a pretty, delicate look)
- Whipped cream or fresh berries – for serving (adds freshness and contrast)
Substitutions: If you want a dairy-free version, swap butter with coconut oil and use a plant-based cream cheese. Almond flour can replace all-purpose flour for a low-carb twist, but expect a different texture. For natural coloring, beet juice powder works well instead of red dye—though the classic hue will be softer.
Equipment Needed
- Two 6-ounce (180ml) ramekins – essential for individual portions and even cooking
- Mixing bowls – one medium-sized for batter, one small for the lava center
- Whisk or handheld mixer – for smooth batter blending
- Measuring cups and spoons – for precise ingredient amounts
- Spatula – for folding ingredients gently
- Baking sheet – to place ramekins on for easy oven handling
- Cooling rack – to cool cakes slightly before serving
If you don’t have ramekins, small oven-safe cups or even muffin tins can work, but ramekins give the best shape and heat distribution. I’ve tried silicone molds before, but they sometimes cause the cakes to spread out too much. For budget-friendly options, thrift stores often have ramekins for next to nothing, and they’re worth the investment if you like making single-serve desserts.
Preparation Method
- Preheat your oven to 425°F (220°C). Place the oven rack in the middle position. Lightly butter your ramekins and dust with cocoa powder to prevent sticking.
- Prepare the lava center: In a small bowl, combine the softened cream cheese, chopped chocolate, and sugar. Stir until smooth but still slightly chunky. Set aside.
- Mix dry ingredients: In a medium bowl, sift together the flour, cocoa powder, baking powder, and salt. This ensures no lumps and a tender crumb.
- Combine wet ingredients: In another bowl, whisk the melted butter and sugar until combined. Add the egg and beat until smooth. Stir in the buttermilk, red food coloring, vanilla extract, and vinegar.
- Fold wet into dry: Gently fold the dry ingredients into the wet mixture using a spatula, mixing just until combined. Overmixing will make the cakes tough.
- Fill the ramekins: Spoon about 2 tablespoons (30g) of batter into each ramekin. Add a heaping tablespoon of the cream cheese-chocolate lava mixture in the center, then cover with the remaining batter, dividing evenly.
- Bake: Place ramekins on a baking sheet and bake for 12-14 minutes. The edges should be set, but the center will still look slightly jiggly. Avoid overbaking to keep the lava molten.
- Cool briefly: Let the cakes rest for 3-5 minutes. Run a knife around the edges to loosen, then carefully invert onto serving plates.
- Serve: Dust with powdered sugar and add whipped cream or fresh berries if desired. Best enjoyed warm for that irresistible molten core.
If the cakes seem too dense, it might be due to overmixing or oven temperature variations—an oven thermometer helps here. Also, timing is key; underbake slightly rather than overbake. The first time I made these, I baked them too long and lost the lava effect. Since then, I watch closely from the 10-minute mark onwards.
Cooking Tips & Techniques
Getting the perfect red velvet lava cake requires a bit of attention but nothing too complicated. Here are some tips I’ve picked up:
- Use room temperature eggs and butter: This helps everything blend smoothly and prevents a grainy batter.
- Don’t skip sifting dry ingredients: It keeps the cake light and prevents clumps of cocoa or flour.
- Be gentle when folding: Overmixing develops gluten, making cakes dense instead of tender.
- Watch your oven: Lava cakes can go from molten to fully set in a minute or two. Set a timer and check early the first time.
- Prepare the lava filling in advance: This ensures the chocolate and cream cheese meld nicely, creating that luscious oozing center.
- Let the cakes rest briefly after baking: It helps them release cleanly from the ramekins and prevents burning your tongue!
One lesson I learned the hard way is that not all ovens bake evenly. If your cakes are browning too fast on top but still raw inside, try lowering the rack or tenting with foil partway through baking. Also, if you want a shinier, more dramatic lava pour, chop your chocolate finely so it melts uniformly.
Variations & Adaptations
This recipe is flexible and welcomes some creativity. Here are a few ways you can customize it:
- Seasonal Twist: Swap the cream cheese lava for a raspberry or cherry preserve center for a fruity surprise that pairs beautifully with red velvet.
- Dietary Adjustments: Use almond or coconut flour for gluten-free versions, and substitute butter for coconut oil to make it dairy-free. Just keep an eye on texture, as it will differ slightly.
- Flavor Boost: Add a teaspoon of espresso powder to the batter to deepen the chocolate notes, or a pinch of cinnamon for warmth.
- Cooking Method: If you don’t have an oven, try making mini lava cakes in a microwave-safe mug for about 1 minute 15 seconds, but watch carefully to avoid overcooking.
- Personal Favorite: I once tried swirling in a tablespoon of peanut butter with the cream cheese for a decadent, nutty twist that my partner adored.
Serving & Storage Suggestions
These red velvet lava cakes are best served warm, right after baking. The molten center starts to set as it cools, so timing is everything if you want that gooey experience. I like to dust them lightly with powdered sugar and serve alongside a small scoop of vanilla ice cream or fresh raspberries to cut through the richness.
For storage, if you have leftovers (rare, but it happens!), cover the cakes tightly with plastic wrap and refrigerate for up to 2 days. Reheat gently in the microwave for 20-30 seconds to soften the center again, but don’t overheat or the lava will solidify. You can also freeze unbaked filled ramekins for up to one month—just thaw in the fridge overnight before baking.
Interestingly, the flavor deepens slightly after a day, making the cakes even more indulgent if you can wait that long!
Nutritional Information & Benefits
Each decadent romantic red velvet lava cake serves two and contains approximately:
| Calories | 360 per serving |
|---|---|
| Fat | 22g (mostly from butter and cream cheese) |
| Carbohydrates | 35g (includes sugar and flour) |
| Protein | 5g |
The cocoa powder provides antioxidants, while the cream cheese adds calcium and a bit of protein. Using buttermilk enhances the texture and adds some probiotics if fresh. For those watching sugar or dairy, you can tweak ingredients as noted above without losing the essence of the dessert.
While this recipe isn’t low-calorie, it’s a treat meant to be savored—perfect for a special moment rather than everyday indulgence.
Conclusion
Decadent romantic red velvet lava cakes for two are that sweet little secret for anyone wanting to make a simple moment feel special. They’re quick, fuss-free, and offer that perfect balance of rich chocolate, tangy cream cheese, and tender cake. What I love most is how they bring people together—sharing warm, gooey bites, laughing over the messes made, and savoring something made with just a bit of intention.
Feel free to make this recipe your own, add your favorite twists, or keep it classic. Either way, it’s a dessert that never fails to impress and definitely earns a spot in the “go-to” recipe list for cozy, romantic nights.
Give it a try, and let me know how your own red velvet lava cake adventure goes—I’m always curious about the little tweaks and stories that come from the kitchen!
FAQs
Can I make these lava cakes ahead of time?
You can prepare the batter and lava filling a few hours ahead and keep them refrigerated in the ramekins. Bake just before serving for best results.
What if I don’t have red food coloring?
You can omit it for a chocolate lava cake, or try natural alternatives like beet juice powder, though the color will be less vibrant.
How do I know when the cakes are done?
The edges should be set and starting to pull away slightly, but the center will still jiggle a bit when you gently shake the ramekin.
Can I make more than two servings?
Absolutely! Just multiply the ingredients and bake in multiple ramekins. Baking time may vary slightly depending on size.
What’s the best way to serve these cakes?
Serve warm, dusted with powdered sugar, and add a scoop of vanilla ice cream or fresh berries for contrast and freshness.
Pin This Recipe!

Decadent Red Velvet Lava Cakes for Two
Rich, indulgent red velvet lava cakes with a molten chocolate and cream cheese center, perfect for a romantic dessert for two. Quick and easy to make with simple pantry ingredients.
- Prep Time: 10 minutes
- Cook Time: 14 minutes
- Total Time: 24 minutes
- Yield: 2 servings 1x
- Category: Dessert
- Cuisine: American
Ingredients
- 1/3 cup all-purpose flour (40g), sifted
- 2 tablespoons unsweetened cocoa powder
- 1/4 teaspoon baking powder
- Pinch of salt
- 4 tablespoons unsalted butter (56g), melted and slightly cooled
- 1/2 cup granulated sugar (100g)
- 1 large egg, room temperature
- 1/4 cup buttermilk (60ml) or whole milk with 1 teaspoon vinegar
- 1 tablespoon red food coloring (gel or liquid)
- 1/2 teaspoon vanilla extract
- 1/2 teaspoon white vinegar
- 2 ounces semisweet or dark chocolate (56g), finely chopped
- 2 tablespoons cream cheese (30g), softened
- 1 teaspoon sugar (for cream cheese mixture)
- Powdered sugar for dusting (optional)
- Whipped cream or fresh berries for serving (optional)
Instructions
- Preheat your oven to 425°F (220°C). Place the oven rack in the middle position. Lightly butter your ramekins and dust with cocoa powder to prevent sticking.
- Prepare the lava center: In a small bowl, combine the softened cream cheese, chopped chocolate, and sugar. Stir until smooth but still slightly chunky. Set aside.
- Mix dry ingredients: In a medium bowl, sift together the flour, cocoa powder, baking powder, and salt.
- Combine wet ingredients: In another bowl, whisk the melted butter and sugar until combined. Add the egg and beat until smooth. Stir in the buttermilk, red food coloring, vanilla extract, and vinegar.
- Fold wet into dry: Gently fold the dry ingredients into the wet mixture using a spatula, mixing just until combined. Avoid overmixing.
- Fill the ramekins: Spoon about 2 tablespoons (30g) of batter into each ramekin. Add a heaping tablespoon of the cream cheese-chocolate lava mixture in the center, then cover with the remaining batter, dividing evenly.
- Bake: Place ramekins on a baking sheet and bake for 12-14 minutes. The edges should be set, but the center will still look slightly jiggly.
- Cool briefly: Let the cakes rest for 3-5 minutes. Run a knife around the edges to loosen, then carefully invert onto serving plates.
- Serve: Dust with powdered sugar and add whipped cream or fresh berries if desired. Best enjoyed warm.
Notes
Use room temperature eggs and butter for smooth blending. Don’t skip sifting dry ingredients to keep the cake light. Be gentle when folding to avoid dense cakes. Watch the oven closely to avoid overbaking and losing the molten center. Prepare the lava filling in advance for best results. Let cakes rest briefly after baking to release cleanly from ramekins. Oven temperatures vary; use an oven thermometer if possible.
Nutrition
- Serving Size: 1 lava cake (half of
- Calories: 360
- Fat: 22
- Carbohydrates: 35
- Protein: 5
Keywords: red velvet lava cake, romantic dessert, lava cake for two, easy lava cake, chocolate lava cake, cream cheese lava center, quick dessert