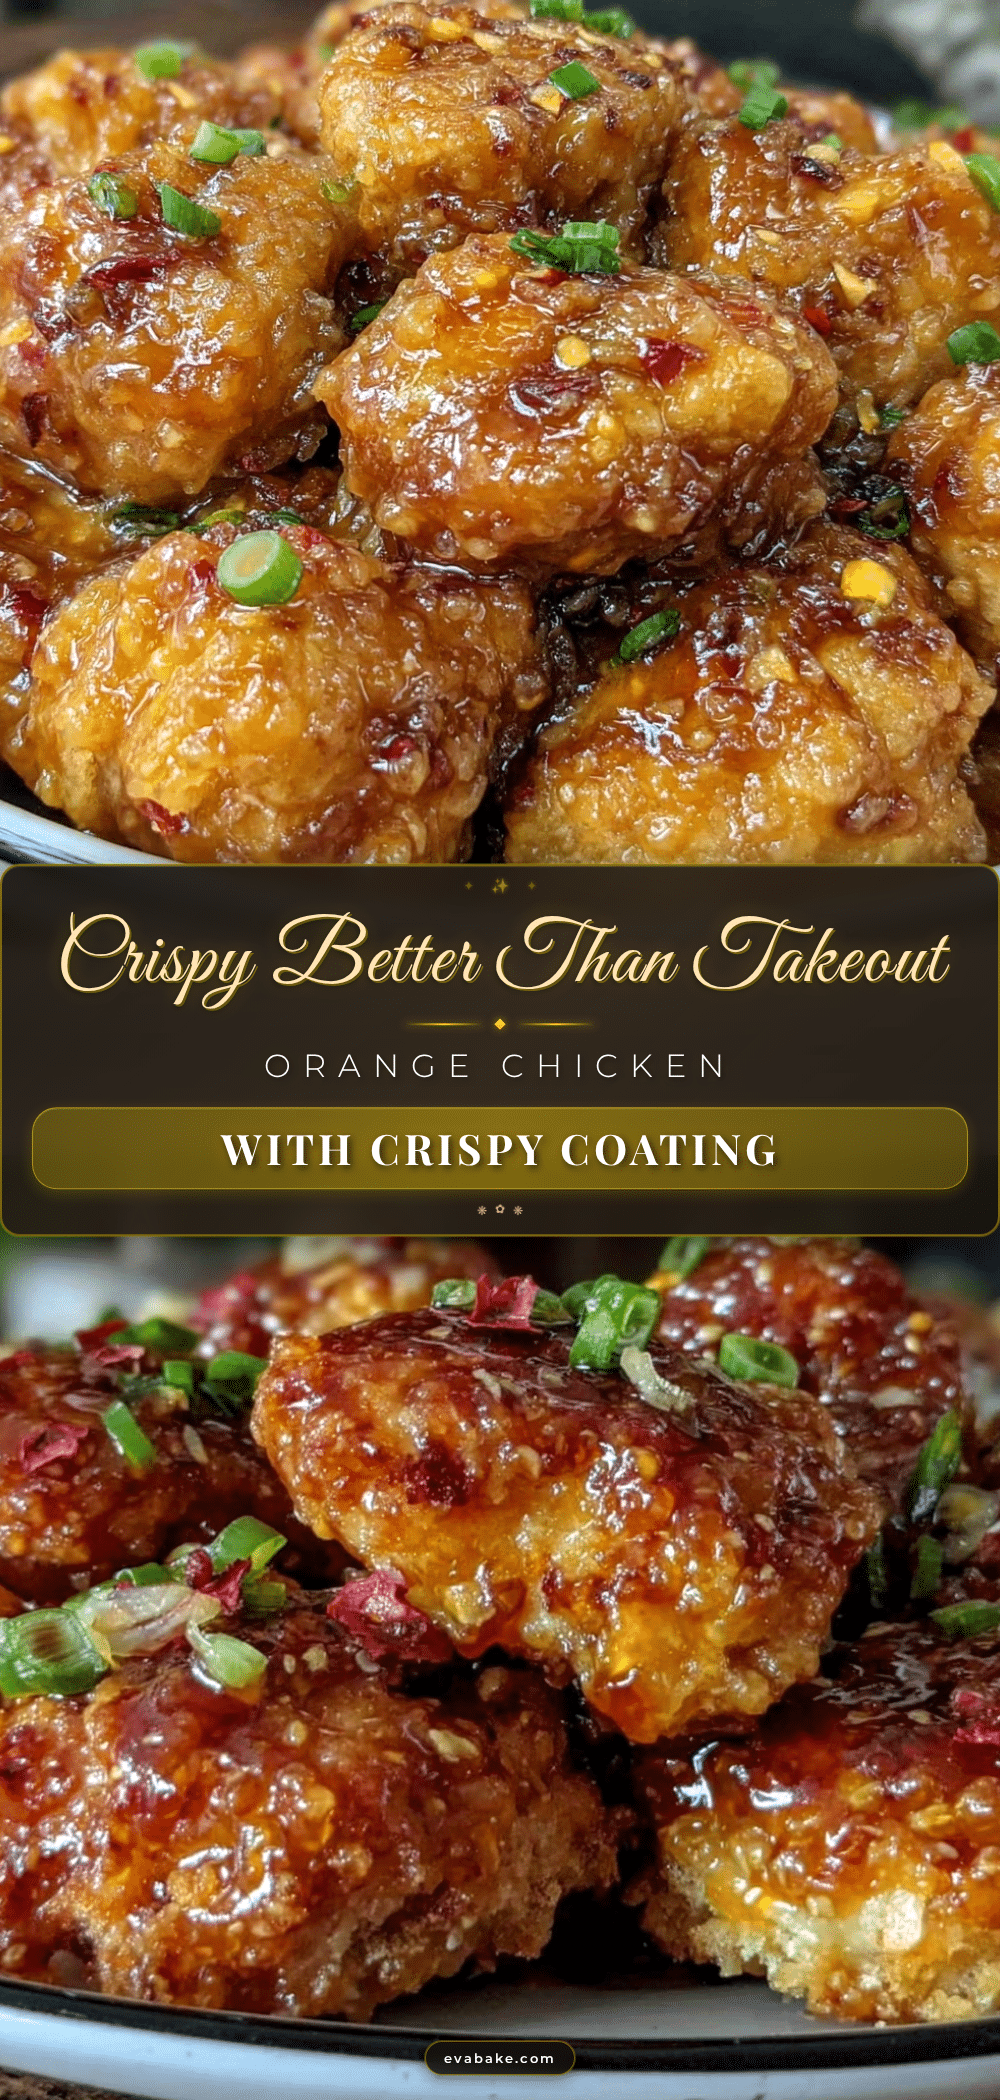
It was one of those evenings where I’d promised quick dinner but ended up with a kitchen that looked like a disaster zone. Honestly, I was halfway convinced ordering takeout was the only sane option. Yet, staring at a lonely bag of chicken breasts in the fridge, I figured, why not give homemade orange chicken a shot? I’d always been skeptical about replicating that crispy, sticky glossy sauce at home — it just seemed like something reserved for restaurants with deep fryers and fancy ingredients.
Fast forward an hour, and there I was, wiping sauce off my countertop with that unmistakable aroma of sweet citrus and ginger filling the air. The chicken was perfectly crisp, sticky with a sauce that clung to every bite, delivering more flavor than any takeout box I’d ever opened. It felt like a little victory — a messy, joyful one — and that recipe stuck with me ever since.
What really surprised me was how simple the ingredients were and how forgiving the method turned out to be. No special equipment required, just a bit of patience and a good skillet. This crispy better than takeout orange chicken with sticky sauce quickly became my go-to for nights when I want something comforting but don’t want to spend forever cooking or cleaning up. It’s that kind of recipe that once you make it, you’ll wonder why you ever bothered with takeout at all.
So here’s the deal — this recipe isn’t about complicated tricks. It’s about bold flavors, crispy textures, and a sauce that sticks like glue in the best way. And honestly? It’s the kind of dish that makes you pause mid-bite and think, “Yep, I nailed this.”
Why You’ll Love This Recipe
- Quick & Easy: Comes together in about 30 minutes, perfect for busy weeknights when you need a satisfying meal fast.
- Simple Ingredients: Nothing fancy here — just pantry staples and fresh produce you probably already have on hand.
- Perfect for Any Occasion: Whether it’s a casual family dinner or impressing friends with a homemade takeout classic, this recipe fits the bill.
- Crowd-Pleaser: Kids and adults alike rave about the crispy chicken and that addictive sticky orange sauce.
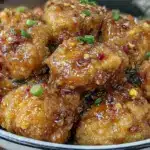
- Unbelievably Delicious: The balance of tangy, sweet, and umami flavors with a crunch that holds up even after saucing is truly next-level.
- What Sets It Apart: The secret lies in the double-coating technique that creates a sturdier crust and a sauce that’s thickened just right — not too gloopy, not too thin. Plus, a touch of freshly grated ginger adds a zing that cuts through the sweetness beautifully.
- Emotional Connection: This recipe has that comforting vibe that makes you want to cozy up with a bowl and forget the day’s nonsense. It’s like a hug on a plate, but with a little kick.
What Ingredients You Will Need
This recipe uses straightforward, wholesome ingredients to deliver that irresistibly crispy texture and sticky, flavorful sauce without fuss or stress. Most are pantry staples, and where fresh produce is involved, substitutions are easy.
- For the Chicken:
- 2 large boneless, skinless chicken breasts (about 1 pound / 450 g), cut into bite-sized pieces
- 1 cup (125 g) all-purpose flour (or substitute with cornstarch for extra crispiness)
- 1/2 cup (60 g) cornstarch (adds crunch and lightness)
- 2 large eggs, beaten (room temperature)
- Salt and pepper, to taste
- Vegetable oil, for frying (I prefer canola or peanut oil for high smoke points)
- For the Orange Sauce:
- 1/2 cup (120 ml) freshly squeezed orange juice (about 1-2 oranges)
- 1/4 cup (60 ml) soy sauce (I use low sodium to control saltiness)
- 1/3 cup (70 g) granulated sugar (adjust to taste; brown sugar works too for depth)
- 2 tablespoons rice vinegar (adds brightness)
- 1 tablespoon cornstarch mixed with 2 tablespoons water (to thicken sauce)
- 1 teaspoon freshly grated ginger (packs a fresh, spicy punch)
- 2 garlic cloves, minced
- 1/4 teaspoon red chili flakes (optional, for mild heat)
- For Garnish (Optional):
- Sliced green onions
- Sesame seeds
Tip: If you want a gluten-free version, swap all-purpose flour for a gluten-free flour blend and use tamari instead of soy sauce. For a dairy-free recipe, this one’s naturally so!
Equipment Needed
- A sturdy skillet or wok — preferably non-stick or cast iron for even heat distribution
- Mixing bowls for dredging chicken and whisking sauce ingredients
- A sharp knife and cutting board for prepping chicken
- Measuring cups and spoons for precise ingredient amounts
- Slotted spoon or tongs for frying and removing chicken pieces
- Paper towels or a wire rack to drain excess oil after frying
If you don’t have a wok, a deep skillet works just fine — just make sure it’s deep enough to hold enough oil for frying without splattering everywhere. I’ve used both and honestly, the results are pretty similar. Also, a thermometer can be handy to keep the oil at 350°F (175°C) for perfect frying but isn’t mandatory if you monitor carefully.
Preparation Method
- Prepare the Chicken: Pat the chicken pieces dry with paper towels to help the coating stick better. Season lightly with salt and pepper.
- Set Up Dredging Station: In one bowl, whisk the eggs until smooth. In another, combine the flour and cornstarch thoroughly. This double-coating mix is key for that unbeatable crispiness.
- Coat the Chicken: Dip each piece first into the egg, letting excess drip off, then into the flour-cornstarch mix. Press gently to ensure an even coating. For extra crunch, you can repeat the egg and flour dip once more, but be careful not to make it too thick.
- Heat the Oil: Pour about 1 1/2 inches (4 cm) of oil into your skillet or wok. Heat to 350°F (175°C). You can test by dropping a small bit of the coating in — it should sizzle and rise immediately.
- Fry the Chicken: Fry the chicken in batches, avoiding overcrowding. Cook for about 4-5 minutes per batch until golden brown and crispy. Use a slotted spoon or tongs to transfer to a paper towel-lined plate or wire rack to drain.
- Make the Sauce: While frying, combine orange juice, soy sauce, sugar, rice vinegar, grated ginger, minced garlic, and chili flakes in a small saucepan over medium heat. Stir until sugar dissolves and sauce begins to simmer.
- Thicken the Sauce: Stir the cornstarch slurry again and slowly drizzle into the simmering sauce, whisking constantly. Cook for another 1-2 minutes until the sauce turns glossy and thick enough to coat the back of a spoon.
- Toss Chicken in Sauce: Add the fried chicken pieces to the pan with the sauce. Gently toss to coat all pieces in that sticky, flavorful glaze.
- Serve: Transfer to a serving dish and garnish with sliced green onions and sesame seeds if you like. Serve immediately with steamed rice or your favorite sides.
Pro tip: Keep an eye on oil temperature during frying. If it drops too low, the chicken will absorb oil and get soggy; too high, it’ll brown too fast and stay raw inside. I usually adjust heat between medium and medium-high to keep it steady.
Cooking Tips & Techniques
Getting that perfect crispy crust isn’t magic — it’s all about the double coating and frying technique. Using both flour and cornstarch in the dredge creates a sturdier shell that holds up when sauced. I learned this after many soggy attempts where just flour wasn’t cutting it.
Don’t rush the frying in crowded batches. It’s tempting to throw all the chicken in at once, but that drops the oil temperature and results in greasy, limp bites. Slow and steady is the way.
The sauce’s thickness is another key factor. Too thin, and it won’t cling; too thick, and it feels gloopy. Adding the cornstarch slurry gradually while whisking helps you catch the perfect texture.
If you want to save time, prep the sauce while the chicken fries. Multitasking is your friend here. Also, using freshly grated ginger rather than powdered makes a noticeable difference in flavor brightness.
One mistake I made early on was overheating the oil, causing burnt bits in the sauce later. Strain your oil if frying more than one batch or use fresh oil for best results.
Variations & Adaptations
- Gluten-Free Version: Swap all-purpose flour with gluten-free flour or extra cornstarch. Use tamari for soy sauce to keep it gluten-free.
- Spicy Orange Chicken: Add more chili flakes or a splash of sriracha to the sauce for a fiery twist.
- Vegetarian Option: Replace chicken with fried tofu cubes or cauliflower florets using the same dredging and frying method.
- Baked Orange Chicken: For a lighter take, bake the coated chicken pieces at 425°F (220°C) on a wire rack for about 20-25 minutes, flipping halfway, then toss in the sauce.
- Personal Twist: I once added a teaspoon of toasted sesame oil to the sauce at the end for a nutty aroma that brought everything together beautifully.
Serving & Storage Suggestions
This orange chicken is best served hot and fresh to enjoy the contrast between crispy coating and sticky sauce. I love plating it over steamed jasmine or basmati rice with a side of simple steamed broccoli or snap peas.
Leftovers keep well in an airtight container in the fridge for up to 3 days. Reheat gently in a skillet over medium heat to bring back some crispiness — microwaving tends to make it soggy.
Flavors actually deepen after a day, so if you’re okay with softer chicken, it’s a tasty next-day lunch option too.
For parties, keep the sauce warm in a small pot on low heat and fry chicken batches fresh to maintain that crispy texture.
Nutritional Information & Benefits
Each serving of this crispy better than takeout orange chicken (about 4 servings) roughly contains:
| Calories | 450-500 kcal |
|---|---|
| Protein | 35 g |
| Carbohydrates | 45 g |
| Fat | 15 g |
Chicken breast provides lean protein, essential for muscle repair and satiety. The fresh ginger and garlic add antioxidants and anti-inflammatory benefits. Using moderate sugar and low-sodium soy sauce helps keep it balanced.
This recipe is naturally gluten-free if you swap flours and soy sauce, and dairy-free by default. It’s a satisfying option that fits well into a balanced diet when enjoyed in reasonable portions.
Conclusion
This crispy better than takeout orange chicken with sticky sauce is one of those dishes that wins you over with every bite. It’s approachable, rewarding, and surprisingly easy to pull off, even on a hectic night. I love how it combines familiar flavors with a homemade touch that feels special but not complicated.
Feel free to tweak the spice level, swap ingredients to suit your diet, or add your own garnishes to make it truly yours. Cooking this recipe always reminds me that great meals don’t need to be stressful or fancy — they just need a little love and good timing.
Give it a try, share how it goes, and don’t be shy about making it your own. This orange chicken might just become your new favorite comfort food, trust me.
FAQs
Can I make this orange chicken ahead of time?
You can fry the chicken ahead and refrigerate it, but it’s best to toss it in the sauce just before serving to keep it crispy.
What’s the best way to get the chicken extra crispy?
Using a mix of flour and cornstarch for the coating and frying in hot oil without crowding the pan are key steps for maximum crispiness.
Can I use frozen chicken for this recipe?
It’s better to use fresh or fully thawed chicken to ensure even cooking and proper coating adhesion.
Is there a way to reduce the sugar in the sauce?
Yes, you can cut the sugar by a third or substitute with honey or maple syrup, but keep in mind it may alter the flavor balance slightly.
What sides go well with orange chicken?
Steamed rice, fried rice, sautéed greens, or simple steamed vegetables like broccoli or snap peas complement this dish beautifully.
Pin This Recipe!
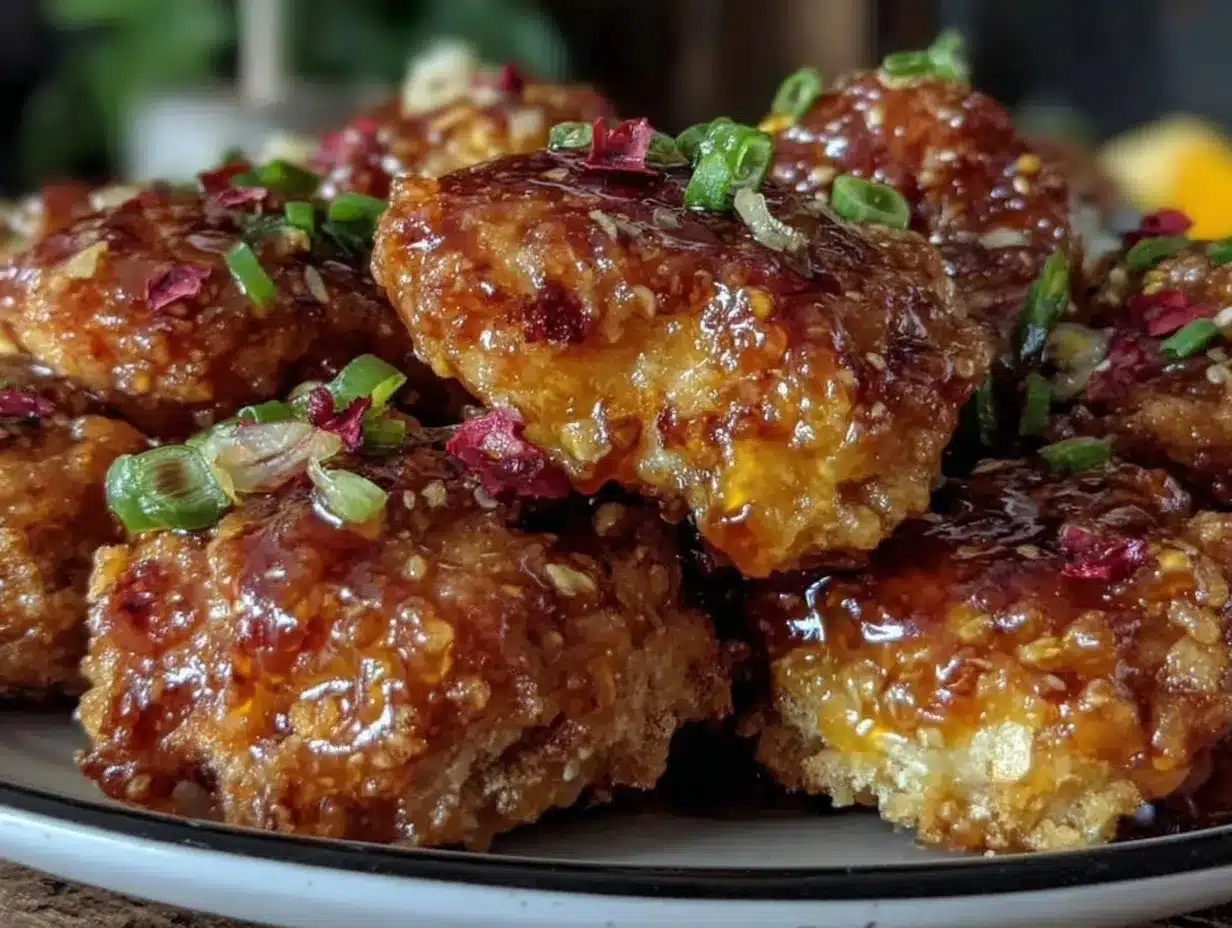
Crispy Better Than Takeout Orange Chicken Recipe with Sticky Sauce Easy and Perfect
A quick and easy homemade orange chicken recipe featuring crispy double-coated chicken pieces tossed in a sticky, flavorful orange sauce that rivals takeout.
- Prep Time: 15 minutes
- Cook Time: 15 minutes
- Total Time: 30 minutes
- Yield: 4 servings 1x
- Category: Main Course
- Cuisine: Chinese-American
Ingredients
- 2 large boneless, skinless chicken breasts (about 1 pound / 450 g), cut into bite-sized pieces
- 1 cup (125 g) all-purpose flour (or substitute with cornstarch for extra crispiness)
- 1/2 cup (60 g) cornstarch
- 2 large eggs, beaten (room temperature)
- Salt and pepper, to taste
- Vegetable oil, for frying (canola or peanut oil preferred)
- 1/2 cup (120 ml) freshly squeezed orange juice (about 1–2 oranges)
- 1/4 cup (60 ml) soy sauce (low sodium recommended)
- 1/3 cup (70 g) granulated sugar (brown sugar can be used)
- 2 tablespoons rice vinegar
- 1 tablespoon cornstarch mixed with 2 tablespoons water (cornstarch slurry)
- 1 teaspoon freshly grated ginger
- 2 garlic cloves, minced
- 1/4 teaspoon red chili flakes (optional)
- Sliced green onions (optional garnish)
- Sesame seeds (optional garnish)
Instructions
- Pat the chicken pieces dry with paper towels and season lightly with salt and pepper.
- Set up dredging station: whisk eggs in one bowl; combine flour and cornstarch in another.
- Dip each chicken piece into the egg, letting excess drip off, then coat evenly with the flour-cornstarch mixture. For extra crunch, repeat the egg and flour dip once more, but avoid making the coating too thick.
- Pour about 1 1/2 inches of vegetable oil into a skillet or wok and heat to 350°F (175°C). Test by dropping a small bit of coating in; it should sizzle and rise immediately.
- Fry chicken in batches without overcrowding for 4-5 minutes per batch until golden brown and crispy. Remove with a slotted spoon or tongs and drain on paper towels or a wire rack.
- While frying, combine orange juice, soy sauce, sugar, rice vinegar, grated ginger, minced garlic, and chili flakes in a small saucepan over medium heat. Stir until sugar dissolves and sauce simmers.
- Slowly drizzle the cornstarch slurry into the simmering sauce while whisking constantly. Cook for 1-2 minutes until sauce is glossy and thick enough to coat the back of a spoon.
- Add the fried chicken pieces to the sauce and gently toss to coat evenly.
- Transfer to a serving dish and garnish with sliced green onions and sesame seeds if desired. Serve immediately with steamed rice or preferred sides.
Notes
Maintain oil temperature between 350°F (175°C) to ensure crispy chicken without sogginess or burning. Use double coating with flour and cornstarch for best crispiness. Prepare sauce while frying chicken to save time. For gluten-free, substitute all-purpose flour with gluten-free flour blend and soy sauce with tamari. Reheat leftovers gently in a skillet to retain crispiness.
Nutrition
- Serving Size: About 1/4 of the rec
- Calories: 475
- Sugar: 20
- Sodium: 700
- Fat: 15
- Saturated Fat: 2.5
- Carbohydrates: 45
- Fiber: 1
- Protein: 35
Keywords: orange chicken, crispy chicken, homemade orange chicken, sticky sauce, easy dinner, takeout copycat, double coating, quick recipe