Red Velvet Brownie
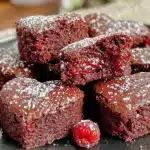
These decadent red velvet brownies are fudgy, rich, and swirled with a tangy cream cheese layer. Perfect for Valentine’s Day, birthdays, or any occasion that calls for a sweet, nostalgic treat.
- Prep Time: 15 minutes
- Cook Time: 22-28 minutes
- Total Time: 45 minutes
- Yield: 12 heart-shaped brownies 1x
- Category: Dessert
- Cuisine: American
Ingredients
Scale
- 3/4 cup (120g) all-purpose flour
- 1/2 cup (113g) unsalted butter, melted
- 1 cup (200g) granulated sugar
- 1/4 cup (50g) brown sugar, packed
- 2 large eggs, room temperature
- 2 teaspoons (10ml) pure vanilla extract
- 2 tablespoons (15g) unsweetened cocoa powder
- 2 teaspoons (10ml) red gel food coloring
- 1 tablespoon (15ml) buttermilk
- 1/2 teaspoon (2ml) white vinegar
- 1/4 teaspoon (1g) salt
- For the Cream Cheese Swirl (optional):
- 4 oz (113g) cream cheese, softened
- 2 tablespoons (25g) granulated sugar
- 1 large egg yolk
- 1/2 teaspoon (2ml) pure vanilla extract
- For Cutting & Decorating:
- Powdered sugar or white chocolate drizzle (optional)
- Sprinkles or freeze-dried raspberries (optional)
Instructions
- Line an 8-inch (20cm) square pan with parchment paper, letting the paper hang over the sides for easy lifting. Preheat oven to 350°F (175°C). Measure all your ingredients.
- In a large mixing bowl, whisk together melted butter, granulated sugar, and brown sugar until glossy and combined.
- Beat in eggs, one at a time, stirring until smooth. Mix in vanilla extract, red gel food coloring, buttermilk, and white vinegar until the batter is velvety and deep red.
- Sift in cocoa powder, flour, and salt. Fold gently with a spatula until just combined. Do not overmix.
- For the cream cheese swirl (optional): In a separate bowl, beat softened cream cheese, granulated sugar, egg yolk, and vanilla extract until smooth and creamy.
- Pour brownie batter into the prepared pan and smooth the top. Dollop spoonfuls of the cream cheese mixture over the batter. Use a butter knife or skewer to gently swirl the two together.
- Bake on the center rack for 22-28 minutes. The edges should look set, and a toothpick inserted in the center should come out with a few moist crumbs.
- Let the brownies cool completely in the pan on a wire rack (at least 30 minutes).
- Lift the cooled brownies out by the parchment. Press your heart-shaped cookie cutter firmly into the slab to cut shapes. If the cutter sticks, dip it in hot water and wipe dry between cuts.
- Decorate with powdered sugar, melted white chocolate, or sprinkles as desired.
- Arrange on a platter or package in treat bags for gifting. Serve and enjoy!
Notes
For gluten-free brownies, use a 1:1 gluten-free flour blend. For dairy-free, substitute plant-based butter and vegan cream cheese. Brownies taste even better the next day as the flavors deepen. If you don’t have a heart-shaped cutter, simply cut into squares. Chill brownies before cutting for clean shapes. Don’t overbake for fudgy texture.
Nutrition
- Serving Size: 1 heart-shaped brown
- Calories: 210
- Sugar: 20
- Sodium: 90
- Fat: 10
- Saturated Fat: 6
- Carbohydrates: 28
- Fiber: 1
- Protein: 3
Keywords: red velvet brownies, Valentine’s Day dessert, cream cheese swirl brownies, fudgy brownies, heart-shaped brownies, easy brownies, homemade brownies
Find it online: https://evabake.com/red-velvet-brownie/