I was elbow-deep in soapy water, scrubbing the aftermath of a particularly ambitious pancake breakfast last October, when my phone buzzed. It was my friend Beth, the accountant. Now, Beth is the kind of person who color-codes her spice rack alphabetically and alphabetically. She plans her meals on a spreadsheet. She is the absolute last person I would ever expect to send me a recipe—especially one that involves anything as whimsical as a ghost-shaped cookie pop. But there she was, on the other end of the line, describing in meticulous detail how to make these little meringue ghosts. She had made them for her son’s Halloween class party, and honestly, the excitement in her voice was contagious. “They’re just egg whites and sugar,” she said, “but the kids lost their minds.” I was skeptical, but I grabbed a pen and scribbled her instructions on the back of a soggy grocery receipt. I mean, who was I to argue with a spreadsheet-loving accountant about a Halloween treat?
That afternoon, with my kitchen still smelling faintly of maple syrup, I gave it a shot. My first batch came out looking less like friendly ghosts and more like sad, lumpy snowmen. The piping bag exploded on me—let me tell you, sticky meringue on the ceiling is not a good look. But the second batch? Oh, the second batch was magic. These little pops are light as air, crisp on the outside with a tiny bit of chew in the middle, and they look so stinking cute on a stick. They are the kind of treat that makes you feel like a kitchen wizard without actually having to be one. And the best part? My kids, who usually turn their noses up at anything that isn’t chocolate, devoured them. You know that feeling when you finally find a Halloween treat that doesn’t involve a sugar coma? This is it.
The reason this recipe stayed with me is simple: it solves a real problem. How do you make something festive and fun that won’t send your kids bouncing off the walls or break the bank? These meringue pops use pantry staples, cost pennies to make, and taste like a little cloud of vanilla sweetness. They’ve become our go-to for school parties, playdates, and just because. And every time I make them, I think of Beth, standing in her perfectly organized kitchen, proving that sometimes the best recipes come from the most unexpected people.
Why You’ll Love This Recipe
Let’s be real for a second. Halloween treats are usually a minefield of artificial colors, excessive sugar, and complicated steps that leave you covered in melted chocolate. These Kid-Approved Ghost Meringue Cookie Pops are the exact opposite. They are the reliable, no-drama friend you need in the chaos of October.
- Quick & Easy: You only need about 15 minutes of active prep time. The oven does the rest of the work while you help with homework or carve a pumpkin. Perfect for those busy weeknights when you still want to bring some holiday magic to the table.
- Simple Ingredients: No fancy grocery trips needed. Eggs, sugar, vanilla, and a pinch of cream of tartar. You probably have everything in your kitchen right now. No expensive candy melts or specialty pans required.
- Perfect for Halloween Fun: These are great for school parties, classroom treats, or a quiet night in with a spooky movie. They are the kind of snack that makes everyone smile without the sticky, messy aftermath of traditional frosted cookies.
- Crowd-Pleaser: Kids love the ghost shape and the “pop” factor. Adults love the light, airy texture that isn’t overly sweet. Honestly, I’ve seen grown-ups sneak two or three when they think no one is looking.
- Unbelievably Delicious: The texture is what gets you. A perfect meringue should be crisp and shatter when you bite into it, then melt away on your tongue. These deliver on that promise every single time. It’s comfort food reimagined—lighter, faster, but with the same soul-soothing satisfaction.
What makes this recipe different from the rest? It’s the technique. I’ve tested this dozens of times to find the perfect ratio of sugar to egg white that gives you a stable meringue that doesn’t weep or crack. Plus, the addition of a small amount of cornstarch helps keep them perfectly white and crisp. This isn’t just another version of a meringue cookie—it’s my best version, tested by my own kids and their friends.
What Ingredients You Will Need
This recipe uses simple, wholesome ingredients to deliver a light and airy treat that feels special without any fuss. Most of these are pantry staples, so you can whip up a batch on a whim. Here is everything you need, along with a few notes from my own kitchen trials.
- 3 large egg whites (room temperature is key—cold eggs won’t whip up as high. Separate your eggs when they are cold, then let the whites sit on the counter for about 30 minutes before you start.)
- 3/4 cup (150g) granulated sugar (Regular white sugar works best. Avoid using superfine or powdered sugar here, as the texture won’t be the same. I have tried using organic cane sugar, and it works, but the meringue is slightly tan instead of pure white.)
- 1/4 teaspoon cream of tartar (This is your secret weapon. It stabilizes the egg whites and helps them hold their shape. Do not skip it. If you don’t have it, you can substitute with 1/2 teaspoon of lemon juice or white vinegar.)
- 1/2 teaspoon vanilla extract (Pure vanilla extract gives the best flavor, but imitation vanilla works in a pinch. For a fun twist, try using peppermint extract for a candy cane vibe.)
- 1 teaspoon cornstarch (This is my little trick for extra-crispy meringues that stay white. It absorbs any excess moisture. I learned this from a pastry chef friend, and I’ve never looked back.)
- Mini chocolate chips (for the eyes—about 1/4 cup. I prefer semi-sweet because it balances the sweetness of the meringue, but milk chocolate or even dark chocolate chips work great.)
- Lollipop sticks (You can find these at any craft store or online. I use the 6-inch size. If you don’t have them, you can skip the sticks and just make regular ghost-shaped meringues.)
Ingredient Selection Tips: For the best results, use the freshest eggs you can find. Older egg whites are thinner and won’t whip up as well. I prefer using organic eggs from a local farm—the whites are often thicker and produce a more stable meringue. Also, make sure your bowl and whisk are completely clean and free of any grease. Even a tiny bit of fat can prevent your egg whites from whipping up properly.
Substitution Guidance: If you need a dairy-free option, you are in luck—this recipe is naturally dairy-free. For a gluten-free version, just ensure your vanilla extract is gluten-free (most are). You can also swap the vanilla for almond extract for a different flavor profile. For a lower-sugar option, you can try using a sugar substitute like Swerve, but the texture will be slightly different and the meringues may not be as crisp.
Equipment Needed
You don’t need a fancy kitchen to make these ghost pops. Here is what you will need, along with some budget-friendly alternatives and personal notes from my own trials.
- Electric mixer (A stand mixer is ideal, but a hand mixer works perfectly. You will be whipping the egg whites for about 8-10 minutes, so doing it by hand with a whisk is not recommended unless you want a serious arm workout. I’ve done it once—never again.)
- Large mixing bowl (Make sure it is glass or metal. Plastic bowls can hold onto grease, which will ruin your meringue. I use a stainless steel bowl that I wipe down with a little vinegar before starting to ensure it’s squeaky clean.)
- Piping bag with a round tip (I use a Wilton #12 round tip. If you don’t have a piping bag, a zip-top bag with the corner snipped off works just fine. Just be careful not to cut too big of an opening.)
- Baking sheet (A standard half-sheet pan is perfect. Line it with parchment paper. Do not use wax paper or aluminum foil—the meringues will stick.)
- Lollipop sticks (I get mine from a local craft store. They are very inexpensive. If you can’t find them, you can use sturdy straws or even pretzel sticks for a salty-sweet variation.)
- Small cookie scoop (Optional, but helpful for portioning the meringue evenly. I use a #100 scoop, which is about 1 tablespoon. It makes the ghosts all the same size.)
Maintenance Tips: After using your piping bag, wash it immediately in hot soapy water. Meringue can be sticky and hard to remove once it dries. For your mixer, make sure the whisk attachment is completely dry before using it for meringue. Any moisture will prevent the egg whites from whipping up properly.
Preparation Method

Follow these steps carefully, and you will have perfect ghost meringue pops every time. I’ve included all my little tricks and troubleshooting tips so you can avoid the mistakes I made my first few times.
- Preheat your oven to 200°F (93°C). Yes, that is very low. Meringues are baked, not cooked. The low temperature dries them out slowly, giving them that perfect crisp texture. Line a large baking sheet with parchment paper. Set it aside.
- Prepare your lollipop sticks. Place the sticks on the parchment paper, about 2 inches apart. You will pipe the meringue directly onto the end of each stick. This makes it much easier than trying to insert the stick after piping. I learned this trick after a disastrous attempt where all my ghosts fell off the sticks.
- Whip the egg whites. In your completely clean, dry mixing bowl, combine the room temperature egg whites and cream of tartar. Beat on medium speed until they become frothy and start to look like soap bubbles—about 1-2 minutes. The bubbles should be small and uniform.
- Add the sugar slowly. With the mixer running on medium-low, start adding the sugar one tablespoon at a time. This is important. If you dump all the sugar in at once, it can deflate the egg whites. Let each addition incorporate fully before adding the next. The mixture will start to look glossy and thick.
- Whip to stiff peaks. Once all the sugar is added, increase the speed to medium-high and beat until the mixture forms stiff, glossy peaks. This will take about 5-7 minutes. You know it’s ready when you lift the whisk and the meringue stands up straight without drooping. It should feel smooth and silky, not grainy. Rub a little between your fingers—if it feels gritty, keep beating until the sugar dissolves completely.
- Add the vanilla and cornstarch. Sprinkle the cornstarch over the meringue and add the vanilla extract. Beat on low speed for just 10-15 seconds until combined. Do not overmix at this stage, or you risk deflating the meringue.
- Transfer to piping bag. Fit your piping bag with the round tip and fill it with the meringue. If you are using a zip-top bag, snip about 1/2 inch off one corner. Work quickly—the meringue can start to deflate if it sits too long.
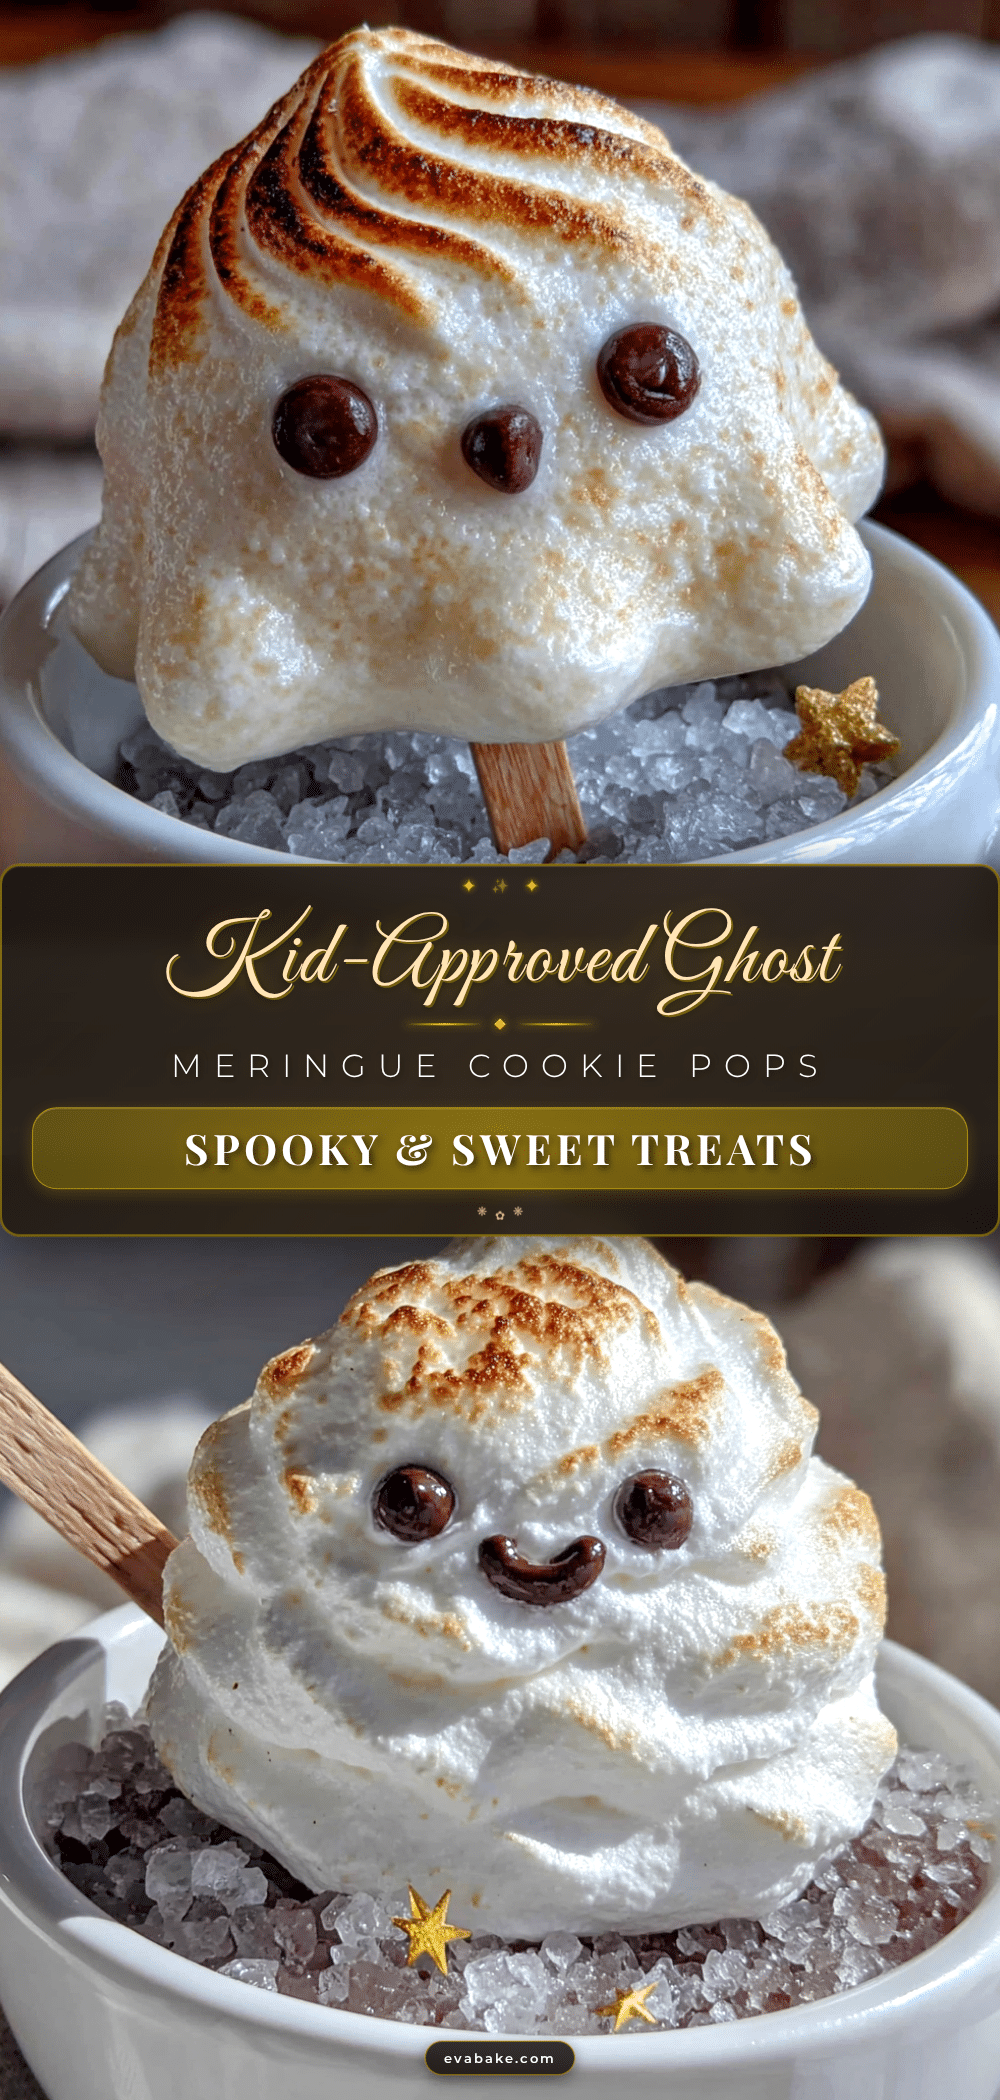
- Pipe the ghosts. Holding the piping bag perpendicular to the baking sheet, pipe a dollop of meringue onto the end of each lollipop stick. Aim for a shape that is slightly wider at the bottom and tapered at the top—like a classic ghost. You can also pipe two small bumps on the sides for arms if you are feeling fancy. Leave about 1 inch between each ghost, as they will not spread much.
- Add the eyes. Gently press two mini chocolate chips into each ghost for eyes. Do this immediately after piping, before the meringue starts to form a skin. The chips should sit right on the surface, not sink in. If they sink, your meringue is too thin—don’t worry, they will still taste great.
- Bake low and slow. Place the baking sheet in the preheated oven and bake for 1 hour and 30 minutes. Do not open the oven door during this time. The meringues need consistent heat to dry properly. After 90 minutes, turn off the oven and leave the meringues inside to cool completely—at least another hour or overnight. This step is crucial for getting that perfect crisp texture.
- Cool and enjoy. Once the oven is completely cool, remove the meringues. They should lift easily off the parchment paper. If they stick, they need more time in the oven. The ghosts should be dry to the touch and sound hollow when tapped. Let them cool completely on the baking sheet before serving.
Cooking Tips & Techniques
I have made these ghost meringue pops more times than I can count, and I have definitely learned a few things the hard way. Here are my best tips to ensure your success, along with a few stories of my own kitchen mishaps.
Room temperature eggs are non-negotiable. I cannot stress this enough. Cold egg whites don’t whip up as high, and they take much longer to reach stiff peaks. I once tried to speed things up by using cold eggs, and after 15 minutes of beating, I still had a soupy mess. Let your eggs sit out for at least 30 minutes. If you forget, place the eggs in a bowl of warm water for 5 minutes before separating them.
Humidity is your enemy. Meringues are hygroscopic—they absorb moisture from the air. If you live in a humid climate, these might not turn out as crisp. I learned this the hard way during a rainy October week. Try to make them on a dry day, or run a dehumidifier in your kitchen for a few hours before starting. You can also add an extra teaspoon of cornstarch to help combat moisture.
Don’t overbake, but don’t underbake either. The key is to dry them out, not to brown them. If your meringues start to turn tan or golden, your oven is too hot. Use an oven thermometer to check the temperature—my oven runs about 25 degrees hot, so I set it to 175°F instead of 200°F. The meringues should be pure white when they are done.
Timing and multitasking strategies: While the meringues are baking, you can prep other Halloween treats or clean up your kitchen. The long baking time is actually a blessing—it gives you a solid 90 minutes of hands-off time. I usually use this time to make dinner or help the kids with their costumes.
Consistency is everything. If your meringue looks curdled or separates while whipping, it means there was a trace of fat in the bowl. Start over with a clean bowl and fresh eggs. I once used a bowl that had a tiny smear of butter from earlier, and the entire batch was ruined. Wipe your bowl and whisk with a little white vinegar before starting to be safe.
Variations & Adaptations
One of the best things about this recipe is how easy it is to adapt. You can change the flavors, colors, and shapes to fit any occasion or dietary need. Here are some of my favorite variations that I have tried over the years.
Dietary Variations: For a vegan version, you can use aquafaba (the liquid from a can of chickpeas) instead of egg whites. Use 3 tablespoons of aquafaba per egg white. The texture is slightly different—a bit chewier—but it works surprisingly well. I tested this for a friend’s vegan Halloween party, and the kids couldn’t tell the difference. For a sugar-free option, use a monk fruit-based sweetener, but note that the meringues will be slightly less crisp.
Seasonal Twists: For Christmas, pipe the meringue into snowman shapes and use mini chocolate chips for eyes and a tiny orange candy for the nose. Add a dash of peppermint extract for a festive flavor. For Valentine’s Day, add a drop of pink food coloring and pipe into heart shapes. For Easter, shape them like little bunnies and use pastel-colored candy eyes.
Flavor Variations: Swap the vanilla extract for almond, coconut, or lemon extract. Add a teaspoon of cocoa powder for chocolate ghosts. For a funfetti version, fold in some sprinkles just before piping—just be gentle so you don’t deflate the meringue. My kids love the chocolate version best; I add 1 tablespoon of unsweetened cocoa powder along with the cornstarch.
Different Cooking Methods: If you don’t want to use lollipop sticks, you can pipe the ghosts directly onto the parchment paper and serve them as regular cookies. You can also use a dehydrator set to 125°F (52°C) for about 4-5 hours. The texture is slightly different—chewier and more marshmallow-like—but still delicious.
Allergen Substitutions: This recipe is naturally gluten-free, dairy-free, and nut-free. For egg allergies, use the aquafaba substitution mentioned above. For chocolate allergies, skip the chocolate chips and use small candy eyes or even a dab of black frosting for the eyes.
Serving & Storage Suggestions
These ghost meringue pops are best served the day they are made, but they can be stored for several days if done properly. Here is everything you need to know about serving and storing them.
Serving Temperature and Presentation: Serve the ghosts at room temperature. They are perfect on their own, but you can also arrange them on a platter with other Halloween treats like pumpkin-shaped cookies or candy corn. For a fun presentation, stick them into a foam block covered with black tissue paper or place them in a tall glass jar. They make a great centerpiece for a Halloween party.
Complementary Dishes and Beverages: These meringues are light and sweet, so they pair well with something tart or savory. Serve them alongside a cup of hot apple cider, a glass of cold milk, or even a mug of hot chocolate. For a grown-up party, pair them with a crisp white wine or a cup of coffee. The sweetness of the meringue balances the bitterness of coffee beautifully.
Storage Instructions: Store the meringue pops in an airtight container at room temperature. Do not refrigerate them—the moisture in the fridge will make them sticky and soft. They will stay crisp for up to 5 days if stored properly. I like to layer them between sheets of parchment paper to prevent them from sticking together.
Reheating Methods: These are best eaten as is, but if they have softened slightly, you can re-crisp them in a 200°F (93°C) oven for 10-15 minutes. Let them cool completely before serving again. Do not microwave them—they will turn into a sticky mess.
How Flavors Develop Over Time: The vanilla flavor actually becomes more pronounced after a day or two as the flavors meld together. The texture, however, is best within the first 24 hours. If you are making these for a party, I recommend making them the day before and storing them in an airtight container.
Nutritional Information & Benefits
These ghost meringue pops are a lighter alternative to traditional Halloween treats. Here is a breakdown of the nutritional value and health benefits.
Estimated Nutritional Values (per pop): Approximately 25 calories, 0g fat, 6g carbohydrates, 6g sugar, 0g fiber, 1g protein. These numbers are estimates and can vary based on the exact ingredients used. The main source of calories is the sugar, but since each pop is small, it is a reasonable treat.
Health Benefits of Key Ingredients: Egg whites are a good source of protein and contain no fat or cholesterol. They are also rich in riboflavin and selenium. The cream of tartar adds potassium, which is beneficial for heart health. While this is still a sugary treat, it is lower in calories and fat than most cookies or candy bars.
Dietary Considerations: This recipe is naturally gluten-free, dairy-free, and nut-free. It is also low in fat and cholesterol-free. For those watching their sugar intake, you can reduce the sugar slightly, but it will affect the texture. The meringues will be less crisp and may not hold their shape as well.
Potential Allergens: The main allergen in this recipe is eggs. For those with egg allergies, use the aquafaba substitution mentioned in the variations section. The chocolate chips may contain dairy or soy—check the label if you have allergies. Otherwise, this is a fairly allergy-friendly treat.
Personal Wellness Perspective: I love that this treat allows my kids to enjoy something festive without the overload of artificial colors and preservatives found in most store-bought Halloween candy. It is a treat I feel good about serving, and the portion control is built in—each pop is just a few bites. Moderation is key, and these fit perfectly into a balanced approach to holiday indulgence.
Conclusion
These Kid-Approved Ghost Meringue Cookie Pops have become a staple in our Halloween rotation for a reason. They are simple, affordable, and absolutely delightful. The light, airy texture and cute ghost shape make them a hit with kids and adults alike, and the best part is that you don’t need any special skills or expensive ingredients to make them. Whether you are hosting a Halloween party, sending treats to school, or just looking for a fun afternoon activity with your kids, these meringue pops are the perfect choice.
I encourage you to make this recipe your own. Experiment with different flavors, shapes, and decorations. Add a little food coloring for a spooky green ghost or a pink one for a more whimsical look. The beauty of this recipe is its versatility. And honestly, there is something so satisfying about watching these little ghosts come to life in your oven. It is a little bit of kitchen magic that never gets old.
I would love to hear how your ghosts turn out! Leave a comment below and let me know if you tried any fun variations. Share a photo of your creations on social media and tag me—I love seeing your kitchen adventures. And if you have any questions, don’t hesitate to ask. Happy Halloween, and happy baking!
Frequently Asked Questions
Can I make these ghost meringue pops ahead of time?
Absolutely! You can make them up to 5 days in advance. Store them in an airtight container at room temperature. Do not refrigerate them, as the moisture will make them sticky. If they soften, pop them back in a 200°F oven for 10 minutes to re-crisp.
Why did my meringue turn out sticky or chewy?
This usually happens because of humidity or underbaking. If the air is humid, the meringues will absorb moisture and become sticky. Try making them on a dry day or run a dehumidifier. Also, make sure they are fully dried out in the oven—they should lift easily off the parchment paper and sound hollow when tapped.
Can I use liquid egg whites from a carton?
I don’t recommend it. Liquid egg whites are pasteurized, which changes their protein structure and makes them harder to whip into stiff peaks. Fresh egg whites from whole eggs give the best results. If you must use carton egg whites, look for ones labeled “for whipping” and expect a slightly less stable meringue.
How do I get the perfect ghost shape?
Practice makes perfect, but here is a tip: hold the piping bag straight up and down, not at an angle. Pipe a dollop that is wider at the bottom and taper as you lift up. You can also use a small offset spatula to smooth out any bumps. For the eyes, press the chocolate chips in gently right after piping, before the meringue forms a skin.
Can I freeze these meringue pops?
Yes, you can freeze them! Place them in a single layer in an airtight container with parchment paper between layers. Freeze for up to 3 months. Thaw them at room temperature for about 30 minutes before serving. Do not thaw them in the refrigerator, as the moisture will ruin the texture.
Pin This Recipe!
Kid-Approved Ghost Meringue Cookie Pops: Easy Halloween Treat
These light and airy ghost-shaped meringue pops are a fun, festive Halloween treat that kids and adults love. Made with simple pantry staples, they are crisp on the outside with a tiny bit of chew in the middle and look adorable on a stick.
- Prep Time: 15 minutes
- Cook Time: 1 hour 30 minutes
- Total Time: 1 hour 45 minutes (plus cooling time)
- Yield: 24 servings 1x
- Category: Dessert
- Cuisine: American
Ingredients
- 3 large egg whites (room temperature)
- 3/4 cup (150g) granulated sugar
- 1/4 teaspoon cream of tartar
- 1/2 teaspoon vanilla extract
- 1 teaspoon cornstarch
- 1/4 cup mini chocolate chips (for eyes)
- Lollipop sticks (6-inch size)
Instructions
- Preheat your oven to 200°F (93°C). Line a large baking sheet with parchment paper.
- Place lollipop sticks on the parchment paper, about 2 inches apart. You will pipe the meringue directly onto the end of each stick.
- In a completely clean, dry mixing bowl, combine the room temperature egg whites and cream of tartar. Beat on medium speed until frothy and bubbly, about 1-2 minutes.
- With the mixer running on medium-low, add the sugar one tablespoon at a time, letting each addition incorporate fully before adding the next.
- Once all sugar is added, increase speed to medium-high and beat until stiff, glossy peaks form, about 5-7 minutes. The meringue should feel smooth and not grainy.
- Sprinkle the cornstarch over the meringue and add the vanilla extract. Beat on low speed for 10-15 seconds until combined. Do not overmix.
- Transfer the meringue to a piping bag fitted with a round tip (or a zip-top bag with a corner snipped off).
- Pipe a dollop of meringue onto the end of each lollipop stick, shaping it wider at the bottom and tapered at the top like a classic ghost. Leave about 1 inch between each ghost.
- Immediately press two mini chocolate chips into each ghost for eyes.
- Bake for 1 hour and 30 minutes. Do not open the oven door during baking. After 90 minutes, turn off the oven and leave the meringues inside to cool completely, at least 1 hour or overnight.
- Once the oven is completely cool, remove the meringues. They should lift easily off the parchment paper. Let cool completely on the baking sheet before serving.
Notes
Room temperature eggs are essential for proper whipping. Humidity can affect the texture; make on a dry day if possible. Do not open the oven door during baking. For best results, let meringues cool completely in the turned-off oven. Store in an airtight container at room temperature for up to 5 days. Do not refrigerate.
Nutrition
- Serving Size: 1 pop
- Calories: 25
- Sugar: 6
- Sodium: 10
- Carbohydrates: 6
- Protein: 1
Keywords: Halloween treats, meringue cookies, ghost cookies, easy Halloween dessert, kid-friendly Halloween, meringue pops, ghost meringue


