Introduction
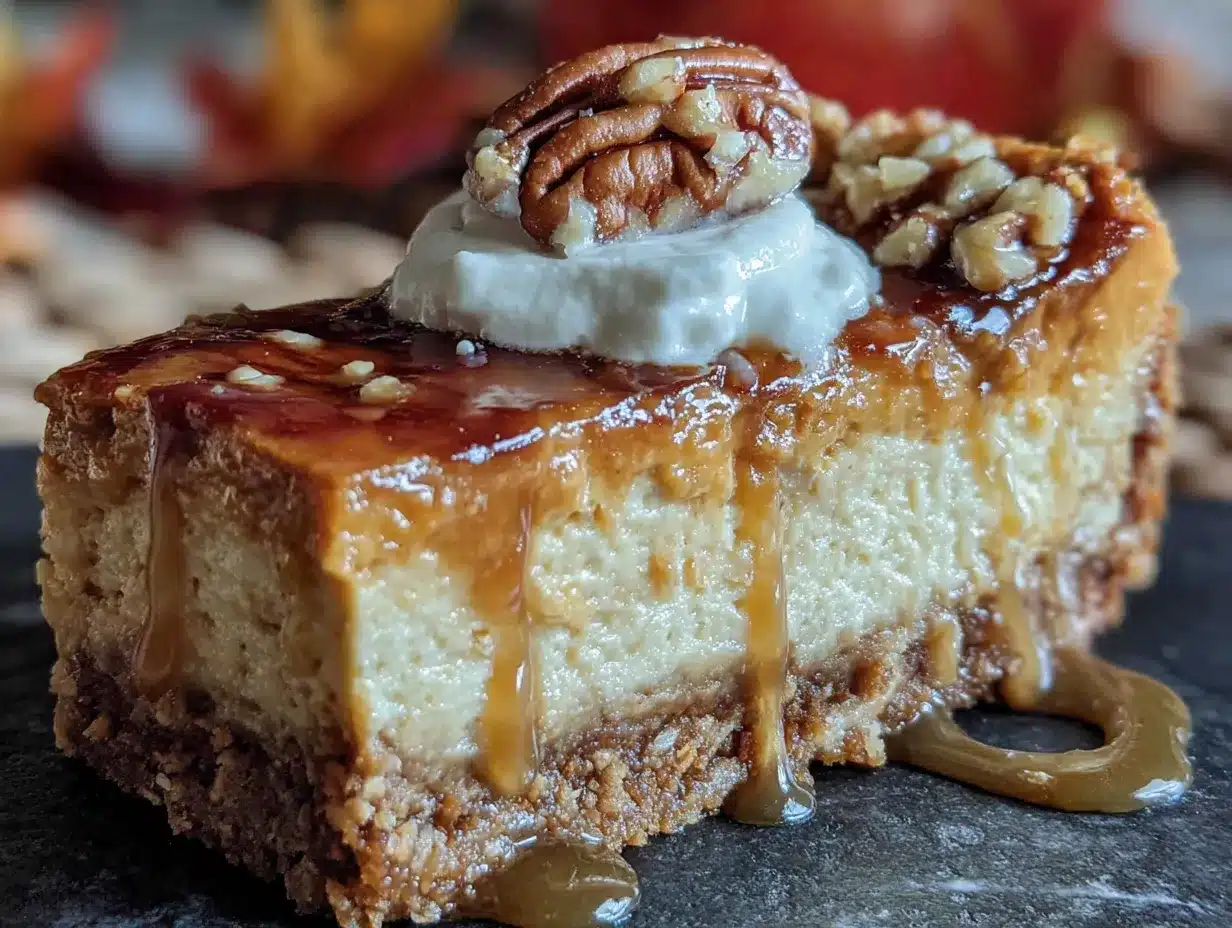
My neighbor Rosa watched me struggle with a wobbly pumpkin pie crust for what felt like an hour last Thanksgiving. She didn’t say anything at first. Then she just shook her head, walked back to her apartment, and came back ten minutes later holding a foil pan of these pumpkin cheesecake bars with a pecan crust. “No more sad crust,” she said with a shrug. “This one stays crunchy.”
I almost laughed, but then I took a bite. That first bite had this unexpected crunch from the pecans, followed by the creamiest pumpkin cheesecake filling I’d ever tasted. Honestly, I stood there in my messy kitchen—flour still on my apron, spilled pumpkin puree on the counter—and just closed my eyes for a second. Rosa laughed and told me she learned the recipe from her grandmother in Mexico, who used whatever nuts they had on hand. The conversation that followed, standing there with our coffee and those bars, mattered just as much as the recipe itself.
Maybe you’ve been there too—staring at a pie that cracked, or a crust that turned soggy, right when you had people coming over. These pumpkin cheesecake bars solve all of that. They’re easier than pie, they travel well, and that pecan crust stays perfectly crunchy even the next day. I’ve tweaked Rosa’s version just slightly over the years, but the heart of it is still hers. And honestly? It’s the only pumpkin dessert I make for gatherings now.
Why You’ll Love This Recipe
I’ve tested this recipe at least a dozen times over the past few years, bringing it to potlucks, family dinners, and casual get-togethers. Every single time, someone asks for the recipe. That’s not me bragging—that’s the magic of these bars working exactly as intended.
Here’s what makes them stand out:
- Crowd-Pleaser Guaranteed : The combination of creamy pumpkin cheesecake and crunchy pecan crust gets rave reviews from both kids and adults. I’ve seen people who “don’t like pumpkin” go back for seconds.
- No-Fuss Crust : Unlike traditional pie crust that requires rolling and blind baking, this pecan crust comes together in one bowl. You just press it into the pan and you’re done. No stress, no mess.
- Make-Ahead Friendly : These bars actually taste better after a night in the fridge. The flavors meld together, and the texture becomes even creamier. Perfect for when you want to prep before guests arrive.
- Perfect for Gatherings : Bars are infinitely easier to serve than pie. No awkward slicing, no crumbling crust. Just neat, beautiful squares that look impressive on any dessert table.
- Simple Ingredients : Nothing fancy here. You probably already have most of these in your pantry—canned pumpkin, cream cheese, butter, pecans, and basic baking staples.
What makes this recipe different from all the others out there? It’s the ratio. The pecan crust is thick enough to hold its own against the creamy filling, but not so thick that it overpowers the pumpkin. And the cheesecake layer has just the right amount of tang to balance the sweet pumpkin spice. I’ve tried versions with graham cracker crusts and shortbread bases, but nothing compares to the nutty crunch of pecans paired with pumpkin.
This is the kind of dessert that makes you close your eyes after the first bite. It’s comfort food reimagined—easier than pie, but with the same soul-soothing satisfaction. Perfect for impressing guests without stress, or turning a simple meal into something memorable.
What Ingredients You Will Need
This recipe uses simple, wholesome ingredients to deliver bold flavor and satisfying texture without the fuss. Most of these are pantry staples, especially during fall baking season.
For the Pecan Crust:
- 1 ½ cups pecan halves (about 6 ounces) – I prefer raw pecans for the best crunch. You can use pre-chopped, but whole halves give you more control over the texture.
- 1 ¼ cups all-purpose flour (150 grams)
- ⅓ cup granulated sugar (65 grams)
- ½ teaspoon salt
- ½ cup unsalted butter, cold and cut into small cubes (113 grams) – Cold butter is key here. It creates a flakier, more tender crust.
For the Pumpkin Cheesecake Filling:
- 16 ounces cream cheese, softened to room temperature (two 8-ounce blocks) – Full-fat cream cheese gives the best texture. I recommend Philadelphia brand for consistent results.
- ¾ cup granulated sugar (150 grams)
- ¼ cup packed light brown sugar (50 grams) – Adds a subtle molasses depth that pairs beautifully with pumpkin.
- 1 cup canned pumpkin puree (not pumpkin pie filling) – Libby’s is my go-to brand. It has the right consistency and isn’t too watery.
- 3 large eggs, room temperature
- ¼ cup sour cream (60 grams) – Adds moisture and a slight tang. Greek yogurt works too.
- 1 teaspoon vanilla extract
- 2 teaspoons pumpkin pie spice – Store-bought is fine, but I sometimes make my own with cinnamon, nutmeg, ginger, and cloves.
- ¼ teaspoon salt
For the Topping (optional but recommended):
- ½ cup pecan halves, roughly chopped (about 2 ounces)
- 2 tablespoons melted butter
- 1 tablespoon brown sugar
If you’re dairy-free, you can use vegan cream cheese and a plant-based butter substitute. Just note that the texture might be slightly less creamy. For a gluten-free version, swap the all-purpose flour with a 1:1 gluten-free baking flour blend. I’ve tried Bob’s Red Mill and it works beautifully here.
Equipment Needed
You don’t need a fancy kitchen to pull these off. Here’s what I use every time:
- 9×13-inch baking pan – This is the perfect size for bars. A metal pan works best for even baking, but glass is fine too. Just watch the edges—they brown faster in glass.
- Food processor – Makes quick work of the pecan crust. If you don’t have one, you can chop the pecans by hand and use a pastry cutter for the butter. It takes a little longer but works just fine.
- Electric hand mixer or stand mixer – For beating the cream cheese until smooth. A stand mixer is easier, but a hand mixer does the job perfectly.
- Parchment paper – Line your pan with it, leaving some overhang. This makes lifting the bars out so much easier. Trust me on this one.
- Mixing bowls – You’ll need a couple of medium bowls.
- Measuring cups and spoons – For accuracy. Baking is a science, after all.
- Spatula – For spreading the filling evenly.
I’ve made this recipe with a cheap hand mixer and a basic baking pan, and it turned out great. You don’t need expensive equipment. Just make sure your cream cheese is truly softened, and you’re golden.
Preparation Method
Let me walk you through this step by step. I’ve made this enough times to know where things can go wrong, so I’ll share those little tricks along the way.
Step 1: Preheat and Prep Your Pan
Preheat your oven to 350°F (175°C). Line a 9×13-inch baking pan with parchment paper, leaving about 2 inches of overhang on the long sides. This creates handles that let you lift the entire block of bars out later. Lightly spray the parchment with non-stick spray just to be safe.
Step 2: Make the Pecan Crust
In a food processor, pulse the pecan halves until they’re finely chopped but not quite a powder. You want some texture remaining. Add the flour, sugar, and salt, and pulse a few times to combine. Add the cold butter cubes and pulse until the mixture looks like coarse meal with pea-sized butter pieces. Don’t over-process—you want those butter chunks for a flaky crust.
If you’re doing this by hand, chop the pecans finely, mix with the dry ingredients, then cut in the cold butter using a pastry cutter or your fingers until the mixture resembles coarse crumbs.
Press the mixture evenly into the bottom of your prepared pan. Use the bottom of a measuring cup to really pack it down firmly. This is important—a loose crust will crumble when you cut the bars. Bake for 15 minutes, until the edges are just starting to turn golden. Set aside to cool slightly while you make the filling.
Step 3: Make the Pumpkin Cheesecake Filling
In a large bowl, beat the softened cream cheese with an electric mixer on medium speed until completely smooth. This takes about 2 minutes. Scrape down the sides and bottom of the bowl with a spatula. Add both sugars and beat until light and fluffy, about 2 more minutes.
Add the pumpkin puree, sour cream, and vanilla extract, and beat on low until combined. The mixture will look slightly orange and very creamy. Add the eggs one at a time, beating on low after each addition just until incorporated. Over-mixing at this point can incorporate too much air, which might cause cracks later.
Add the pumpkin pie spice and salt, and beat on low until just combined. Give the bowl one final scrape with your spatula to make sure everything is evenly mixed. The filling should be smooth, thick, and beautifully spiced.
Step 4: Assemble and Bake
Pour the filling over the pre-baked crust. Use your spatula to spread it evenly to the edges. Tap the pan gently on the counter a few times to release any air bubbles.
If you’re using the pecan topping, mix the chopped pecans, melted butter, and brown sugar in a small bowl. Sprinkle evenly over the filling.
Bake at 350°F (175°C) for 30-35 minutes. The edges should be set and slightly puffed, but the center should still jiggle slightly when you gently shake the pan. That’s the sweet spot. Over-baking will make the cheesecake dry and prone to cracking.
Step 5: Cool and Chill
Let the bars cool completely on a wire rack. This takes about an hour. Then cover the pan with plastic wrap and refrigerate for at least 4 hours, but overnight is better. I know it’s hard to wait, but this step is non-negotiable. The bars need time to set properly so you get clean slices.
Step 6: Slice and Serve
Once fully chilled, use the parchment overhang to lift the entire block out of the pan. Place it on a cutting board. Use a sharp knife to cut into squares. Wipe the knife clean between cuts for the neatest edges. I usually cut 24 bars (6 rows by 4 rows), but you can make them bigger or smaller depending on your crowd.
Cooking Tips & Techniques
Over the years, I’ve learned a few things the hard way. Here are the tips I wish someone had told me sooner.
Room temperature ingredients matter. Cold cream cheese will leave you with lumpy filling, no matter how long you beat it. Take it out of the fridge at least an hour before you start. Same goes for the eggs. If you forget, you can place the eggs in a bowl of warm water for 5 minutes, and microwave the cream cheese in 10-second bursts until it’s soft but not melted.
Don’t over-mix the filling. I made this mistake once when I was distracted by a phone call. The bars came out with a puffy, almost soufflé-like texture that deflated and cracked as they cooled. Mix just until everything comes together, then stop.
The water bath shortcut. Traditional cheesecake recipes call for a water bath to prevent cracking. For bars, I skip the water bath entirely. The shallow pan and shorter baking time mean cracks are much less likely. If you’re nervous, place a shallow pan of water on the oven rack below the bars. The steam helps keep the surface moist.
Patience with chilling. I know you want to dig in right away. But cutting these bars while they’re still warm will give you a crumbly mess. The pecan crust needs time to firm up, and the cheesecake needs to set. Four hours minimum, but overnight is where the magic happens. The flavors deepen, the texture becomes velvety, and the crust stays perfectly crunchy.
Multitasking strategy. While the crust is baking for 15 minutes, use that time to get your cream cheese softening and measure out your other ingredients. By the time the crust comes out, you’re ready to mix the filling. This keeps the whole process moving smoothly.
Variations & Adaptations
One of the best things about this recipe is how adaptable it is. Here are some variations I’ve tried and loved.
Gluten-Free Version: Swap the all-purpose flour with a 1:1 gluten-free baking flour blend. I’ve used Bob’s Red Mill and King Arthur Measure for Measure with great results. The crust might be slightly more crumbly, but the flavor is still spot on.
Dairy-Free Version: Use vegan cream cheese and a plant-based butter substitute. I’ve tried this with Miyoko’s cream cheese and it worked surprisingly well. The texture is slightly less dense, but still creamy and delicious.
Maple Pecan Twist: Add 2 tablespoons of maple syrup to the filling and swap the brown sugar in the topping for maple sugar. The maple flavor pairs beautifully with the pecans and pumpkin. I made this version for a fall brunch and it disappeared in minutes.
Chocolate Drizzle: Melt ½ cup of semi-sweet chocolate chips with 1 teaspoon of coconut oil and drizzle over the chilled bars. The chocolate adds a nice richness that complements the pumpkin spice. My kids beg for this version.
Spice It Up: If you like things spicy, add ¼ teaspoon of cayenne pepper or chipotle powder to the filling. The heat cuts through the sweetness and adds a surprising kick. I tried this on a whim one year and now it’s my secret weapon for adult gatherings.
Nut-Free Option: Replace the pecans with toasted sunflower seeds or omit the nuts entirely and use a classic graham cracker crust. The texture will be different, but still delicious.
Serving & Storage Suggestions
These bars are incredibly versatile when it comes to serving. Here’s how I like to present them.
Serving Temperature: I prefer them cold, straight from the fridge. The cheesecake is firm and creamy, and the crust stays crunchy. If you prefer a softer texture, let them sit at room temperature for 15 minutes before serving.
Presentation Tips: Arrange the bars on a platter and dust with a little powdered sugar or cinnamon. A dollop of whipped cream on each bar makes them look extra special. For holiday gatherings, I sometimes add a candied pecan on top of each bar for a festive touch.
What to Serve Alongside: These bars pair beautifully with coffee, hot cider, or a spiced chai latte. If you’re serving them as part of a dessert spread, they go well with classic apple pie or moist pumpkin bread for a full fall-themed table.
Storage: Store the bars in an airtight container in the refrigerator for up to 5 days. Place a sheet of parchment paper between layers to prevent sticking. The flavor actually improves after a day or two as the spices meld with the cheesecake.
Freezing: These bars freeze beautifully. Wrap individual bars tightly in plastic wrap, then place them in a freezer-safe bag. They’ll keep for up to 3 months. To thaw, transfer to the refrigerator overnight or let sit at room temperature for about 30 minutes.
Reheating: I don’t recommend reheating these bars. They’re meant to be served cold or at room temperature. If you want a warm dessert, try my pumpkin crumble instead.
Nutritional Information & Benefits
Here’s the approximate nutritional breakdown for one bar (based on 24 servings):
| Nutrient | Amount Per Serving |
|---|---|
| Calories | 245 |
| Total Fat | 17g |
| Saturated Fat | 8g |
| Cholesterol | 55mg |
| Sodium | 180mg |
| Total Carbohydrates | 21g |
| Dietary Fiber | 2g |
| Sugars | 14g |
| Protein | 4g |
Pumpkin is packed with vitamin A, which supports eye health and immune function. It’s also a good source of fiber and antioxidants. Pecans provide healthy fats and magnesium, which is great for heart health and energy production.
These bars are not exactly health food, but they’re made with real ingredients and no artificial additives. If you’re watching your sugar intake, you can reduce the sugar by ¼ cup without affecting the texture too much. For a lower-calorie option, use reduced-fat cream cheese—just note that the texture will be slightly less creamy.
Potential allergens: Contains dairy, nuts, eggs, and gluten (if using all-purpose flour).
Conclusion
These pumpkin cheesecake bars with pecan crust have become my go-to dessert for every fall gathering. They’re easier than pie, more impressive than cookies, and somehow always the first thing to disappear from the dessert table. Rosa’s grandmother would probably be surprised to know her recipe has made its way into so many kitchens, but I think she’d be happy about it.
The best part? You can make them your own. Add a chocolate drizzle, swap the spices, or skip the topping entirely. The base recipe is forgiving and flexible, which is exactly what you want when you’re cooking for a crowd. I’ve made these for Thanksgiving, potlucks, office parties, and casual dinners, and they’ve never let me down.
I’d love to hear how they turn out for you. Did you try a variation? Did your guests go back for seconds? Drop a comment below and let me know. And if you’re looking for more crowd-pleasing desserts, check out my pecan pie bars for another nutty, crunchy, creamy treat.
Happy baking, friends. May your crusts stay crunchy and your cheesecake stay creamy.
Frequently Asked Questions
Can I use fresh pumpkin instead of canned?
Yes, you can. Roast a small sugar pumpkin until tender, then puree the flesh in a food processor. Drain any excess liquid through a cheesecloth or fine-mesh strainer. Fresh pumpkin puree tends to be more watery than canned, so you might need to reduce it slightly on the stove before using.
Why did my cheesecake layer crack?
Cracks usually happen from over-baking or over-mixing. Bake just until the edges are set and the center jiggles slightly. Also, make sure your cream cheese and eggs are at room temperature so everything mixes together smoothly without incorporating too much air.
Can I make these bars ahead of time?
Absolutely. In fact, I recommend it. These bars need at least 4 hours to chill, but they’re even better after 24 hours. You can make them up to 3 days in advance and keep them covered in the refrigerator. They also freeze well for up to 3 months.
How do I get clean, neat slices?
Use a sharp knife and wipe it clean between each cut. For the neatest edges, chill the bars thoroughly—overnight is best. You can also run the knife under hot water and dry it off before slicing. This helps the knife glide through the cheesecake without dragging.
Can I use a different nut for the crust?
Definitely. Walnuts, almonds, or even a mix of nuts work well. Pecans have a naturally sweet, buttery flavor that pairs beautifully with pumpkin, but feel free to experiment. Just make sure to toast the nuts first for the best flavor and crunch.
Pin This Recipe!
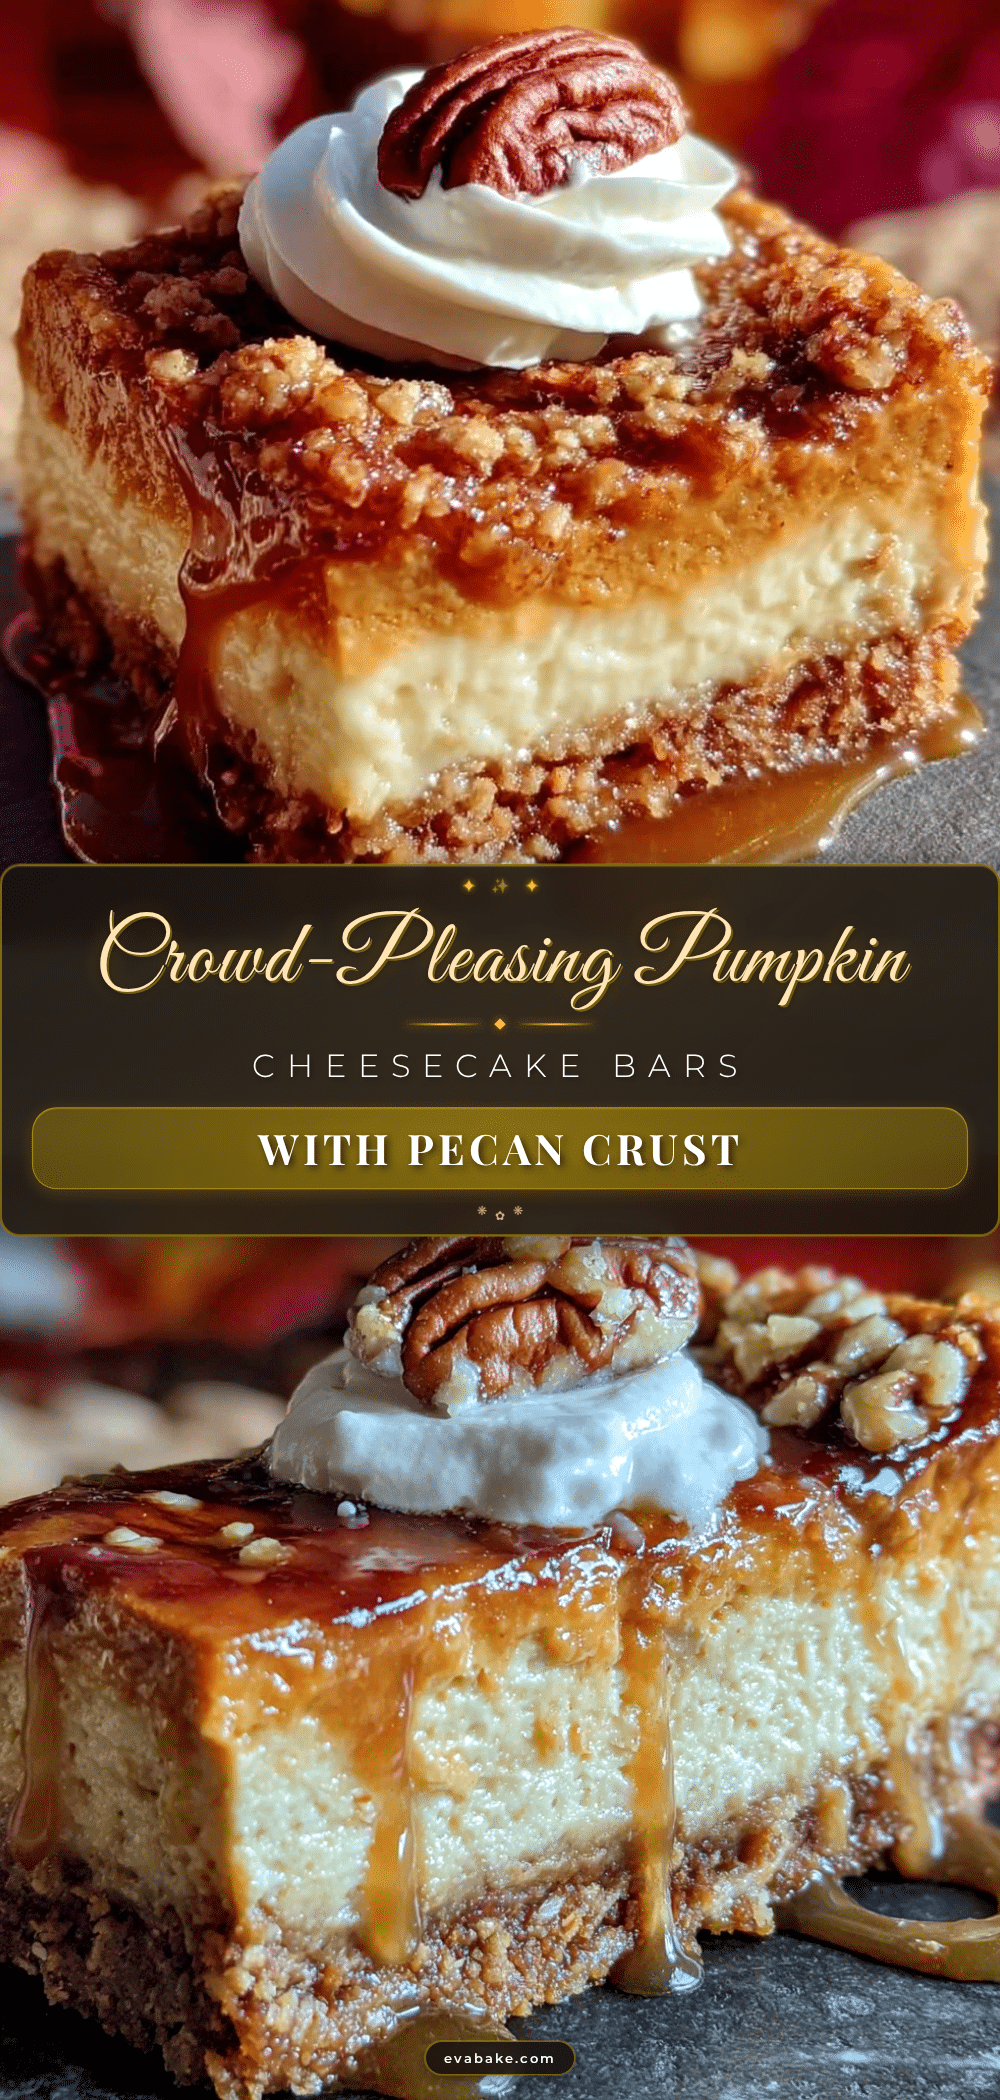
Best Easy Pumpkin Cheesecake Bars with Pecan Crust
These pumpkin cheesecake bars feature a crunchy pecan crust and a creamy pumpkin cheesecake filling. They’re easier than pie, perfect for gatherings, and can be made ahead of time.
- Prep Time: 20 minutes
- Cook Time: 45 minutes
- Total Time: 5 hours 5 minutes (includes chilling)
- Yield: 24 servings 1x
- Category: Dessert
- Cuisine: Mexican-American
Ingredients
- 1 ½ cups pecan halves (about 6 ounces)
- 1 ¼ cups all-purpose flour (150 grams)
- ⅓ cup granulated sugar (65 grams)
- ½ teaspoon salt
- ½ cup unsalted butter, cold and cut into small cubes (113 grams)
- 16 ounces cream cheese, softened to room temperature (two 8-ounce blocks)
- ¾ cup granulated sugar (150 grams)
- ¼ cup packed light brown sugar (50 grams)
- 1 cup canned pumpkin puree (not pumpkin pie filling)
- 3 large eggs, room temperature
- ¼ cup sour cream (60 grams)
- 1 teaspoon vanilla extract
- 2 teaspoons pumpkin pie spice
- ¼ teaspoon salt
- ½ cup pecan halves, roughly chopped (about 2 ounces)
- 2 tablespoons melted butter
- 1 tablespoon brown sugar
Instructions
- Preheat your oven to 350°F (175°C). Line a 9×13-inch baking pan with parchment paper, leaving about 2 inches of overhang on the long sides. Lightly spray the parchment with non-stick spray.
- In a food processor, pulse the pecan halves until finely chopped but not a powder. Add the flour, sugar, and salt, and pulse a few times. Add the cold butter cubes and pulse until the mixture looks like coarse meal with pea-sized butter pieces. Press the mixture evenly into the bottom of the prepared pan. Bake for 15 minutes, until the edges are just starting to turn golden. Set aside to cool slightly.
- In a large bowl, beat the softened cream cheese with an electric mixer on medium speed until completely smooth, about 2 minutes. Add both sugars and beat until light and fluffy, about 2 more minutes. Add the pumpkin puree, sour cream, and vanilla extract, and beat on low until combined. Add the eggs one at a time, beating on low after each addition just until incorporated. Add the pumpkin pie spice and salt, and beat on low until just combined.
- Pour the filling over the pre-baked crust. Spread evenly to the edges. Tap the pan gently on the counter to release air bubbles. If using the pecan topping, mix the chopped pecans, melted butter, and brown sugar in a small bowl and sprinkle evenly over the filling.
- Bake at 350°F (175°C) for 30-35 minutes. The edges should be set and slightly puffed, but the center should still jiggle slightly when shaken.
- Let the bars cool completely on a wire rack, about 1 hour. Cover with plastic wrap and refrigerate for at least 4 hours, preferably overnight.
- Once fully chilled, use the parchment overhang to lift the entire block out of the pan. Place on a cutting board and cut into squares using a sharp knife, wiping the knife clean between cuts.
Notes
Room temperature ingredients are key for a smooth filling. Don’t over-mix the filling to avoid cracks. Chill thoroughly for clean slices. For a gluten-free version, use a 1:1 gluten-free baking flour blend. For a dairy-free version, use vegan cream cheese and plant-based butter.
Nutrition
- Serving Size: 1 bar
- Calories: 245
- Sugar: 14
- Sodium: 180
- Fat: 17
- Saturated Fat: 8
- Carbohydrates: 21
- Fiber: 2
- Protein: 4
Keywords: pumpkin cheesecake bars, pecan crust, pumpkin dessert, fall dessert, Thanksgiving dessert, easy cheesecake bars