I wasn’t expecting turkey advice from my accountant, but there I was, stuck in his office during a last-minute tax panic, watching him demonstrate how to roll cake balls with his bare hands. “You’re overthinking it,” he said, dusting off his fingers. “Kids don’t care if it’s perfect. They care if it’s fun.” He was talking about his annual Thanksgiving class party, where he’d been making these no-bake turkey cake pops for a decade. And honestly? He was right. I’d been stressing about elaborate Thanksgiving desserts for weeks, and here was a guy who filed taxes by day and made adorable turkey cake pops by night. The contrast was so unexpected I nearly forgot I was late on my quarterly payments.
That conversation stuck with me. I mean, who expects to get a recipe from someone holding a calculator? But the more I thought about it, the more it made sense. This is exactly the kind of recipe you need when you’re already overwhelmed by turkey prep, pie crusts, and figuring out how many rolls to bake. It’s quick, it’s no-bake, and it uses store-bought ingredients so you can focus on the main event. No oven required, no candy thermometer, no stress. Just cake balls on a stick that look like adorable little turkeys.
So if you’re staring down a long Thanksgiving to-do list and wondering how you’ll find time to make something cute for the kids’ table, this is your answer. These no-bake turkey cake pops come together in under 30 minutes, and they’re so simple you can even get the kids involved. Maybe you’ve been there—standing in the baking aisle, overwhelmed by complicated recipes, wishing there was an easier way. Well, this is it. Let me show you how to make the cutest turkeys on the block without breaking a sweat.
Why You’ll Love This Recipe
Let me tell you why these no-bake turkey cake pops have become my go-to for every fall gathering. I’ve tested this recipe with my own kids, at school parties, and even for a grown-up Friendsgiving, and it never fails to get smiles. Here’s what makes them special:
- Quick & Easy: Ready in under 30 minutes, no baking required. Perfect for busy weeknights or last-minute classroom treats.
- Simple Ingredients: You only need store-bought cake, frosting, and candy melts. No fancy grocery trips needed—you likely already have everything.
- Perfect for Fall Gatherings: Great for Thanksgiving parties, classroom celebrations, or just a fun weekend project with the kids.
- Crowd-Pleaser: Kids and adults alike go crazy for these little turkeys. They’re cute enough to impress but simple enough to make with help.
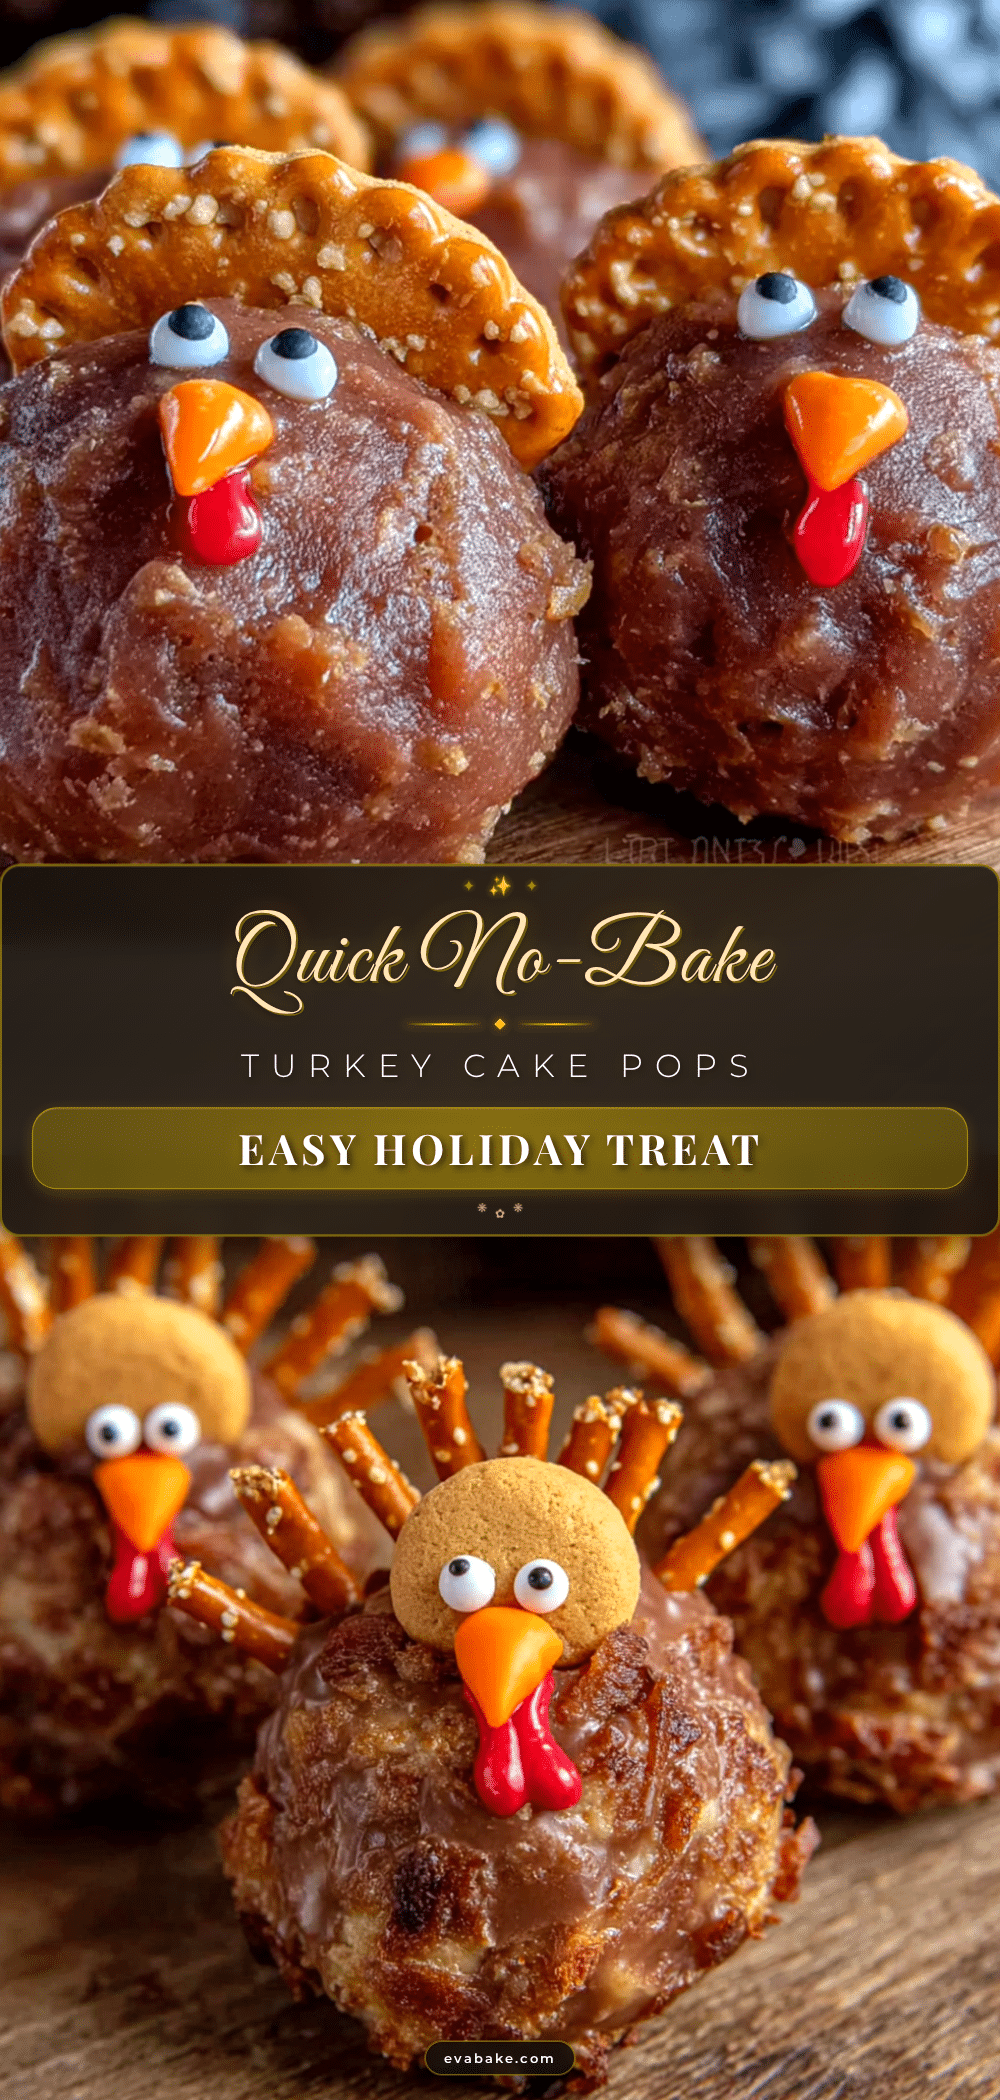
- Unbelievably Adorable: The candy corn feathers and candy eyes make these look like they came from a bakery. Your guests will think you spent hours on them.
What sets this recipe apart is the no-bake approach. Most cake pop recipes require you to bake a cake first, then crumble it, then chill it—that’s a lot of steps. But this version uses pre-made cake or even leftover cake scraps, so you skip the entire baking process. The secret is in the ratio of cake to frosting: too much frosting and they’re sticky, too little and they fall apart. I’ve nailed that balance so you don’t have to guess. Plus, the candy corn “feathers” create that perfect turkey silhouette without any fancy piping skills.
These aren’t just another cake pop recipe. They’re the kind of treat that makes you feel like a holiday hero without the holiday stress. Honestly, there’s something special about watching someone’s face light up when they see a cute little turkey on a stick. It’s comfort food reimagined—faster, simpler, but with the same soul-soothing satisfaction. Perfect for impressing guests without stress, or turning a simple fall afternoon into something memorable.
What Ingredients You Will Need
This recipe uses simple, store-bought ingredients to create adorable turkey cake pops without any baking. Most items are pantry staples or easy to find at any grocery store. Here’s what you’ll need:
- For the cake balls:
- 1 (15.25 oz) box vanilla or chocolate cake mix, prepared and cooled (or 3-4 cups leftover cake scraps)
- 1/2 cup vanilla frosting (store-bought or homemade)
- 1/4 cup chocolate frosting (for flavor depth, optional but recommended)
- For the coating:
- 12 oz chocolate candy melts (I recommend Wilton or Ghirardelli for best texture)
- 1 tablespoon coconut oil or vegetable shortening (to thin the coating)
- For the turkey decorations:
- 24 candy corn pieces (for the feathers)
- 24 candy eyes (the small ones, about 6mm)
- 12 orange candy melts or orange M&Ms (for the beak)
- 12 red candy melts or red M&Ms (for the wattle, the red dangly bit under the beak)
- For assembly:
- 12 lollipop sticks (6-inch size works best)
- 1 block of styrofoam or a cake pop stand (for drying)
- Wax paper or parchment paper (for work surface)
Ingredient tips from my kitchen: I’ve found that using a mix of vanilla and chocolate frosting gives the cake balls a richer flavor, like a black-and-white cookie. If you’re using leftover cake, make sure it’s completely cool—warm cake will make the frosting melt and create a sticky mess. For the candy melts, I prefer the Wilton brand because they melt smoothly and don’t seize up as easily. If you can’t find candy melts, you can use almond bark or even white chocolate chips mixed with a little shortening.
Substitution guidance: For a gluten-free version, use a gluten-free cake mix and gluten-free frosting. For dairy-free, use dairy-free cake mix, vegan frosting, and dairy-free chocolate chips instead of candy melts. You can also swap the candy corn for small pretzel sticks if you want a savory-sweet combo—just break them in half for the feathers. The possibilities are endless, but the classic candy corn version is always a hit.
Equipment Needed
You don’t need fancy equipment to make these turkey cake pops, but a few tools will make the process much smoother. Here’s what I recommend:
- Large mixing bowl: For crumbling the cake and mixing with frosting. I use a glass bowl because it doesn’t retain odors.
- Baking sheet: To hold the cake balls while they chill. Line it with wax paper for easy cleanup.
- Microwave-safe bowl: For melting the candy coating. A glass measuring cup works great because it’s easy to dip into.
- Lollipop sticks: Available at craft stores or online. Don’t use regular skewers—they’re too thick.
- Styrofoam block or cake pop stand: To hold the pops upright while the coating sets. A cardboard box with holes punched in it works in a pinch.
- Small piping bag or zip-top bag: For attaching the candy eyes and beaks with a tiny dab of melted coating.
- Tweezers (optional): For placing small decorations like candy eyes. It saves your fingers from getting sticky.
Budget-friendly tip: If you don’t have lollipop sticks, you can use sturdy pretzel rods instead—they add a salty crunch that complements the sweet cake. For the drying stand, I’ve used an egg carton with holes poked in it, and it worked perfectly. Don’t let missing equipment stop you from making these adorable turkeys.
Preparation Method
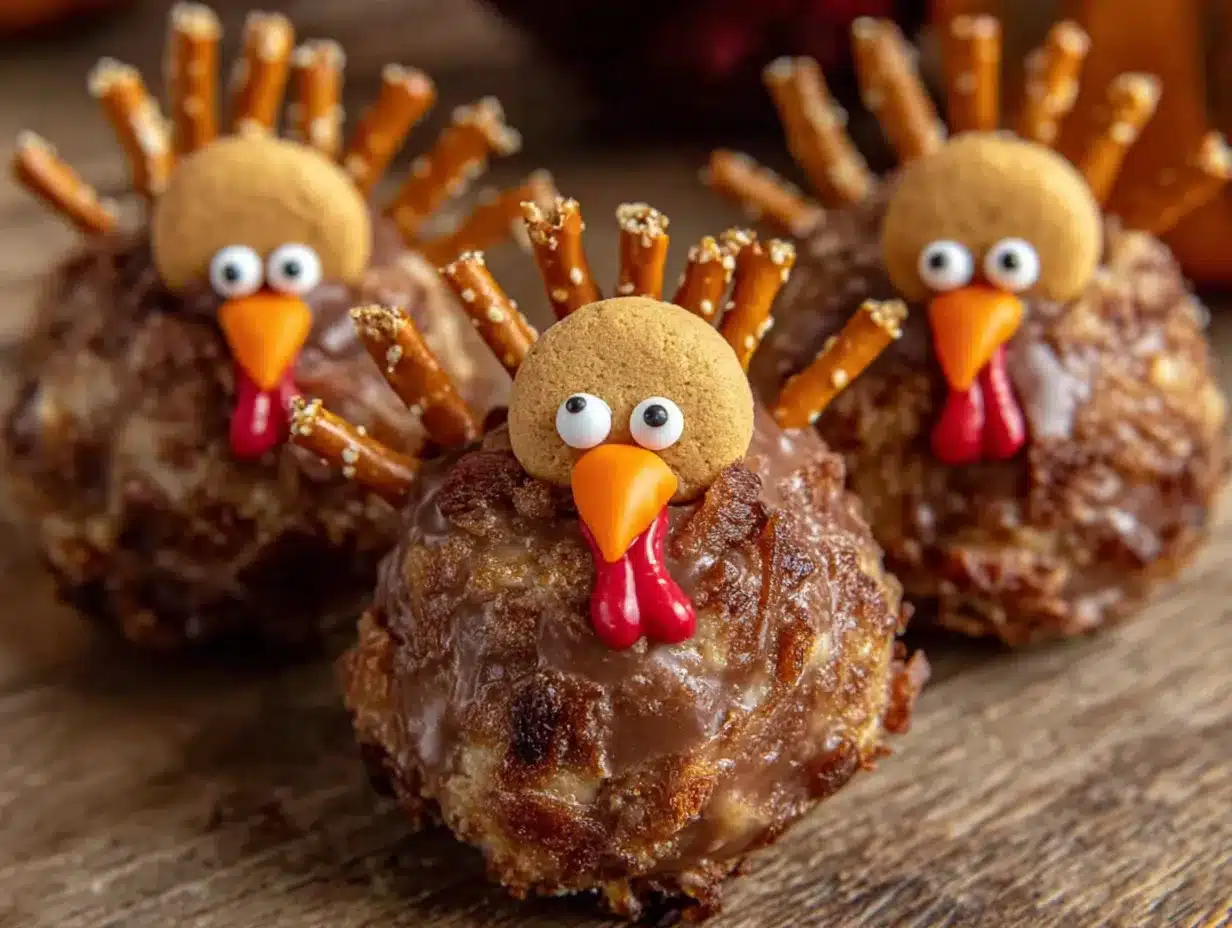
Follow these steps carefully, and you’ll have adorable turkey cake pops in no time. I’ve included sensory cues and troubleshooting tips so you know exactly what to look for at each stage.
- Prepare the cake base: If using a boxed cake mix, bake according to package directions and let cool completely. You want the cake to be at room temperature—warm cake will make the frosting melt and create a sticky, unworkable dough. If using leftover cake, crumble it into a large bowl with your hands. The crumbs should be fine, like wet sand, with no large chunks bigger than a pea. This usually takes about 2-3 minutes of rubbing the cake between your palms.
- Mix the dough: Add the vanilla frosting and chocolate frosting (if using) to the crumbled cake. Start with 1/3 cup of frosting and mix with a spatula or your hands. The mixture should hold together when squeezed but not feel greasy. If it’s too dry, add more frosting a tablespoon at a time. If it’s too wet, add more cake crumbs. The texture should be like play-dough—firm but pliable. I usually end up using about 1/2 cup total frosting. This step takes about 3-4 minutes.
- Form the cake balls: Scoop out about 2 tablespoons of the cake mixture and roll it into a smooth ball between your palms. You should get about 12 balls, each about 1.5 inches in diameter. Place them on a wax paper-lined baking sheet. If the mixture sticks to your hands, lightly dampen your palms with water. The balls should be smooth and crack-free. If you see cracks, the mixture is too dry—add a tiny bit more frosting. This step takes about 5 minutes.
- Chill the balls: Place the baking sheet in the refrigerator for at least 30 minutes, or up to 2 hours. Chilling is crucial—it firms up the cake balls so they don’t fall apart when you dip them. If you’re in a hurry, you can pop them in the freezer for 15 minutes, but don’t leave them longer or they’ll crack when you insert the sticks. The balls should feel firm to the touch, like a chilled truffle.
- Melt the candy coating: Place the candy melts in a microwave-safe bowl and microwave in 30-second intervals, stirring between each, until smooth. Add the coconut oil or shortening and stir until glossy. The coating should be thin enough to drip off a spoon but not watery. If it’s too thick, add more oil a few drops at a time. Be careful not to overheat—candy melts can seize up if they get too hot. The coating should be about 90°F, warm but not hot to the touch.
- Insert the sticks: Remove the cake balls from the refrigerator. Dip the tip of a lollipop stick into the melted coating, then insert it about halfway into a cake ball. The coating acts as glue, holding the stick in place. Don’t push the stick all the way through—it should be secure but not poking out the other side. Repeat with all 12 balls. Return them to the refrigerator for 5 minutes to set the stick in place.
- Dip the cake pops: Hold a cake pop by the stick and dip it into the melted coating, tilting the bowl to cover the entire ball. Lift it out and gently tap the stick on the edge of the bowl to remove excess coating. Don’t swirl or spin the pop—that can cause the cake ball to fall off. Let the excess drip off for a few seconds, then place the pop upright in your styrofoam block. Work quickly, as the coating sets fast. If the coating starts to thicken, reheat it for 10 seconds in the microwave. This step takes about 10-15 minutes for all 12 pops.
- Add the decorations: While the coating is still wet, insert 2 candy corn pieces into the top of each pop to form the turkey’s “feathers.” Place them at a slight angle, pointing outward like a fan. Then attach 2 candy eyes, 1 orange piece for the beak, and 1 red piece for the wattle. Use a tiny dab of melted coating as glue if needed. Work quickly—the coating sets in about 30 seconds. If it hardens before you finish, just dip the pop again in the melted coating and reattach the decorations. This step takes about 10 minutes.
- Let them set: Allow the cake pops to dry completely in the styrofoam block, about 15-20 minutes at room temperature. Don’t refrigerate them during this step—condensation can make the coating dull and streaky. Once set, they’re ready to serve or store.
Cooking Tips & Techniques
I’ve made these turkey cake pops more times than I can count, and I’ve learned a few tricks along the way. Here are my best tips for success:
- Don’t overmix the dough: I learned this the hard way after making a batch of cake balls that were dense and greasy. Mix just until the frosting is incorporated—overmixing breaks down the cake crumbs and releases too much moisture. You want the texture to be light and tender, not pasty.
- Chill thoroughly before dipping: This is non-negotiable. If the cake balls are even slightly warm, they’ll fall apart in the coating. I once rushed this step and ended up with a bowl of chocolate soup with cake chunks floating in it. Not cute. Give them at least 30 minutes in the fridge, or 15 in the freezer.
- Use the right coating consistency: The candy coating should be thin enough to drip off easily but thick enough to coat the cake ball in one dip. If it’s too thick, it will clump and look lumpy. If it’s too thin, it will run off and leave bare spots. The perfect consistency is like warm honey—it flows slowly but coats evenly.
- Tap, don’t swirl: When removing excess coating, tap the stick gently against the side of the bowl. Don’t swirl or spin the pop—that centrifugal force can send the cake ball flying across the kitchen. Trust me, I’ve cleaned chocolate off my ceiling before.
- Work in small batches: Only melt half the coating at a time. If you melt it all at once, it will start to thicken and harden before you’re done dipping. Keep the unused portion in the microwave and reheat as needed. This also prevents the coating from getting too hot and seizing.
- Plan your decoration order: Attach the candy corn feathers first, then the eyes, then the beak and wattle. The feathers need to go on while the coating is very wet so they stick. The eyes and beak can go on with a tiny dab of coating as glue. If you do it in the wrong order, you’ll smudge the eyes while trying to add the feathers.
My biggest failure? The first time I made these, I forgot to chill the cake balls before dipping. I was in a hurry (story of my life), and every single one fell apart in the coating. I ended up with a lumpy, messy pile of chocolate-covered cake crumbs. My kids still ate them, but they looked nothing like turkeys. Now I set a timer and walk away—no shortcuts on the chilling step.
Variations & Adaptations
These turkey cake pops are endlessly adaptable. Here are some of my favorite variations:
- Chocolate Lover’s Version: Use chocolate cake mix and chocolate frosting for the base, then coat with dark chocolate candy melts. Use candy corn for the feathers and white candy eyes for contrast. The rich chocolate flavor pairs beautifully with the sweet candy corn—it’s like a grown-up version.
- Peanut Butter Twist: Add 1/4 cup creamy peanut butter to the cake mixture for a salty-sweet flavor. Use a coating of milk chocolate candy melts. The peanut butter adds protein and makes these more filling—great for a classroom snack that won’t cause a sugar crash.
- Vegan-Friendly Option: Use a vegan cake mix and vegan frosting. For the coating, use dairy-free chocolate chips mixed with coconut oil. The candy corn is typically vegan, but check the label. The texture is slightly different with vegan ingredients, but they’re just as cute and delicious.
- Mini Turkey Bites: Instead of lollipop sticks, form the cake mixture into 1-inch balls and place them on a baking sheet. Dip them in the coating and decorate as directed. These are perfect for younger kids who might choke on the sticks, or for a grazing table where guests can grab them by hand.
- Seasonal Swaps: For Christmas, use red and green candy melts and add a tiny red nose to make Rudolph. For Easter, use pastel coating and add bunny ears made from marshmallows. The basic technique stays the same—just change the decorations to fit the holiday.
My personal favorite variation: I once made these with red velvet cake mix and cream cheese frosting, then coated them in white chocolate. The red “feathers” (I used red candy corn) against the white coating looked so festive for Valentine’s Day. My husband called them “angry birds” and ate four in one sitting. The cream cheese frosting adds a tangy note that cuts through the sweetness perfectly.
Serving & Storage Suggestions
These turkey cake pops are best served at room temperature, straight from the drying rack. The coating should be firm but not hard, and the cake center should be soft and tender. Arrange them on a platter with the feathers pointing up for maximum cuteness—they look like a flock of little turkeys.
Presentation ideas: Place them in a small vase or mason jar for a festive centerpiece. You can also stick them into a pumpkin or a block of styrofoam covered in fall-colored tissue paper. For a classroom party, arrange them on a tray with fall leaves (real or fake) scattered around. The visual impact is huge—guests will think you spent hours on them.
Complementary dishes: Serve these alongside other no-bake treats like pumpkin pie dip, caramel apples, or chocolate-covered pretzels. They pair beautifully with warm apple cider or a pumpkin spice latte. For a full Thanksgiving dessert table, they’re a fun contrast to traditional pies and cheesecakes.
Storage instructions: Store the cake pops in an airtight container at room temperature for up to 3 days. Do not refrigerate them—the cold can cause condensation on the coating, making it sticky and dull. If you need to store them longer, you can freeze them for up to 2 months. Place them in a single layer in a freezer-safe container, with wax paper between layers. Thaw at room temperature for about 30 minutes before serving.
Make-ahead tip: You can prepare the cake balls (without the sticks or coating) up to 2 days in advance. Keep them covered in the refrigerator. When you’re ready to serve, just insert the sticks, dip, and decorate. This is a lifesaver for busy Thanksgiving week—you can do the messy work ahead of time and finish the fun part on the day of the party.
How flavors develop: These cake pops actually taste better the next day. The flavors meld together as the cake absorbs the frosting, creating a more cohesive texture. The coating stays firm, but the center becomes almost truffle-like. If you can resist eating them all immediately, let them sit overnight for the best flavor.
Nutritional Information & Benefits
While these turkey cake pops are definitely a treat, they’re smaller than a slice of cake, making them a more portion-controlled dessert option. Here’s the estimated nutritional breakdown per pop (based on 12 servings):
- Calories: 220-250
- Total Fat: 10-12g
- Saturated Fat: 6-8g
- Carbohydrates: 32-35g
- Sugar: 24-28g
- Protein: 2-3g
- Sodium: 180-220mg
Health benefits of key ingredients: The cake provides quick energy from carbohydrates, perfect for active kids. The candy coating contains antioxidants from cocoa (if using dark chocolate), and the coconut oil used to thin the coating contains medium-chain triglycerides (MCTs) that are metabolized differently than other fats. Of course, these are treats, not health foods—but knowing what’s in them helps you make informed choices.
Dietary considerations: This recipe contains gluten (from the cake mix), dairy (from the frosting and candy melts), and soy (often in candy melts). For allergen-free versions, see the variations section. These are not suitable for low-carb or keto diets due to the high sugar content. For a lower-sugar option, use a sugar-free cake mix and sugar-free frosting, but note that the texture will be slightly different.
My wellness perspective: I believe in balance—enjoying treats like these in moderation, especially during holidays and celebrations. These cake pops are about joy, creativity, and making memories with loved ones. They’re not an everyday food, and that’s okay. The smile on a kid’s face when they see a turkey cake pop is worth every calorie. Just pair them with a balanced meal and plenty of water, and you’re good.
Conclusion
These no-bake turkey cake pops are proof that you don’t need to be a professional baker to create something adorable and delicious. They’re quick, simple, and perfect for busy weeknights or holiday gatherings when you’re already overwhelmed. The best part? They come together in under 30 minutes, using ingredients you can find at any grocery store.
I love this recipe because it’s more than just a dessert—it’s a memory maker. Whether you’re making them for a classroom party, a Friendsgiving gathering, or just a fun afternoon with your kids, these little turkeys bring smiles every time. The accountant who first showed me this recipe would be proud to know his simple idea has made so many people happy.
Now it’s your turn. Customize these cake pops with your favorite cake flavors, try different candy coatings, or swap the decorations for a different holiday. The basic technique is the same, and the possibilities are endless. I’d love to hear how yours turn out—drop a comment below and tell me about your turkey cake pop adventures. Did you try a fun variation? Did your kids help? Did you eat three before they made it to the party? (No judgment here!) Share your photos and tag me so I can see your creations. Happy fall, and happy baking—or should I say, happy no-baking!
Frequently Asked Questions
Can I use homemade cake instead of boxed mix?
Absolutely! Any cake recipe works, as long as it’s fully cooled and crumbled finely. Homemade cake often has a more tender crumb, which can make the cake balls softer. You might need slightly less frosting since homemade cake is usually more moist. Just adjust the frosting amount until the mixture holds together when squeezed.
Why did my cake pops fall off the sticks?
This usually happens for one of three reasons: the cake balls weren’t chilled enough, the coating was too thick, or you inserted the stick too far. Make sure the cake balls are thoroughly chilled (at least 30 minutes in the fridge), and dip the stick tip in melted coating before inserting it. Don’t push the stick all the way through—just halfway. Also, tap the stick gently to remove excess coating rather than swirling it.
Can I make these ahead of time for a party?
Yes! You can prepare the cake balls (without sticks or coating) up to 2 days ahead and keep them covered in the refrigerator. The day of the party, insert the sticks, dip in coating, and decorate. The finished cake pops will keep at room temperature for up to 3 days in an airtight container. You can also freeze them for up to 2 months—just thaw at room temperature before serving.
What can I use instead of candy melts?
If you can’t find candy melts, you can use almond bark, white chocolate chips, or even regular chocolate chips mixed with a little coconut oil or shortening. For a naturally colored coating, try melting white chocolate and adding food coloring. Just be careful not to get water in the chocolate—it will seize up and become grainy. Always use oil-based coloring, not water-based.
How do I keep the candy corn feathers from falling off?
The key is to attach the candy corn while the coating is still very wet. Insert them immediately after dipping, before the coating starts to set. If the coating has already hardened, you can dab a tiny bit of melted coating on the back of the candy corn and press it onto the pop. Hold it in place for about 10 seconds until it sticks. Also, make sure your candy corn isn’t stale—old candy corn is harder and won’t stick as well.
Pin This Recipe!
Easy No-Bake Turkey Cake Pops: Perfect Fall Treat
These no-bake turkey cake pops are quick, simple, and perfect for busy weeknights or holiday gatherings. They come together in under 30 minutes using store-bought ingredients, making them an adorable and stress-free treat for Thanksgiving or any fall celebration.
- Prep Time: 15 minutes
- Cook Time: 0 minutes
- Total Time: 30 minutes
- Yield: 12 servings 1x
- Category: Dessert
- Cuisine: American
Ingredients
- 1 (15.25 oz) box vanilla or chocolate cake mix, prepared and cooled (or 3–4 cups leftover cake scraps)
- 1/2 cup vanilla frosting (store-bought or homemade)
- 1/4 cup chocolate frosting (optional, for flavor depth)
- 12 oz chocolate candy melts (e.g., Wilton or Ghirardelli)
- 1 tablespoon coconut oil or vegetable shortening
- 24 candy corn pieces
- 24 candy eyes (about 6mm)
- 12 orange candy melts or orange M&Ms
- 12 red candy melts or red M&Ms
- 12 lollipop sticks (6-inch)
- 1 block of styrofoam or a cake pop stand
- Wax paper or parchment paper
Instructions
- Prepare the cake base: If using a boxed cake mix, bake according to package directions and let cool completely. Crumble the cooled cake into a large bowl with your hands until the crumbs are fine, like wet sand, with no large chunks bigger than a pea.
- Mix the dough: Add the vanilla frosting and chocolate frosting (if using) to the crumbled cake. Start with 1/3 cup of frosting and mix with a spatula or your hands. The mixture should hold together when squeezed but not feel greasy. If too dry, add more frosting a tablespoon at a time; if too wet, add more cake crumbs. The texture should be like play-dough—firm but pliable. Use about 1/2 cup total frosting.
- Form the cake balls: Scoop out about 2 tablespoons of the cake mixture and roll into smooth balls between your palms. You should get about 12 balls, each about 1.5 inches in diameter. Place them on a wax paper-lined baking sheet. If the mixture sticks to your hands, lightly dampen your palms with water.
- Chill the balls: Place the baking sheet in the refrigerator for at least 30 minutes, or up to 2 hours. For a quicker option, freeze for 15 minutes. The balls should feel firm to the touch, like a chilled truffle.
- Melt the candy coating: Place the candy melts in a microwave-safe bowl and microwave in 30-second intervals, stirring between each, until smooth. Add the coconut oil or shortening and stir until glossy. The coating should be thin enough to drip off a spoon but not watery. Be careful not to overheat.
- Insert the sticks: Remove the cake balls from the refrigerator. Dip the tip of a lollipop stick into the melted coating, then insert it about halfway into a cake ball. Repeat with all 12 balls. Return them to the refrigerator for 5 minutes to set the stick in place.
- Dip the cake pops: Hold a cake pop by the stick and dip it into the melted coating, tilting the bowl to cover the entire ball. Lift it out and gently tap the stick on the edge of the bowl to remove excess coating. Place the pop upright in your styrofoam block. Work quickly, as the coating sets fast. If the coating starts to thicken, reheat it for 10 seconds in the microwave.
- Add the decorations: While the coating is still wet, insert 2 candy corn pieces into the top of each pop to form the turkey’s ‘feathers’ at a slight angle, pointing outward. Then attach 2 candy eyes, 1 orange piece for the beak, and 1 red piece for the wattle. Use a tiny dab of melted coating as glue if needed. Work quickly—the coating sets in about 30 seconds.
- Let them set: Allow the cake pops to dry completely in the styrofoam block, about 15-20 minutes at room temperature. Do not refrigerate during this step. Once set, they’re ready to serve or store.
Notes
Chill the cake balls thoroughly before dipping to prevent them from falling apart. Use a mix of vanilla and chocolate frosting for richer flavor. For gluten-free, use gluten-free cake mix and frosting. For dairy-free, use dairy-free alternatives. Store in an airtight container at room temperature for up to 3 days. Can be frozen for up to 2 months.
Nutrition
- Serving Size: 1 cake pop
- Calories: 235
- Sugar: 26
- Sodium: 200
- Fat: 11
- Saturated Fat: 7
- Carbohydrates: 33
- Protein: 2.5
Keywords: turkey cake pops, no-bake, Thanksgiving dessert, fall treat, easy cake pops, kids dessert, holiday treat