Introduction
That cool, sweet burst of fresh berries on a warm summer afternoon—still takes me right back to those slow, golden evenings on my grandmother’s porch. The kind where the sun sinks low, and the hum of cicadas mixes with laughter and clinking glasses. I remember grabbing a simple jar of layered strawberries, blueberries, and whipped cream, spooning it up without a care for fancy plates or fuss. It was messy, yes, but somehow perfect. The texture of fluffy cake soaked just right, the tartness of berries balancing the creamy sweetness, all tucked inside a glass jar that felt homemade and honest.
Creating these Easy No-Bake Patriotic Berry Trifle Jars brings back that same feeling of effortless joy. No oven needed, no complicated steps—just layering vibrant red, white, and blue elements that make summer gatherings feel special. Honestly, it’s the kind of recipe you can throw together while chatting with friends or keeping an eye on the grill, and still have time to savor the moment.
What stuck with me is how this recipe manages to be both nostalgic and fresh—a reminder of simple pleasures but with a modern twist. The jars make it personal, festive, and mess-free, which is a total win for summer dessert magic. If you’ve ever wanted a dessert that tastes like a celebration but feels like home, this one’s for you.
Why You’ll Love This Recipe
After trying dozens of berry desserts over the years, these trifle jars have earned their spot as my go-to summer treat. Here’s why they always come through:
- Quick & Easy: Ready in under 20 minutes, perfect for last-minute celebrations or casual get-togethers.
- Simple Ingredients: You probably have most of these in your pantry or fridge already—no special shopping trips required.
- Ideal for Summer Parties: Whether it’s the Fourth of July, backyard BBQs, or picnics, these jars bring the perfect patriotic vibe.
- Crowd-Pleaser: Kids love the bright colors and creamy layers, while adults appreciate the light, fresh flavors.
- Unbelievably Delicious: The interplay of moist cake, fluffy whipped cream, and juicy berries hits all the right notes.
This recipe isn’t just another layered dessert. The secret lies in using store-bought angel food cake for that soft, airy texture combined with a lightly sweetened cream base that’s not overpowering. And the berries? I like to toss them with a hint of lemon zest and sugar to brighten their natural flavors before layering.
It’s the kind of dessert that makes you close your eyes after the first bite, savoring the cool creaminess and fresh fruit. Plus, serving in individual jars means no slicing or messy plates—just grab, dig in, and enjoy. It’s a simple way to make summer feel a little more special without the fuss.
What Ingredients You Will Need
This recipe uses straightforward, wholesome ingredients that come together beautifully to create layers of flavor and texture without any complicated prep. Most are pantry staples or easy to find fresh at the market during berry season.
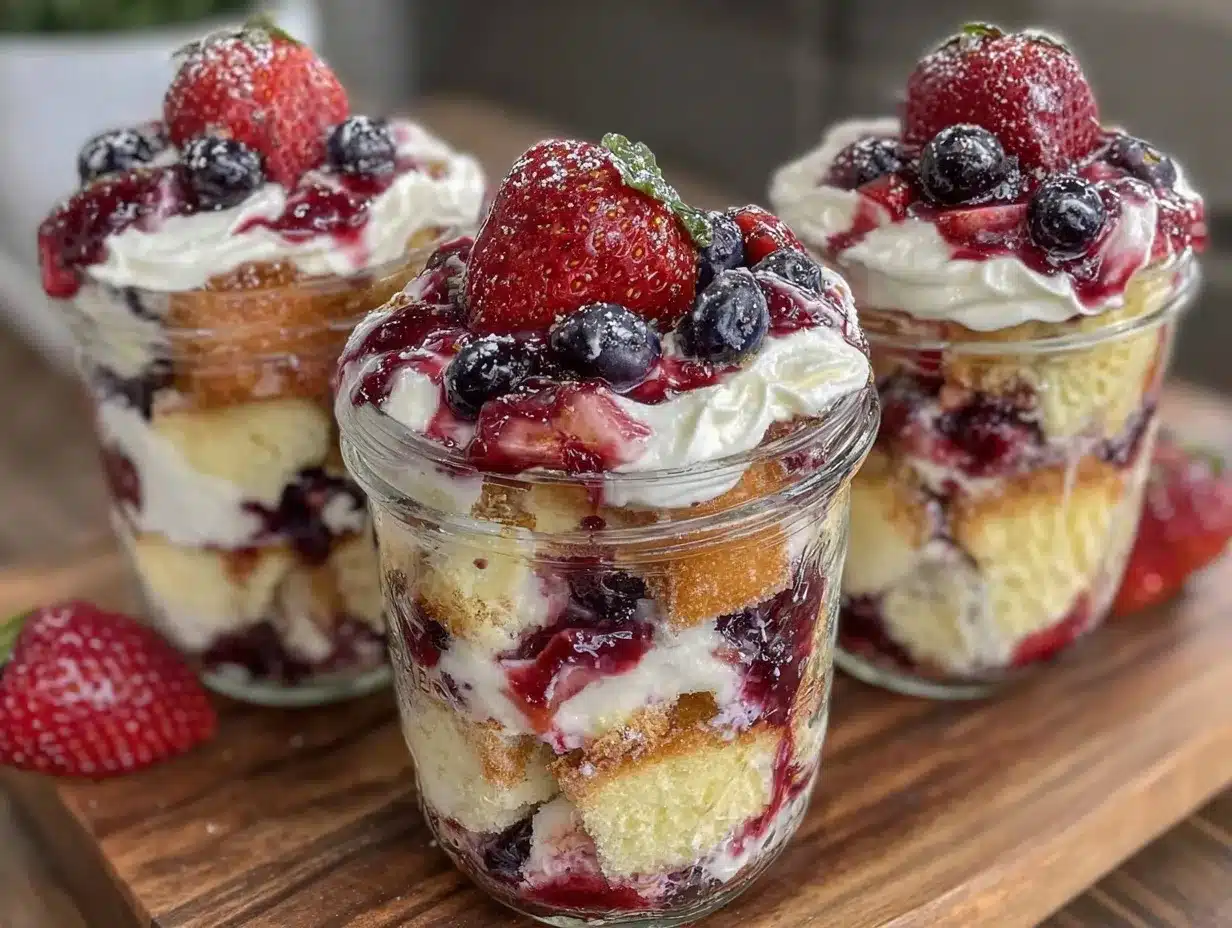
- Angel Food Cake: About 8 ounces (225 g), store-bought or homemade, cut into 1-inch cubes. Its light texture soaks up the flavors without getting soggy.
- Fresh Strawberries: 1 cup (150 g), hulled and sliced. Choose firm, ripe berries for the best sweetness.
- Fresh Blueberries: 1 cup (150 g), washed and drained. Look for plump, deep blue berries for a juicy pop.
- Whipped Cream: 1 cup (240 ml), lightly sweetened. I recommend using heavy whipping cream for that rich, silky mouthfeel. You can also use a quality store-bought whipped topping for convenience.
- Greek Yogurt: 1/2 cup (120 g), plain and full-fat. This adds a subtle tang and creamy texture that balances the sweetness.
- Lemon Zest: 1 teaspoon, freshly grated, to brighten the berry flavors.
- Granulated Sugar: 2 tablespoons, to gently sweeten the berries and cream mixture.
- Vanilla Extract: 1 teaspoon, pure, to enhance the creaminess and add warmth.
Optional: A handful of fresh mint leaves for garnish or a sprinkle of toasted almonds for crunch if you want a little texture contrast.
If you want to switch things up, you can swap Greek yogurt with dairy-free coconut yogurt, making it suitable for lactose intolerance. For a gluten-free version, make sure your angel food cake is gluten-free or substitute with gluten-free sponge cake.
Equipment Needed
Making these Easy No-Bake Patriotic Berry Trifle Jars doesn’t require fancy tools, which is part of why I keep coming back to this recipe. Here’s what you’ll want on hand:
- Mixing Bowls: Two medium-sized bowls for tossing berries and whipping cream.
- Hand Mixer or Stand Mixer: For whipping the cream to soft peaks. If you don’t have one, a whisk and a bit of patience can work too.
- Measuring Cups and Spoons: Precision helps but eyeballing works when you’re in a hurry.
- Glass Jars or Small Cups: About 8-ounce (240 ml) capacity. Mason jars are perfect for presentation and portability.
- Spatula or Spoon: For folding the cream and layering the jars.
I’ve tried making this recipe with plastic cups when hosting large picnics—works fine, but the glass jars just feel more festive and hold the layers better. Plus, jars are reusable and easy to store leftovers.
Preparation Method
- Prepare the Berries (5 minutes): In a bowl, combine sliced strawberries, blueberries, lemon zest, and 1 tablespoon sugar. Toss gently and let sit while you prepare the cream. This helps the berries release natural juices and get a little sweeter.
- Whip the Cream (5-7 minutes): In a chilled bowl, beat heavy cream with the remaining 1 tablespoon sugar and vanilla extract until soft peaks form. Fold in Greek yogurt gently to keep it airy but add a nice tangy creaminess.
- Cube the Angel Food Cake (2 minutes): Cut the cake into 1-inch (2.5 cm) cubes. Try not to handle too much, or it can crumble.
- Assemble the Trifle Jars (8 minutes): Start by placing a layer of cake cubes at the bottom of each jar (about 1/3 cup or 40 g). Spoon a layer of the berry mixture over the cake (about 2 tablespoons). Next, add a generous dollop of the whipped cream mixture (about 3 tablespoons). Repeat layers until jars are full, ending with whipped cream on top.
- Chill (at least 30 minutes): Refrigerate the jars to let the flavors meld and the cake soak up berry juices slightly. This step makes a big difference in taste and texture.
- Garnish and Serve: Just before serving, add a few whole berries and a mint leaf on top for a fresh, festive look.
Pro tip: If the whipped cream starts to deflate while folding in the yogurt, stop folding immediately to keep it light. Also, layering quickly helps keep the cake from absorbing too much moisture and turning mushy.
Cooking Tips & Techniques
One thing I’ve learned is that timing and layering are everything with this no-bake trifle. You want the cake to absorb just enough berry juice to be moist but not soggy. Here’s what helped me the most:
- Use fresh, firm berries: Juicier berries can make the trifle watery, so pick ones that hold their shape well.
- Don’t over-whip the cream: Soft peaks give you the best texture—stiff peaks can feel heavy.
- Fold yogurt gently: This keeps the cream mixture fluffy and adds a nice tang.
- Layer carefully: Use a small spoon or piping bag for neater layers, especially if you’re serving at a party.
- Chill before serving: At least 30 minutes helps flavors meld and texture settle.
I once skipped the chilling step in a rush and ended up with a dessert that was too loose and didn’t hold the layers well. Lesson learned—patience pays off! Also, if you’re juggling other dishes, like crispy air fryer chicken wings, this trifle is a perfect hands-off dessert you can prep ahead.
Variations & Adaptations
One of the best things about this recipe is how easy it is to tweak to fit your taste or dietary needs. Here are some ideas I’ve tried or thought about:
- Berry Swaps: Try raspberries or blackberries instead of blueberries for a different flavor profile. During summer, fresh peaches or mango chunks work wonderfully too.
- Dairy-Free Version: Replace heavy cream and Greek yogurt with coconut cream and coconut yogurt for a luscious tropical twist.
- Chocolate Layer: Add a thin layer of chocolate pudding or drizzle melted dark chocolate between layers for a festive twist.
- Spiced Cream: Stir in a pinch of cinnamon or cardamom to the whipped cream mixture for warmth and complexity.
- Mini Trifles for Kids: Use smaller jars or even clear plastic cups and add colorful sprinkles between layers for a fun, kid-friendly version.
Personally, I once made a batch with a mix of angel food cake and cubes of blueberry lemon poke cake for a more citrusy twist—definitely a crowd-pleaser at our summer picnic!
Serving & Storage Suggestions
These trifle jars are best served chilled, straight from the fridge. The cool cream mixed with the fresh berries is incredibly refreshing on a hot day. I like to serve them alongside light dishes like grilled chicken or a crisp salad—think something like the creamy cucumber dill salad to keep the meal balanced and fresh.
Store any leftovers tightly covered in the refrigerator for up to 2 days. The flavors actually get better as the cake absorbs more of the berry juices, but the texture can get softer, so if you’re planning to serve later, keep the layers a little thicker.
To reheat? Honestly, these are best cold. If you want to serve them slightly less chilled, remove from the fridge about 20 minutes before eating.
Nutritional Information & Benefits
Each jar offers a balanced treat with fresh fruit, protein from the yogurt, and a light touch of sweetness. Roughly estimated per serving:
| Nutrient | Amount |
|---|---|
| Calories | 220-250 kcal |
| Protein | 5-7 g |
| Fat | 10-12 g |
| Carbohydrates | 30-35 g |
| Fiber | 3-4 g |
The berries contribute antioxidants and vitamins, while the Greek yogurt adds probiotics and protein. This dessert feels indulgent but doesn’t weigh you down, making it a great choice for summer gatherings when you want something sweet and satisfying without the heaviness.
Conclusion
These Easy No-Bake Patriotic Berry Trifle Jars perfectly capture the spirit of summer—bright, fresh, and effortless. They bring a splash of color and a burst of flavor to any celebration, whether it’s a holiday barbecue or a simple weekend treat. I love how you can customize them with your favorite fruits or cream variations while still keeping the heart of the recipe intact.
Give this recipe a try next time you want a dessert that looks charming but doesn’t demand hours in the kitchen. And if you end up making a batch, I’d love to hear how you tweaked it or what memories it brought back for you.
After all, the best desserts are the ones that taste like home, no matter the occasion.
FAQs about Easy No-Bake Patriotic Berry Trifle Jars
Can I make these trifle jars ahead of time?
Yes! They actually taste better after chilling for at least 30 minutes, and you can prepare them up to a day in advance. Just keep them covered in the fridge.
What can I use instead of angel food cake?
You can substitute with sponge cake, pound cake, or even store-bought ladyfingers. Just cut them into similar-sized cubes for layering.
Is there a vegan option for this recipe?
Absolutely! Use coconut cream whipped into soft peaks instead of heavy cream, and coconut yogurt or a plant-based yogurt alternative instead of Greek yogurt.
How do I keep the layers from getting soggy?
Don’t assemble too far ahead, and be gentle when layering to avoid crushing the cake. Chilling helps the layers set nicely without becoming mushy.
Can I use frozen berries?
Fresh berries are best, but if you use frozen, thaw and drain them well to prevent excess moisture from making the trifle watery.
Pin This Recipe!

Easy No-Bake Patriotic Berry Trifle Jars

A quick and easy no-bake dessert featuring layers of angel food cake, fresh berries, and whipped cream, perfect for summer gatherings and patriotic celebrations.
- Prep Time: 15 minutes
- Cook Time: 0 minutes
- Total Time: 45 minutes
- Yield: 6 servings 1x
- Category: Dessert
- Cuisine: American
Ingredients
- 8 ounces angel food cake, cut into 1-inch cubes
- 1 cup fresh strawberries, hulled and sliced
- 1 cup fresh blueberries, washed and drained
- 1 cup whipped cream, lightly sweetened
- 1/2 cup plain full-fat Greek yogurt
- 1 teaspoon lemon zest, freshly grated
- 2 tablespoons granulated sugar
- 1 teaspoon pure vanilla extract
- Optional: fresh mint leaves for garnish
- Optional: toasted almonds for crunch
Instructions
- Prepare the berries: In a bowl, combine sliced strawberries, blueberries, lemon zest, and 1 tablespoon sugar. Toss gently and let sit while you prepare the cream.
- Whip the cream: In a chilled bowl, beat heavy cream with the remaining 1 tablespoon sugar and vanilla extract until soft peaks form. Fold in Greek yogurt gently.
- Cube the angel food cake into 1-inch cubes.
- Assemble the trifle jars: Place a layer of cake cubes (about 1/3 cup or 40 g) at the bottom of each jar. Spoon a layer of the berry mixture (about 2 tablespoons) over the cake. Add a generous dollop of the whipped cream mixture (about 3 tablespoons). Repeat layers until jars are full, ending with whipped cream on top.
- Chill the jars in the refrigerator for at least 30 minutes to let flavors meld and cake soak up berry juices.
- Garnish with a few whole berries and a mint leaf just before serving.
Notes
Use fresh, firm berries to avoid watery trifle. Do not over-whip the cream; soft peaks are best. Fold yogurt gently to keep cream airy. Chill at least 30 minutes before serving for best texture. Optional garnishes include fresh mint leaves or toasted almonds. For dairy-free, substitute coconut cream and coconut yogurt. For gluten-free, use gluten-free angel food or sponge cake.
Nutrition
- Serving Size: One 8-ounce jar
- Calories: 235
- Sugar: 20
- Sodium: 90
- Fat: 11
- Saturated Fat: 7
- Carbohydrates: 32
- Fiber: 3.5
- Protein: 6
Keywords: no-bake dessert, berry trifle, patriotic dessert, summer dessert, easy trifle jars, angel food cake dessert