“You sure that’s injera?” my friend asked, peering skeptically over the rim of her glass as I slid the warm flatbread across the table. Honestly, I wasn’t quite sure myself. The first time I attempted injera without teff, I was armed only with curiosity and a kitchen full of pantry staples, barely expecting this tangy, spongy flatbread to actually come together. The usual teff flour is notoriously tricky to find and pricey, but there I was, improvising with a blend of white and whole wheat flours, hoping for a miracle.
The sour aroma filled the kitchen, a hint of that familiar fermented tang, and as it cooked, bubbles bubbled up like little craters, promising the airy texture I craved. When I finally tore off a piece and tasted it with a hearty stew, it felt like a comforting hug from a distant place. This wasn’t just a substitute—it was a revelation. Injera without teff? Who would’ve thought?
Since that accidental win, I’ve made this recipe a dozen times, tweaking the fermentation times and flour ratios. It quickly became my go-to for Ethiopian-inspired dinners, especially when I’m craving that authentic experience without the fuss of hunting down teff. The best part? You don’t need special ingredients or complicated tools. Just a little patience, some basic flours, and you’re on your way to fluffy, tangy injera that holds up perfectly for scooping up spicy stews or drizzling with honey for a sweeter twist.
There’s something quietly satisfying about mastering this flatbread from scratch. It’s not just about the bread itself but the ritual—the waiting, the watching bubbles form, the smell that hints at something special. For me, this easy homemade recipe stuck because it’s a gentle reminder that great food doesn’t always need fancy ingredients, just a little love and a dash of creativity.
Why You’ll Love This Fluffy Injera Flatbread Without Teff Recipe
This recipe has become a staple in my kitchen, and here’s why it might just become yours too:
- Quick & Easy: The batter comes together quickly, and while fermentation takes some time, the actual hands-on prep is less than 15 minutes—perfect for busy weeknights or when you want a laid-back weekend project.
- Simple Ingredients: No need to hunt for teff flour or exotic grains. White and whole wheat flours, a bit of yeast, and some natural fermentation—ingredients you probably already have.
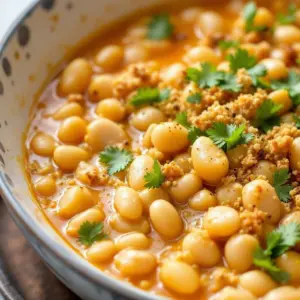
- Perfect for Sharing: Whether it’s a cozy dinner with family or an unexpected guest, injera is a communal flatbread that brings everyone to the table. It pairs beautifully with spicy stews, like the kind I often serve alongside my hearty chicken tortilla soup for a comforting fusion meal.
- Crowd-Pleaser: The texture is light and fluffy, with just the right amount of tang, so it wins over skeptics and fans of traditional injera alike.
- Unbelievably Delicious: The natural fermentation creates a depth of flavor that’s surprisingly complex for such a simple bread. This isn’t your average flatbread—it’s a soft, spongy canvas for bold flavors.
What sets this recipe apart is the little fermentation trick I learned along the way—it creates that signature sourness without needing teff. Plus, balancing white and whole wheat flour gives it just enough heft without sacrificing fluffiness. It’s like comfort food reimagined for home cooks who want authenticity without complexity.
Honestly, this recipe isn’t just about making bread; it’s about making memories around the table. I remember how I felt the first time I served it: a quiet pride mixed with relief that I’d cracked the code without the usual ingredients. If you’ve ever been intimidated by injera, this easy homemade version promises a friendly, approachable way to enjoy one of Ethiopia’s best-loved staples.
What Ingredients You Will Need
This recipe uses simple, wholesome ingredients to deliver that bold, tangy flavor and airy texture without the fuss of specialty grains. Most are pantry staples, making it super convenient.
- All-purpose flour: 2 cups (240g) – forms the base of the batter, providing lightness and structure.
- Whole wheat flour: 1 cup (120g) – adds a subtle nutty flavor and helps mimic the earthiness of teff.
- Instant yeast: 1 teaspoon – jumpstarts fermentation and helps create bubbles for fluffiness.
- Baking soda: 1/2 teaspoon – added just before cooking to boost the rise and lightness.
- Salt: 1 teaspoon – balances flavors.
- Water: Approximately 3 cups (720 ml), lukewarm – to create a thin, pourable batter. Adjust as needed.
- Lemon juice or apple cider vinegar: 1 tablespoon – adds acidity to help with fermentation and flavor.
You can find quality flour brands like King Arthur or Bob’s Red Mill for consistent results. The yeast should be fresh for best fermentation results. If you want to try a gluten-free twist, I’ve had luck swapping in a mix of sorghum and rice flour, but the texture will be a bit different.
For the naturally tangy flavor, the fermentation process is key. I like to let the batter rest overnight or up to 24 hours in a warm spot. If you’re short on time, a 6-hour ferment still works, but the flavor is milder.
And if you’re feeling adventurous, a little bit of millet or buckwheat flour (about 1/4 cup) mixed in can add an earthy note reminiscent of traditional injera.
Equipment Needed
- Large mixing bowl: For combining and fermenting the batter comfortably.
- Whisk or wooden spoon: To mix the batter well and incorporate air.
- Non-stick skillet or cast iron pan: A heavy-bottomed skillet around 10-12 inches works best for even cooking. I personally prefer cast iron because it retains heat so well and creates that perfect bubbly surface.
- Lid for the skillet: Needed to cover the bread while cooking, trapping steam to help it cook through and stay moist.
- Measuring cups and spoons: Precision matters when balancing flour and liquids.
- Ladle: For pouring batter evenly into the pan.
If you don’t have a cast iron pan, a good quality non-stick skillet will do the trick. Just avoid thin pans that heat unevenly. Also, keeping a clean kitchen towel nearby helps with the resting and covering steps.
Preparation Method
- Mix the flours and yeast: In your large mixing bowl, combine 2 cups (240g) all-purpose flour, 1 cup (120g) whole wheat flour, and 1 teaspoon instant yeast. Whisk them together so everything is evenly distributed. This base gives you the perfect blend to replicate the classic injera texture without teff. (Prep time: 5 minutes)
- Add water and acid: Slowly pour in about 3 cups (720 ml) of lukewarm water along with 1 tablespoon lemon juice or apple cider vinegar. Stir with your whisk or spoon until you have a thin, smooth batter—about the consistency of heavy cream. You might need to add a splash more water if the batter feels too thick. (Prep time: 5 minutes)
- Ferment the batter: Cover the bowl loosely with a kitchen towel or plastic wrap and leave it in a warm spot for 12 to 24 hours. You’ll see bubbles forming on the surface, and the batter will develop a pleasantly sour aroma. This fermentation is what creates the signature tang and airy texture. (Fermentation time: 12-24 hours)
- Prepare to cook: Just before cooking, stir in 1/2 teaspoon baking soda and 1 teaspoon salt. The baking soda reacts with the acid from fermentation to lighten the batter, making the injera fluffier. The batter might bubble up a bit—this is good!
- Heat your skillet: Warm your non-stick or cast iron skillet over medium heat. Lightly grease with a tiny bit of oil or cooking spray if needed, but traditional injera is typically cooked dry. The pan should be hot but not smoking.
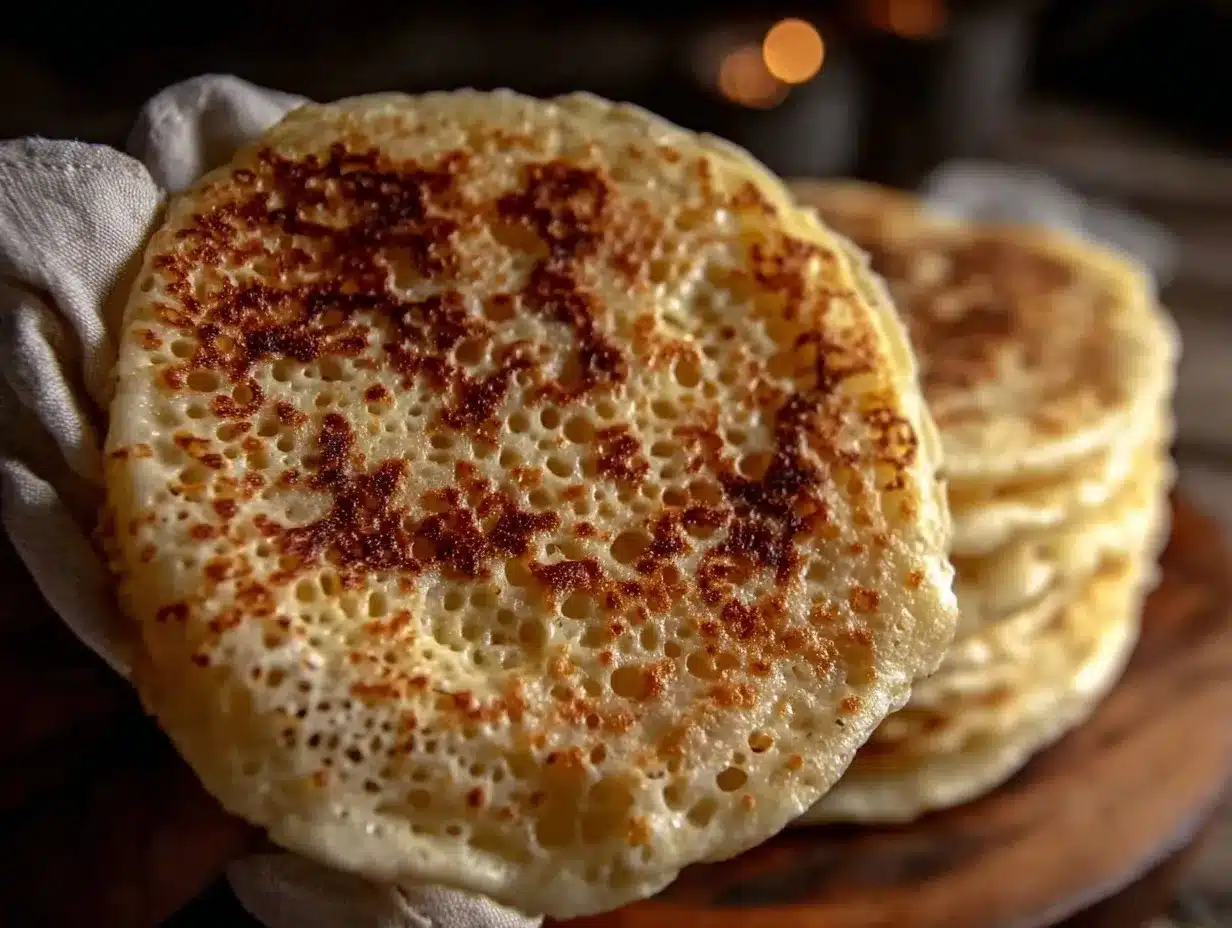
- Cook the injera: Using a ladle, pour about 1/3 to 1/2 cup (80-120 ml) of batter into the pan, swirling the pan slightly to spread the batter evenly into a thin, round flatbread about 9-10 inches in diameter. Immediately cover with a lid to trap steam. Cook until the surface is filled with bubbles and looks dry, about 2 to 3 minutes. The bottom should be lightly golden, but not flipped or browned like a pancake.
- Remove and cool: Carefully lift the injera with a spatula and transfer to a clean kitchen towel or plate. Repeat with the remaining batter, stacking the injera so they stay soft. (Cooking time per injera: 2-3 minutes)
- Serve: Injera is best served warm, torn into pieces for scooping up stews or dips. It also keeps well covered at room temperature for a day or two.
Common hiccups: If your injera is too thick, thin the batter with a little water. If it tears easily, your pan might be too hot or the batter too thin. And remember, patience with fermentation really pays off here!
Cooking Tips & Techniques for Fluffy Injera Without Teff
Making injera without teff can feel like walking a tightrope between authentic texture and improvisation, but a few tips make it a breeze:
- Fermentation matters: Letting the batter sit in a warm spot overnight develops the sour flavor and creates those signature bubbles. I’ve learned that even a 6-hour ferment can work if you’re short on time, but the flavor deepens with longer fermentation.
- Use the baking soda at the last moment: Adding baking soda right before cooking gives injera its fluffiness. Don’t add it too early or you’ll lose the leavening effect.
- Pan temperature is key: Medium heat works best. Too hot, and the injera will burn on the bottom before cooking through; too low, and it won’t bubble properly. I often test with a small pour first.
- Cover while cooking: Injera cooks only on one side, so covering the pan traps steam and cooks the top through without flipping. This also helps keep the surface moist and tender.
- Thin batter is your friend: The batter should be pourable, similar to crepe batter but slightly thinner than pancake batter. If it’s thick, the injera won’t get those beautiful holes and texture.
- Practice patience: It takes a couple of tries to get the perfect consistency and temperature dialed in. My first few batches were lumpy or too dense, but once you get the hang of the rhythm, it becomes second nature.
I remember once rushing the fermentation because I was hungry, and the injera was bland and cakey. Lesson learned: patience adds flavor and texture no mixer or ingredient can replace.
Variations & Adaptations
One of the best things about making injera at home is how adaptable it can be:
- Gluten-Free Version: Swap the all-purpose and whole wheat flours with a blend of teff-free gluten-free flours like sorghum, millet, and rice flour. Use xanthan gum to bind if needed. The texture will be slightly different but still tasty.
- Spiced Injera: Add a pinch of ground fenugreek or cardamom into the batter for a subtle warm flavor twist that pairs beautifully with spicy stews.
- Shorter Fermentation: For a milder injera, ferment the batter for only 6-8 hours in a warm place. This is great if you’re pressed for time but still want some tang.
- Sweet Injera: Skip the acid and baking soda, add a tablespoon of honey or sugar, and serve warm with butter and honey drizzled on top for a breakfast twist.
Personally, I love trying different flour blends depending on what’s in my pantry, and sometimes I add a few tablespoons of sourdough starter if I have it handy to boost flavor and heighten fermentation.
Serving & Storage Suggestions
Serve your fluffy injera warm, ideally fresh from the pan. It’s perfect for tearing by hand and scooping up stews, lentils, or vegetable curries. For a cozy meal, I like serving it alongside something like my hearty ham and bean soup or a robust lentil stew.
If you’re storing leftover injera, wrap it tightly in plastic wrap or place it in an airtight container. It keeps well in the refrigerator for up to 3 days. Gently reheat by steaming or warming in a covered skillet over low heat to keep it soft and pliable.
Freezing is possible—separate each injera with parchment paper and store in a freezer-safe bag. Thaw in the fridge overnight and steam or warm before serving.
Flavors tend to mellow and deepen after a day, so leftovers can be even better the next day, especially if you like a more pronounced tang.
Nutritional Information & Benefits
This injera flatbread variation is naturally low in fat and a good source of carbohydrates for energy. Using whole wheat flour adds fiber, helping with digestion. The natural fermentation helps break down some of the phytic acid in the flours, making minerals more available and easier to digest.
Estimated per serving (one piece about 9-10 inches):
| Calories | 130-150 |
|---|---|
| Carbohydrates | 28g |
| Protein | 4g |
| Fiber | 3g |
| Fat | 0.5g |
This recipe is naturally vegan and can be made gluten-free with flour substitutions. Always check for cross-contamination if you have allergies. The fermentation process also contributes to gut-friendly bacteria, which is a nice bonus.
Conclusion
Fluffy injera flatbread without teff is a simple, satisfying way to enjoy a taste of Ethiopian cuisine without hunting down specialty ingredients. This easy homemade recipe captures the signature tang and airy texture with just a few pantry staples and a little patience. I love how approachable it feels—no intimidating steps or rare flours, just good old-fashioned fermentation and cooking know-how.
Feel free to tweak the flours or fermentation time to suit your taste. Whether you’re serving it with spicy stews or using it as a unique wrap, this injera will quickly become a favorite in your recipe box. And hey, if you’re looking for a warming drink to pair with your meal, you might enjoy my creamy spiced ginger turmeric golden milk latte—it’s a cozy combo you didn’t know you needed.
Give it a try, experiment, and please share your own twists—I always love hearing how this recipe evolves in kitchens around the world.
FAQs About Fluffy Injera Flatbread Without Teff
Can I make injera without fermenting the batter?
Fermentation is key for the signature tang and bubbles in injera. Without it, the flatbread will be bland and dense, so I don’t recommend skipping this step.
What can I use if I don’t have whole wheat flour?
You can use all-purpose flour alone, but the injera will be less nutty and slightly less textured. Adding a small amount of millet or buckwheat flour can help add earthiness.
How do I store leftover injera?
Wrap leftovers tightly and refrigerate for up to 3 days. Reheat by steaming or warming gently in a pan to keep it soft and pliable.
Can I freeze injera?
Yes! Separate each piece with parchment paper, store in a freezer-safe bag, and thaw in the fridge overnight before reheating.
Is this recipe gluten-free?
Not as written, but you can substitute gluten-free flours like sorghum and rice flour with xanthan gum to make a gluten-free version. Texture will vary.
Pin This Recipe!

Fluffy Injera Flatbread Without Teff

A simple, tangy, and spongy Ethiopian-inspired flatbread made without teff flour, using a blend of all-purpose and whole wheat flours with natural fermentation for authentic flavor and texture.
- Prep Time: 10 minutes
- Cook Time: 2-3 minutes per injera
- Total Time: 12-24 hours fermentation plus cooking time
- Yield: 8-10 injera (depending on size) 1x
- Category: Main Course
- Cuisine: Ethiopian-inspired
Ingredients
- 2 cups all-purpose flour (240g)
- 1 cup whole wheat flour (120g)
- 1 teaspoon instant yeast
- 1/2 teaspoon baking soda
- 1 teaspoon salt
- Approximately 3 cups lukewarm water (720 ml)
- 1 tablespoon lemon juice or apple cider vinegar
Instructions
- In a large mixing bowl, combine 2 cups all-purpose flour, 1 cup whole wheat flour, and 1 teaspoon instant yeast. Whisk together until evenly distributed.
- Slowly pour in about 3 cups lukewarm water and 1 tablespoon lemon juice or apple cider vinegar. Stir until you have a thin, smooth batter, similar to heavy cream consistency. Add more water if needed.
- Cover the bowl loosely with a kitchen towel or plastic wrap and ferment in a warm spot for 12 to 24 hours until bubbles form and a sour aroma develops.
- Just before cooking, stir in 1/2 teaspoon baking soda and 1 teaspoon salt. The batter will bubble up slightly.
- Heat a non-stick or cast iron skillet over medium heat. Lightly grease if desired, but traditionally cooked dry.
- Pour about 1/3 to 1/2 cup (80-120 ml) of batter into the pan, swirling to spread evenly into a thin, round flatbread about 9-10 inches in diameter. Immediately cover with a lid.
- Cook until the surface is filled with bubbles and looks dry, about 2 to 3 minutes. The bottom should be lightly golden. Do not flip.
- Carefully lift the injera with a spatula and transfer to a clean kitchen towel or plate. Repeat with remaining batter, stacking the injera to keep soft.
- Serve warm, torn into pieces for scooping stews or dips.
Notes
Fermentation is key for flavor and texture; allow 12-24 hours for best results. Add baking soda just before cooking to keep injera fluffy. Use medium heat and cover the pan while cooking to trap steam. Batter should be thin and pourable. Injera cooks only on one side and is not flipped. Store leftovers wrapped tightly in the refrigerator for up to 3 days or freeze with parchment paper between layers.
Nutrition
- Serving Size: One injera flatbread
- Calories: 140
- Sodium: 230
- Fat: 0.5
- Carbohydrates: 28
- Fiber: 3
- Protein: 4
Keywords: injera, flatbread, Ethiopian, teff-free, homemade, fermented bread, gluten-free option, vegan, easy recipe