That first crack of the knife through the golden-brown crust—the one that gives way with a gentle hiss of escaping steam—still takes me straight back to my tiny Brooklyn apartment. I remember standing there, convinced I had ruined another chicken breast, bracing myself for the familiar disappointment of dry, stringy meat. But instead, this thin ribbon of garlic butter came oozing out, sliding down the side of the chicken like it was grateful to finally be free. I actually laughed out loud. After years of dry chicken dinners that felt more like a chore than a meal, I had finally stumbled onto something that worked. And honestly, it was almost too simple.
This Juicy Garlic Butter Baked Chicken Breast recipe was born from a very specific kind of kitchen frustration—the kind where you follow every rule and still end up with something that tastes like a cardboard cutout of itself. I had tried brining, pounding, and pan-searing until my arm hurt. But baking? That always felt like a gamble I was destined to lose. Then one night, with a fridge full of garlic and a half-used stick of butter staring back at me, I decided to stop fighting the oven and start working with it. The trick, I learned, is not about cooking faster or hotter. It’s about protecting the meat so it never has a chance to dry out in the first place.
What I’m sharing today is the result of many, many imperfect experiments. Some were too salty. Others were somehow both burnt and raw. But this version? It’s the one that made my picky-eater partner ask for seconds without being prompted. It’s the recipe I now make when I need a guaranteed win—a dinner that feels special but doesn’t demand a full production. No complicated steps, no fancy equipment, just honest food that delivers. And the best part? You probably already have everything you need to make it tonight.
Why You’ll Love This Recipe
Let me tell you why this particular baked chicken breast has earned a permanent spot in my weekly rotation. It’s not just good—it’s the kind of meal that makes you close your eyes after the first bite, even if you’re the only one at the table.
- Quick & Easy: Comes together in about 30 minutes with just 10 minutes of active prep. Perfect for those evenings when you need dinner on the table fast but still want something that tastes like you tried.
- Simple Ingredients: No weird specialty items here. If you have chicken breasts, butter, garlic, and a few pantry spices, you’re already halfway there. No last-minute grocery runs required.
- Perfect for Busy Weeknights: This is the dinner you make when you’ve had a long day and need something reliable. It works just as well for a quiet Tuesday as it does for a Sunday meal prep session.
- Crowd-Pleaser: I’ve served this to everyone from my spice-averse mom to my heat-seeking brother-in-law, and the plate always comes back clean. It’s that universally appealing.
- Unbelievably Juicy: This is not a marketing claim—it’s a texture. The meat stays tender and moist all the way through, with no dry spots or stringy edges. The garlic butter seeps into every bite.
What makes this recipe different from the dozens of other baked chicken recipes out there? It’s the technique of creating a butter pocket that self-bastes the meat from the inside out. Most recipes just spread butter on top, which melts off and leaves the chicken exposed. Here, we tuck the butter right where it matters most, so every slice releases a little burst of garlicky goodness. It’s a small tweak that changes everything.
This recipe isn’t just good—it’s the one you’ll remember. It’s comfort food reimagined: healthier than fried, faster than slow-cooked, but with the same soul-soothing satisfaction that makes you want to lick the plate. Perfect for impressing guests without stress, or turning a simple Tuesday dinner into something you actually look forward to.
What Ingredients You Will Need
This recipe uses simple, wholesome ingredients to deliver bold flavor and satisfying texture without the fuss. Most of these are pantry staples you likely already have on hand, which makes this dish perfect for spontaneous cooking.
For the Chicken:
- 2 boneless, skinless chicken breasts (about 6-8 ounces each) — Look for breasts that are relatively even in thickness. If they’re very thick on one end, you can gently pound them to an even thickness, but I prefer to buy the pre-trimmed thin-cut breasts when I’m in a hurry.
- 1 teaspoon salt — I use fine sea salt here. Kosher salt works too, but you might need a bit more since the crystals are larger.
- ½ teaspoon black pepper — Freshly ground is always better, but pre-ground works in a pinch.
- ½ teaspoon garlic powder — This adds a subtle background flavor that complements the fresh garlic without overpowering it.
- ½ teaspoon paprika — I prefer smoked paprika for a deeper flavor, but sweet paprika works beautifully too. It adds color and a gentle warmth.
- ¼ teaspoon onion powder — Optional but recommended. It rounds out the savory notes.
For the Garlic Butter:
- 3 tablespoons unsalted butter, softened — Make sure it’s at room temperature so it blends easily. I recommend using a good-quality butter like Kerrygold for best flavor, but any unsalted butter works.
- 4 cloves garlic, minced — Fresh garlic is non-negotiable here. The pre-minced stuff in jars just doesn’t have the same punch. I use a microplane for the finest mince, but a sharp knife works perfectly.
- 1 tablespoon fresh parsley, finely chopped — Optional for garnish, but it adds a fresh pop of color and a hint of brightness that balances the richness.
- ½ teaspoon dried thyme — Or 1 teaspoon fresh thyme leaves. Thyme and chicken are a classic pairing for good reason.
For the Pan Sauce (Optional but Highly Recommended):
- ¼ cup chicken broth — Low-sodium is best so you can control the salt level.
- 1 tablespoon lemon juice — Freshly squeezed, please. Bottled lemon juice has a flat, metallic taste that won’t do this dish justice.
- 1 tablespoon capers — These little briny bursts are totally optional but add a lovely tang that cuts through the richness of the butter.
Ingredient Selection Tips: When choosing chicken breasts, look for ones that feel firm to the touch and have a pink, not gray, color. Avoid packages with excess liquid, which can indicate the meat has been frozen and thawed. If you can, buy air-chilled chicken—it has better texture and less water retention than water-chilled options. For the garlic, choose firm, heavy cloves with tight skin. Avoid any that feel soft or have started to sprout green shoots, as those will taste bitter.
Substitution Guidance: If you’re dairy-free, you can use a high-quality vegan butter stick (not margarine) in place of regular butter. The flavor will be slightly different, but the technique works the same. For a lower-fat option, you can reduce the butter to 2 tablespoons and add an extra tablespoon of olive oil. If you don’t have fresh parsley, dried parsley works for garnish, though it won’t have the same vibrant color. And if you’re out of thyme, try rosemary or oregano instead—they all pair beautifully with garlic and chicken.
Equipment Needed
The beauty of this recipe is that you don’t need any fancy gadgets. Here’s what you’ll need:
- Baking dish or oven-safe skillet — A 9×13-inch baking dish works perfectly. I prefer using a cast-iron skillet because it retains heat beautifully and gives the chicken a nice sear on the bottom. An enameled cast-iron dish also works great.
- Sharp knife — For making the pocket in the chicken breast. A paring knife is ideal because it gives you control, but any sharp knife will do.
- Cutting board — Preferably one with a groove to catch juices. I use a large wooden board for prep and a separate plastic one for raw chicken to avoid cross-contamination.
- Meat thermometer — This is non-negotiable if you want perfectly cooked chicken every time. An instant-read digital thermometer is my go-to. It takes the guesswork completely out of the equation.
- Small bowl — For mixing the garlic butter.
- Garlic press or microplane — Optional, but makes mincing garlic much faster and more consistent.
- Aluminum foil — For tenting the chicken while it rests. This step is crucial for keeping the juices redistributed.
Budget-Friendly Alternatives: If you don’t have a meat thermometer, you can test for doneness by cutting into the thickest part of the chicken breast. The juices should run clear, and the meat should be opaque all the way through with no pink spots. However, I strongly recommend investing in a basic digital thermometer—they cost around $10 and will save you from countless dry chicken dinners. If you don’t have a cast-iron skillet, any oven-safe baking dish will work. Just be aware that glass or ceramic dishes may cook slightly differently, so keep an eye on the temperature.
Maintenance Tip: If you’re using a cast-iron skillet, make sure it’s well-seasoned before cooking. A dry, rusty pan will cause the chicken to stick and may impart an off flavor. Clean your cast iron with hot water and a stiff brush (no soap!) and dry it thoroughly over low heat before storing.
Preparation Method
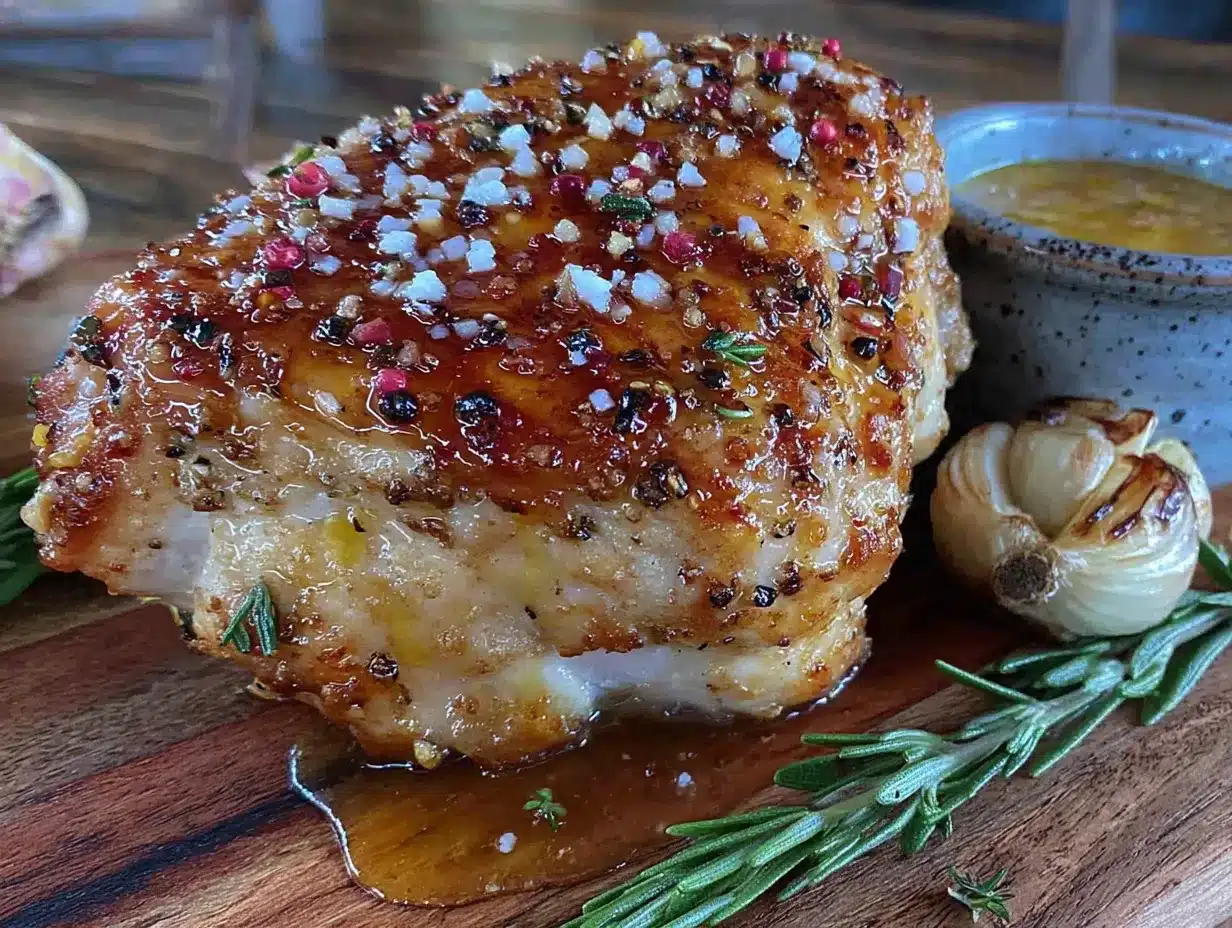
Let me walk you through this step by step. Trust me, the process is simpler than it looks, and the results are worth every minute.
- Preheat your oven to 400°F (200°C). Getting the oven hot before you start is crucial. A properly preheated oven ensures the chicken cooks evenly and develops that beautiful golden crust. While the oven heats, take your chicken breasts out of the fridge and let them sit at room temperature for about 15-20 minutes. This helps them cook more evenly.
- Make the garlic butter. In a small bowl, combine the softened butter, minced garlic, dried thyme, and a pinch of salt. Mix until everything is well incorporated. The butter should be soft enough to spread easily but not melted. If your butter is too cold, microwave it in 5-second bursts until it’s pliable but not liquid. Set this aside while you prepare the chicken.
- Prepare the chicken breasts. Pat the chicken breasts dry with paper towels. This step is more important than you might think—excess moisture on the surface will steam the meat instead of allowing it to brown. Season both sides generously with salt, pepper, garlic powder, paprika, and onion powder. Rub the seasonings in gently so they adhere.
- Create the butter pocket. Using a sharp paring knife, make a horizontal slit along the thickest side of each chicken breast, cutting about two-thirds of the way through. Be careful not to cut all the way through—you want to create a pocket that will hold the butter. Think of it like you’re making a pita pocket. Take about half of the garlic butter mixture and stuff it into each pocket, spreading it evenly inside. Press the edges of the chicken together gently to seal the butter in. Don’t worry if a little butter escapes—it will baste the chicken as it cooks.
- Spread the remaining butter. Take the remaining garlic butter and spread it over the top of each chicken breast. This creates a protective layer that keeps the meat moist while adding flavor to the surface. If you want extra garlic flavor, you can tuck a few extra garlic slivers under the skin (if using skin-on breasts) or just press them into the butter on top.
- Place in the baking dish. Arrange the chicken breasts in your baking dish or cast-iron skillet, leaving a little space between them so they cook evenly. If they’re touching, they’ll steam instead of roast. Pour the chicken broth around the chicken (not over it) if you’re making the pan sauce. This will create steam in the oven and keep the chicken extra moist.
- Bake. Place the dish in the preheated oven and bake for 20-25 minutes, depending on the thickness of your chicken breasts. The key here is to check the internal temperature. Start checking at the 18-minute mark if your breasts are on the thinner side. You’re looking for an internal temperature of 160°F (71°C) in the thickest part of the breast. Remember, the chicken will continue to cook as it rests, rising to the safe temperature of 165°F (74°C).
- Rest the chicken. This is the step most people skip, and it’s the biggest mistake you can make. Remove the chicken from the oven and tent it loosely with aluminum foil. Let it rest for 5-10 minutes. During this time, the juices redistribute throughout the meat, ensuring every bite is moist and tender. If you cut into it immediately, those juices will run out onto the cutting board, leaving you with dry chicken. I learned this the hard way—trust me on this one.
- Make the pan sauce (optional). While the chicken rests, place the baking dish on the stovetop over medium heat (if it’s oven-safe). Add the lemon juice and capers to the pan juices, scraping up any browned bits from the bottom. Let it simmer for 1-2 minutes until slightly thickened. If you used a glass or ceramic dish that can’t go on the stovetop, simply pour the pan juices into a small saucepan and follow the same steps.
- Serve. Slice the chicken against the grain into thick slices. Spoon the pan sauce over the top and garnish with fresh parsley. Watch as that garlic butter oozes out with every slice—that’s the sign of a job well done.
Sensory Cues: When the chicken is done, it should feel firm to the touch but still have a slight give, like the fleshy part of your palm when you make a fist. The butter on top should be golden and bubbling, and the edges of the chicken should be lightly browned. If you insert a thermometer, it should slide in smoothly with no resistance. The aroma of garlic and thyme filling your kitchen is your first clue that something special is happening.
Cooking Tips & Techniques
After making this recipe more times than I can count (and failing plenty along the way), I’ve picked up a few tricks that make all the difference. Let me share them so you don’t have to learn the hard way.
The Butter Pocket Technique: This is the secret weapon against dry chicken. By tucking the garlic butter directly into the meat, you’re essentially creating a self-basting system. As the butter melts, it infuses the chicken from the inside out, keeping every fiber moist and flavorful. I’ve tried just spreading butter on top, and it works okay, but the pocket method is a game-changer. The first time I tried it, I was shocked at how much juicier the chicken was. It’s one of those techniques that seems almost too simple to work, but it absolutely does.
Temperature is Everything: I cannot stress this enough—invest in a good meat thermometer. Chicken breast is notoriously easy to overcook because the window between perfectly done and dry is so narrow. I used to rely on visual cues and ended up with dry chicken more often than not. Now I use a digital instant-read thermometer, and I’ve never looked back. Pull the chicken at 160°F (71°C) and let it rest. The carryover cooking will bring it to the safe temperature of 165°F (74°C) without drying it out. If you wait until the thermometer reads 165°F in the oven, you’ve already gone too far.
Don’t Skip the Rest: I know it’s tempting to dig in right away, especially when your kitchen smells amazing. But resting the chicken is non-negotiable for juicy results. Think of it as the meat taking a deep breath after a workout. Those 5-10 minutes allow the juices to redistribute evenly throughout the meat. If you cut into it immediately, all that flavorful liquid ends up on your cutting board instead of in your mouth. I learned this lesson the hard way during a dinner party when my beautifully golden chicken turned into a sad, dry disappointment after I carved it too soon. Never again.
Pound for Even Thickness: If your chicken breasts are uneven in thickness, the thin ends will overcook before the thick center is done. To fix this, place the chicken between two sheets of plastic wrap and gently pound it with a rolling pin or meat mallet until it’s an even thickness—about ¾ inch thick all around. This ensures uniform cooking and eliminates the dreaded dry-tip syndrome. I do this even with pre-trimmed breasts, just to be safe.
Brine for Extra Insurance: If you have extra time, consider a quick brine. Dissolve ¼ cup of salt in 4 cups of warm water, add the chicken breasts, and let them sit for 15-30 minutes. Rinse and pat dry before seasoning. This simple step helps the meat retain moisture during cooking and seasons it from the inside out. I do this when I’m meal prepping or have a few extra minutes, and it’s never let me down.
Variations & Adaptations
One of the best things about this recipe is how easily it adapts to different tastes and dietary needs. Here are some of my favorite variations:
Herb and Lemon Variation: Replace the dried thyme with a mix of fresh rosemary, oregano, and parsley. Add the zest of one lemon to the garlic butter mixture, and squeeze the juice over the chicken before baking. This bright, herbaceous version is perfect for spring and summer meals. I love serving it with roasted asparagus and a simple green salad.
Spicy Chipotle Version: For those who like heat, add 1-2 minced chipotle peppers in adobo sauce to the garlic butter mixture. Reduce the paprika to ¼ teaspoon and add ½ teaspoon of cumin. The smoky, spicy flavor pairs beautifully with the rich butter. Serve with cilantro-lime rice and black beans for a complete meal. This version is a crowd favorite at my house, especially when I’m craving something with a kick.
Dairy-Free Adaptation: Use a high-quality vegan butter stick (I recommend Miyoko’s or Country Crock Plant Butter) in place of regular butter. The technique works exactly the same, though the flavor will be slightly different. You can also use olive oil instead of butter, but you’ll lose some of the richness. If going the oil route, mix the minced garlic with 2 tablespoons of olive oil and brush it over and inside the chicken.
Low-Carb/Keto Friendly: This recipe is naturally low in carbs and keto-friendly as written. To make it even more keto-friendly, skip the pan sauce (which has a small amount of carbs from the lemon juice and capers) and instead serve the chicken with a side of roasted broccoli or cauliflower mash. The garlic butter adds healthy fats that fit perfectly into a keto diet.
Sheet Pan Dinner: Turn this into a complete one-pan meal by adding vegetables to the baking dish. Toss chopped broccoli, bell peppers, and red onion with olive oil, salt, and pepper, then arrange them around the chicken breasts. Everything roasts together, and the vegetables soak up the garlic butter juices. This is my go-to for busy weeknights when I want minimal cleanup. Add about 5 minutes to the cooking time if the vegetables are thick-cut.
Serving & Storage Suggestions
Serving: This juicy garlic butter chicken is best served hot, straight from the oven. Slice it against the grain into thick pieces and fan them out on a warm plate. Spoon the pan sauce generously over the top, letting it pool around the chicken. A sprinkle of fresh parsley adds a beautiful pop of green that makes the dish look as good as it tastes.
For sides, I love pairing this chicken with something that can soak up all that garlic butter goodness. A fresh pasta salad with sun-dried tomatoes is a fantastic option—the tangy tomatoes and tender pasta balance the richness of the butter beautifully. Or try it alongside creamy lemon zucchini ricotta stuffed shells for a truly indulgent dinner. If you want something lighter, steamed green beans or a crisp arugula salad with lemon vinaigrette are perfect choices.
Storage: Leftover chicken can be stored in an airtight container in the refrigerator for up to 4 days. To keep it from drying out, store it with a little of the pan sauce spooned over the top. When reheating, the key is to add moisture back. I recommend reheating in a covered skillet over low heat with a splash of chicken broth or water. Microwave reheating works in a pinch, but it tends to toughen the meat. If using the microwave, cover the chicken with a damp paper towel and heat in 30-second intervals until just warmed through.
Freezing: This chicken freezes beautifully. Let it cool completely, then wrap each breast individually in plastic wrap, followed by a layer of aluminum foil. Place in a freezer-safe bag and freeze for up to 3 months. To thaw, transfer to the refrigerator overnight. Reheat gently as described above. The texture won’t be quite as perfect as fresh, but it’s still miles better than any frozen chicken dinner you can buy.
Flavor Development: Interestingly, the flavors in this dish actually deepen and meld together after a day in the fridge. The garlic becomes less sharp, and the herbs infuse more thoroughly into the meat. I often make double the recipe just so I can enjoy the leftovers the next day. Cold, sliced over a salad, it’s absolutely wonderful—the garlic butter acts as a built-in dressing.
Nutritional Information & Benefits
Here’s the approximate nutritional breakdown for one serving (one chicken breast with 1½ tablespoons garlic butter and pan sauce):
- Calories: 385
- Protein: 42g
- Fat: 22g
- Carbohydrates: 3g
- Fiber: 0g
- Sugar: 1g
- Sodium: 680mg
Health Benefits: Chicken breast is an excellent source of lean protein, which is essential for muscle repair, immune function, and satiety. Garlic is packed with allicin, a compound known for its anti-inflammatory and immune-boosting properties. Butter, when used in moderation, provides fat-soluble vitamins A, D, E, and K, as well as butyrate, a fatty acid that supports gut health. Fresh parsley is surprisingly nutrient-dense, offering vitamin K, vitamin C, and antioxidants.
Dietary Considerations: This recipe is naturally gluten-free, low-carb, and keto-friendly. It’s also suitable for those following a Whole30 diet if you use ghee or clarified butter instead of regular butter. The main allergens are dairy (from the butter) and potentially garlic (some people have sensitivities). For a dairy-free version, see the variations section above.
My Personal Perspective: I believe food should nourish both body and soul. This recipe hits that sweet spot perfectly—it’s packed with protein and healthy fats to keep you full and satisfied, but it’s also deeply comforting and delicious. I don’t believe in demonizing any food group, and this recipe shows that butter can absolutely be part of a balanced, wholesome diet when used thoughtfully. The key is quality ingredients and mindful portions.
Conclusion
If you’ve struggled with dry, disappointing baked chicken in the past, I hope this recipe gives you a new sense of confidence in the kitchen. The garlic butter pocket technique is one of those simple tricks that changes everything—it’s not about cooking faster or hotter, but about working smarter to protect the meat from the inside out. Once you try it, you’ll wonder why you ever did it any other way.
I’d love to hear how this recipe turns out for you! Did you try any of the variations? Did you discover a new favorite side dish to pair it with? Drop a comment below and share your experience. And if you really loved it, please share this post with a friend who deserves a perfect chicken dinner. Your feedback and stories are what make this community so special.
Remember, cooking is about progress, not perfection. Every time you step into the kitchen, you learn something new. This recipe is just one tool in your growing arsenal—use it, adapt it, make it your own. And when you pull that golden, garlic-buttery chicken out of the oven and hear that first sizzle, take a moment to appreciate how far you’ve come. You’ve got this.
Frequently Asked Questions
Can I use chicken thighs instead of chicken breasts?
Absolutely! Chicken thighs are more forgiving because they have a higher fat content, which means they’re harder to dry out. Follow the same recipe, but increase the baking time to 25-30 minutes, or until the internal temperature reaches 170°F (77°C) for dark meat. The thighs will be incredibly tender and flavorful with the garlic butter.
How do I know when the chicken is fully cooked without a thermometer?
If you don’t have a meat thermometer, look for these signs: the juices should run clear when you pierce the thickest part of the chicken, the meat should be opaque all the way through with no pink spots, and the chicken should feel firm to the touch but still have a slight give. However, I strongly recommend getting a basic digital thermometer—it takes the guesswork out and guarantees perfect results every time.
Can I prepare this recipe ahead of time?
Yes! You can assemble the chicken with the garlic butter pocket up to 24 hours in advance. Simply prepare the chicken as directed, place it in the baking dish, cover tightly with plastic wrap, and refrigerate. When you’re ready to cook, let it sit at room temperature for 20 minutes while the oven preheats, then bake as directed. You may need to add 2-3 minutes to the cooking time since the chicken starts cold.
What’s the best way to reheat leftover chicken without drying it out?
The best method is to reheat the chicken in a covered skillet over low heat with a splash of chicken broth or water. This creates steam that keeps the meat moist. Heat for about 5-7 minutes, flipping halfway through. If you’re in a hurry, the microwave works too—just cover the chicken with a damp paper towel and heat in 30-second intervals until warmed through. Avoid high heat or long reheating times, which will toughen the meat.
Can I make this recipe with frozen chicken breasts?
Yes, but you’ll need to thaw them completely first. I don’t recommend cooking chicken from frozen for this recipe because the uneven thickness and moisture content will affect the cooking time and texture. To thaw safely, transfer the frozen chicken to the refrigerator 24 hours before cooking. For a quicker method, place the sealed chicken in a bowl of cold water, changing the water every 30 minutes, until thawed (about 1-2 hours depending on size). Pat dry thoroughly before seasoning and proceeding with the recipe.
Pin This Recipe!
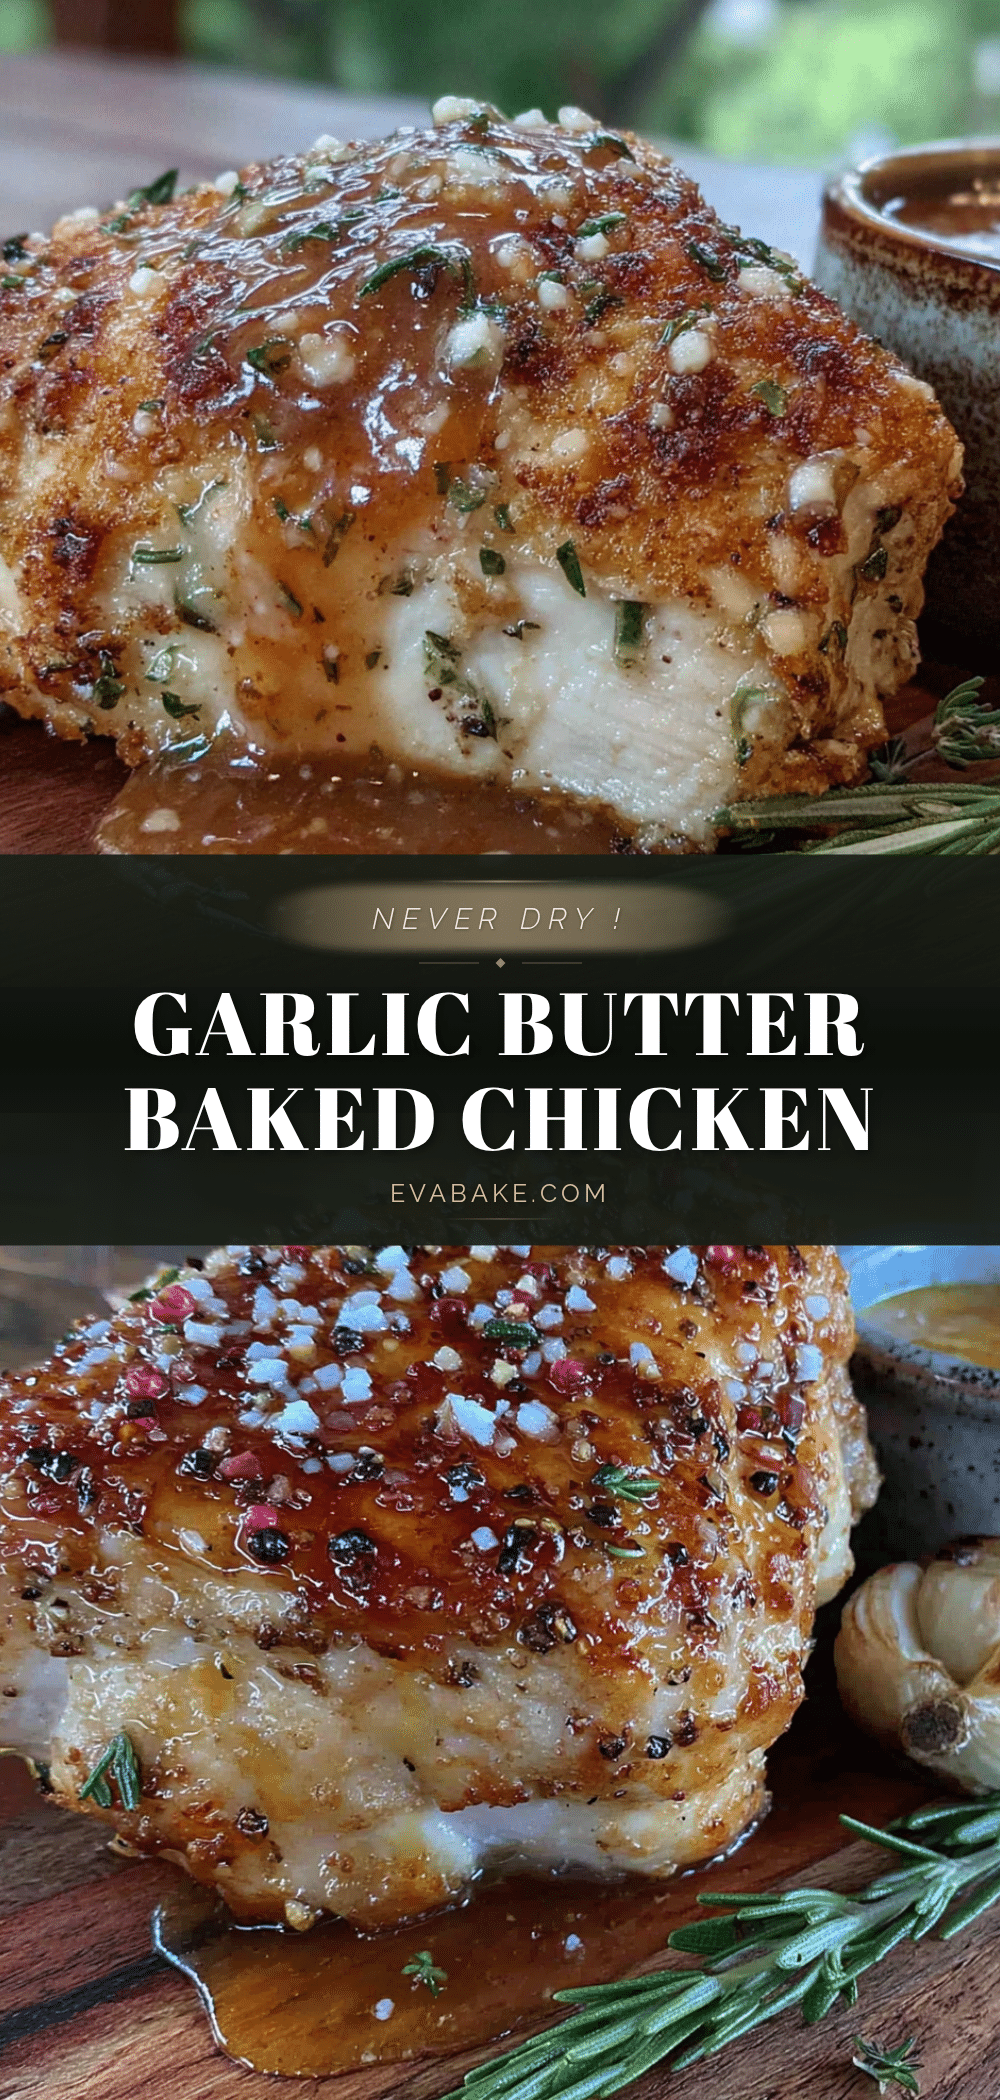
Juicy Garlic Butter Baked Chicken Breast – Never Dry
This Juicy Garlic Butter Baked Chicken Breast recipe is the solution to dry, disappointing chicken. A simple butter pocket technique ensures every bite is tender and moist, with garlic butter oozing out as you slice. Ready in about 30 minutes with minimal prep, it’s a guaranteed weeknight win.
- Prep Time: 10 minutes
- Cook Time: 25 minutes
- Total Time: 35 minutes
- Yield: 2 servings 1x
- Category: Main Course
- Cuisine: American
Ingredients
- 2 boneless, skinless chicken breasts (about 6–8 ounces each)
- 1 teaspoon salt
- ½ teaspoon black pepper
- ½ teaspoon garlic powder
- ½ teaspoon paprika
- ¼ teaspoon onion powder
- 3 tablespoons unsalted butter, softened
- 4 cloves garlic, minced
- 1 tablespoon fresh parsley, finely chopped
- ½ teaspoon dried thyme
- ¼ cup chicken broth
- 1 tablespoon lemon juice
- 1 tablespoon capers
Instructions
- Preheat your oven to 400°F (200°C). Let chicken breasts sit at room temperature for 15-20 minutes.
- In a small bowl, combine softened butter, minced garlic, dried thyme, and a pinch of salt. Mix until well incorporated.
- Pat chicken breasts dry with paper towels. Season both sides with salt, pepper, garlic powder, paprika, and onion powder.
- Using a sharp paring knife, make a horizontal slit along the thickest side of each chicken breast, cutting about two-thirds of the way through to create a pocket. Stuff about half of the garlic butter mixture into each pocket, spreading evenly. Press edges gently to seal.
- Spread remaining garlic butter over the top of each chicken breast.
- Arrange chicken breasts in a baking dish or cast-iron skillet, leaving space between them. Pour chicken broth around the chicken (not over it).
- Bake for 20-25 minutes, until internal temperature reaches 160°F (71°C) in the thickest part.
- Remove from oven and tent loosely with aluminum foil. Let rest for 5-10 minutes.
- While chicken rests, place baking dish on stovetop over medium heat (if oven-safe). Add lemon juice and capers to pan juices, scraping up browned bits. Simmer 1-2 minutes until slightly thickened.
- Slice chicken against the grain into thick slices. Spoon pan sauce over top and garnish with fresh parsley.
Notes
The butter pocket technique is key for juiciness. Pull chicken at 160°F (71°C) and let rest; carryover cooking brings it to 165°F (74°C). For even thickness, pound chicken breasts to ¾ inch. A quick brine (¼ cup salt in 4 cups water for 15-30 minutes) adds extra moisture. Leftovers keep in the fridge for up to 4 days or freeze for up to 3 months.
Nutrition
- Serving Size: 1 chicken breast wit
- Calories: 385
- Sugar: 1
- Sodium: 680
- Fat: 22
- Saturated Fat: 12
- Carbohydrates: 3
- Protein: 42
Keywords: baked chicken breast, garlic butter chicken, juicy chicken, easy chicken recipe, weeknight dinner, gluten-free, low-carb, keto-friendly


