Perfect Halloween Sugar Cookies with Easy Royal Icing
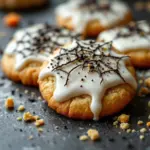
These buttery vanilla-almond sugar cookies hold their shape perfectly and are topped with a glossy royal icing that dries to a flawless finish. A foolproof recipe that turns simple cookies into spooky works of art, perfect for Halloween parties and gifting.
- Prep Time: 30 minutes
- Cook Time: 10 minutes
- Total Time: 2 hours 40 minutes (includes 2 hours chilling)
- Yield: 24-36 cookies (depending on cutter size) 1x
- Category: Dessert
- Cuisine: American
Ingredients
Scale
- 1 cup (226g) unsalted butter, softened
- 1 cup (200g) granulated sugar
- 1 large egg, room temperature
- 2 teaspoons vanilla extract
- ½ teaspoon almond extract
- 2½ cups (312g) all-purpose flour
- 1 teaspoon baking powder
- ½ teaspoon salt
- 3 tablespoons meringue powder
- 4 cups (480g) powdered sugar, sifted
- 5–6 tablespoons warm water
- ½ teaspoon vanilla extract (for icing)
- Gel food coloring (black, orange, purple, green)
- Halloween cookie cutters (ghosts, pumpkins, bats, cats, moons)
- Piping bags or squeeze bottles
- Edible glitter or sanding sugar (optional)
Instructions
- Cream the butter and sugar: In a stand mixer with paddle attachment, beat softened butter and granulated sugar on medium speed for 3-4 minutes until light, fluffy, and pale. Scrape down sides halfway through.
- Add wet ingredients: Beat in egg, vanilla extract, and almond extract until fully combined. Mixture may look slightly curdled.
- Mix dry ingredients: In a separate bowl, whisk together flour, baking powder, and salt.
- Combine wet and dry: With mixer on low, gradually add flour mixture to butter mixture. Mix just until dough comes together; a few streaks of flour should remain.
- Divide and chill: Turn dough onto floured surface, divide in half, flatten each into a 1-inch thick disk, wrap in plastic wrap, and refrigerate at least 2 hours or overnight.
- Preheat oven to 350°F (175°C). Line baking sheets with parchment paper.
- Roll out dough: Lightly flour surface and rolling pin. Roll one disk to ¼-inch thickness. Cut shapes with floured cookie cutters, pressing straight down without twisting.
- Chill cut cookies: Place cut cookies on baking sheets and refrigerate for 15-20 minutes before baking.
- Bake for 8-10 minutes, rotating pan halfway through. Cookies should look set around edges but still pale on top.
- Cool completely: Let cookies cool on baking sheet for 5 minutes, then transfer to wire rack to cool completely.
- Make royal icing: In stand mixer bowl, combine meringue powder and sifted powdered sugar. Add 5 tablespoons warm water and ½ teaspoon vanilla. Beat on low until combined, then medium-high for 5-7 minutes until thick, glossy, and holds stiff peaks.
- Check consistency: Lift beater; icing should form a peak that holds its shape (stiff consistency for outlines).
- Divide and color: Portion icing into bowls, add gel food coloring a tiny bit at a time.
- Thin for flooding: Add water 1 teaspoon at a time to portion of icing until it reaches ’15-second’ consistency (ribbon smooths in 15 seconds).
- Fill bags: Transfer stiff icing to piping bags with small round tips. Transfer flooding icing to squeeze bottles or piping bags with larger tips.
- Outline first: Pipe outline around edge of each cookie with stiff icing.
- Flood center: Fill outlined area with thinner flooding icing. Use toothpick to guide into corners and pop bubbles.
- Add details while wet: Add multiple colors or details while flood icing is still wet for seamless blending.
- Let dry completely: Royal icing needs 6-8 hours to dry completely; overnight is ideal.
Notes
For sharp edges, don’t skip the second chill before baking. On humid days, add 1 extra tablespoon flour to dough and use slightly less water in icing. Cookies can be baked up to a week ahead; decorate up to 3 days before serving. Store in airtight container at room temperature for up to 2 weeks. Freeze decorated cookies for up to 3 months.
Nutrition
- Serving Size: 1 cookie (3-inch sha
- Calories: 190
- Sugar: 18
- Sodium: 75
- Fat: 8
- Saturated Fat: 5
- Carbohydrates: 28
- Protein: 2
Keywords: Halloween cookies, sugar cookies, royal icing, decorated cookies, holiday baking, spooky cookies, cut-out cookies