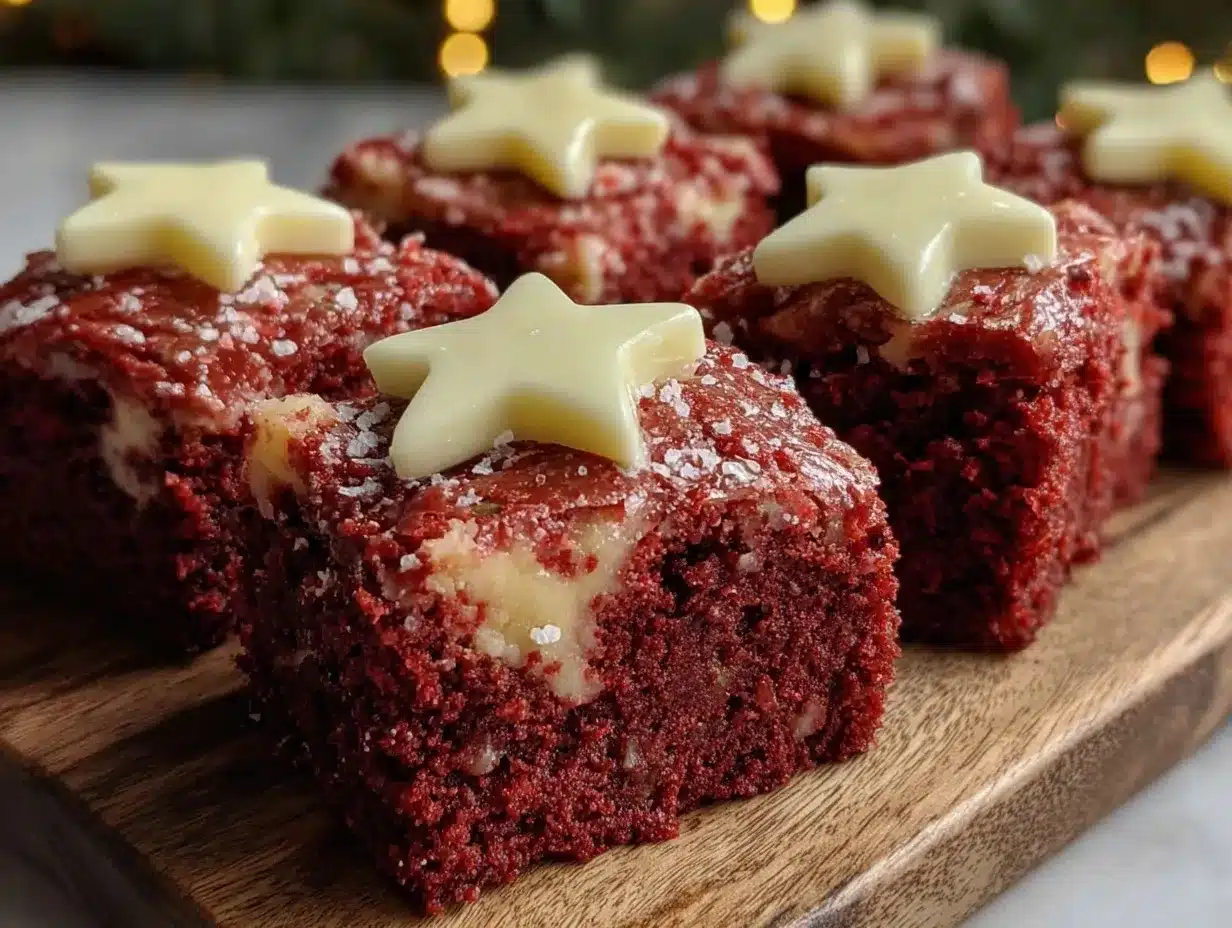
The kitchen is quiet, save for the soft hum of the oven warming up. It’s early July, just past dawn, and the light filters in lazily through the curtains, casting long shadows on the countertop dusted with a faint trace of cocoa powder. The only thing I want right now is to bake something that feels like a small celebration in itself—a little ritual that marks the day without noise or fuss. Perfect Red Velvet Flag Brownies with White Chocolate Stars seem to call for this moment: a slow, deliberate baking project that folds in both the sweetness of summer and a gentle nod to the flag’s iconic colors.
These brownies aren’t about flashy fireworks or loud parties. Instead, they are about the quiet joy of creating something beautiful and tasty, piece by piece. The rich red velvet base is comforting and soft, the kind of dessert that invites you to linger over a slice with a cup of tea. And those white chocolate stars? They aren’t just decoration—they are a subtle celebration of detail and patience, turning a simple tray of brownies into something truly special.
What makes this recipe stick with me is how it quietly transforms an ordinary baking day into a thoughtful gesture. It’s not about impressing anyone with fancy techniques or complicated steps, but about the calm satisfaction that comes from crafting something with care. This recipe has become my go-to for when I want a bit of sweetness that feels both familiar and a little bit festive, without the need for a big occasion. It’s a trust-worthy companion to slow mornings and gentle celebrations alike.
Why You’ll Love This Recipe
Honestly, these Perfect Red Velvet Flag Brownies with White Chocolate Stars are one of those recipes that manages to hit all the right notes without requiring a lot of fuss. After making them multiple times, I can say they’ve become a reliable dessert for both casual weekends and special summer gatherings.
- Quick & Easy: You can have these brownies ready in under 45 minutes, which makes them perfect when you need a festive treat fast.
- Simple Ingredients: No need for fancy or hard-to-find items; everything is probably already in your pantry or fridge.
- Perfect for Summer Celebrations: Great for Independence Day, Memorial Day, or any time you want to add a little red, white, and blue to your table.
- Crowd-Pleaser: Kids love the bright red color, and adults appreciate the rich, velvety texture combined with the sweet white chocolate stars.
- Unbelievably Delicious: The moist crumb of the red velvet pairs beautifully with the creamy sweetness of the white chocolate, giving you a lovely balance of flavors.
What really sets this recipe apart is the way the white chocolate stars are gently folded into the top, creating that classic flag look that’s festive but not over the top. It’s a twist on traditional red velvet brownies that I haven’t seen elsewhere, and it brings a bit of charm and personality to the tray. Plus, the batter’s texture is silky and smooth, thanks to an extra step I picked up from baking pros—whisking the cocoa powder with the wet ingredients before mixing in the flour, which gives this brownie a tender crumb.
It’s the kind of dessert that makes you pause, close your eyes after the first bite, and just savor the moment. No rush, no fuss—just the slow, sweet reward of a homemade treat that looks as good as it tastes.
What Ingredients You Will Need
This recipe uses simple, wholesome ingredients that come together to deliver bold flavor and a delightfully soft texture without a lot of fuss. Most are pantry staples, with a couple of special touches that make the red velvet flavor truly shine.
- For the Brownie Base:
- Unsalted butter, 1/2 cup (113g), melted and slightly cooled (adds richness)
- Granulated sugar, 1 cup (200g)
- Large eggs, 2, at room temperature
- Vanilla extract, 1 teaspoon (I prefer Nielsen-Massey for its pure flavor)
- Unsweetened cocoa powder, 2 tablespoons (for that subtle chocolate depth)
- All-purpose flour, 1 cup (125g), sifted
- Salt, 1/4 teaspoon
- Red food coloring, 2 tablespoons (gel-based for vibrant color without thinning the batter)
- White vinegar, 1 teaspoon (helps with the classic red velvet tang)
- Baking soda, 1/2 teaspoon
- For the White Chocolate Stars:
- White chocolate chips or chunks, 1 cup (175g) (I recommend Ghirardelli for smooth melting)
- Optional: A small pinch of cornstarch (to keep stars firm during baking)
In summer, you might swap the white chocolate stars for fresh blueberries to create a different take on the flag theme, but these stars really deliver that perfect balance of sweetness and texture. If you’re dairy-free, consider using a dairy-free white chocolate alternative or white chocolate-flavored baking chips, which work well too.
Equipment Needed
For this recipe, you’ll need some basic kitchen tools—nothing too fancy or specialized, but a few things really do help get the best result.
- 8×8-inch (20×20 cm) square baking pan – I’ve tried metal and glass; metal gives crisper edges, glass holds heat more evenly.
- Mixing bowls – at least two, one for wet ingredients and one for dry.
- Whisk – for blending cocoa powder smoothly into the wet ingredients.
- Rubber spatula – great for folding in the flour without overworking the batter.
- Measuring cups and spoons – precise measurements make a big difference here.
- Optional: a small star-shaped cookie cutter or a toothpick if you want to refine the shape of your white chocolate stars.
If you don’t have a whisk, a fork works fine to mix the cocoa into the butter and eggs, though you might spend a bit more time ensuring smoothness. When it comes to the pan, a non-stick liner or parchment paper helps with easy removal and cleanup. I’ve found that a well-greased pan with parchment underneath is the best combo for getting those perfect edges without sticking.
Preparation Method
- Preheat your oven to 350°F (175°C). Grease your 8×8-inch baking pan and line it with parchment paper, leaving some overhang for easy removal later. This takes about 10 minutes.
- Melt the butter gently in a small saucepan or microwave. Let it cool slightly so it’s warm but not hot—about 3 minutes. This prevents the eggs from cooking when mixed.
- In a medium bowl, whisk together the melted butter and sugar until combined. Add the eggs, one at a time, whisking well after each addition. Stir in the vanilla extract and white vinegar.
- Whisk the cocoa powder into the wet mixture until fully incorporated and smooth. This step is key for the tender texture—no lumps allowed! It takes about 1-2 minutes to get it silky.
- Sift the flour, baking soda, and salt into a separate bowl. Gradually fold this into the wet mixture using a rubber spatula. Don’t overmix; you want just enough to combine. The batter should be thick, velvety, and a deep red color.
- Add the red food coloring evenly into the batter. Stir gently until the color is uniform. If you want a deeper red, feel free to add a bit more—just remember it’s mostly for show!
- Pour the batter into the prepared pan and spread it out smoothly with an offset spatula or the back of a spoon. You want an even surface for the white chocolate stars.
- Sprinkle the white chocolate chips or chunks evenly on top, pressing them gently into the batter. If you’re feeling creative, use a small star-shaped cutter or a toothpick to shape some stars from larger white chocolate pieces—just be patient, it’s a delicate task.
- Bake for 25-30 minutes, until the edges pull away slightly and a toothpick inserted in the center comes out with just a few moist crumbs. The white chocolate should be soft but not melted beyond recognition.
- Cool completely in the pan on a wire rack before lifting out with the parchment paper overhang. Cut into squares or rectangles, making sure each piece gets a few white chocolate stars on top.
Don’t rush the cooling step. The brownies firm up and the flavors settle during this time, making slicing easier and cleaner. If your stars start melting too much during baking, try chilling the batter briefly before baking next time—10 minutes in the fridge can help keep them distinct.
Cooking Tips & Techniques
Making Perfect Red Velvet Flag Brownies with White Chocolate Stars isn’t hard, but a few insider tips can save you from common pitfalls.
- Don’t skip the vinegar and baking soda combo. It’s classic for red velvet and adds that subtle tang and lift to the texture.
- Use gel food coloring. Liquid colors can thin your batter and affect texture, but gels give you vibrant color without changing consistency.
- Whisk cocoa powder into the wet ingredients. This prevents clumps and creates a smooth, velvety base that sets this recipe apart.
- When folding flour, be gentle. Overmixing will make brownies tough, so fold just until no streaks remain.
- Press white chocolate stars lightly into batter. If they sit on top without contact, they might burn or slide off. A gentle press keeps them nestled.
- Watch your oven. Since ovens vary, start checking at 25 minutes. Overbaking dries out the brownies, and the stars lose their charm.
- Let brownies cool fully. Cutting warm brownies can cause them to crumble or smear the stars.
I’ve learned these the hard way—burnt stars and dry edges taught me to trust the timing and technique. When I’m short on time, I multitask by prepping the batter while the oven preheats, saving a few minutes without rushing steps.
Variations & Adaptations
These brownies are a perfect base to make your own. Here are a few ways I’ve personalized this recipe:
- Gluten-Free Version: Swap all-purpose flour for a 1:1 gluten-free baking flour blend. I’ve had success with Bob’s Red Mill, which keeps the texture soft.
- Blueberry Stars: Instead of white chocolate, scatter fresh or frozen blueberries on top before baking for a fresh, fruity twist that pairs well with the red velvet.
- Chocolate Ganache Drizzle: After cooling, drizzle a simple dark chocolate ganache over the top to add richness and a glossy finish.
- Dairy-Free Option: Use dairy-free butter and dairy-free white chocolate chips to make these suitable for lactose intolerance.
- Mini Flag Brownie Bites: Bake in a mini muffin tin for smaller, party-friendly portions that still show off the stars beautifully.
Once, I tried adding a thin layer of cream cheese frosting underneath the white chocolate stars for extra tang. It was delicious but a bit messier, so I keep that for more relaxed gatherings. If you want a more patriotic spread, pairing these brownies with a flag fruit pizza or patriotic pinwheel sandwiches makes for a colorful table.
Serving & Storage Suggestions
These Perfect Red Velvet Flag Brownies are best served at room temperature, allowing the flavors and texture to shine. I like to slice them into neat squares and arrange them on a simple white platter to highlight the red and white contrast.
They pair wonderfully with a cold glass of milk or a cup of black coffee. For a summer twist, try serving alongside a fresh berry salad or a scoop of vanilla ice cream for an easy dessert that feels special without fuss.
To store, keep brownies in an airtight container at room temperature for up to 3 days. If you want to keep them longer, refrigerate for up to a week or freeze for up to 3 months. When freezing, wrap individual pieces tightly in plastic wrap and place them in a freezer bag.
Reheat refrigerated or frozen brownies gently in a microwave for 10-15 seconds or in a low oven (300°F/150°C) for about 10 minutes. The white chocolate stars soften pleasantly with gentle warming, releasing their creamy sweetness.
Flavors mellow and deepen if you let the brownies sit for a day before serving, so if you can wait, that’s the best way to enjoy them.
Nutritional Information & Benefits
A typical serving of these brownies (about 2×2 inches) contains roughly 220 calories, with 10 grams of fat, 30 grams of carbohydrates, and 2 grams of protein. While these are definitely a treat, the use of real butter and cocoa powder means they have a wholesome richness.
The cocoa powder adds antioxidants, and the vinegar-baking soda reaction helps keep the brownies lighter than dense fudge brownies. Since this recipe uses simple ingredients without artificial fillers, it’s a cleaner dessert option compared to store-bought mixes.
For those mindful of allergens, the recipe contains dairy, eggs, and gluten but can easily be adapted to gluten-free and dairy-free versions. The white chocolate stars add sweetness without overpowering, keeping sugar levels moderate for a dessert.
From a wellness perspective, I appreciate how this recipe balances indulgence with simplicity—no overcomplicated layers or heavy frostings, just pure, satisfying flavor that feels rewarding but not overwhelming.
Conclusion
These Perfect Red Velvet Flag Brownies with White Chocolate Stars have become my quiet celebration in a pan—simple enough to make without stress, but special enough to bring a little joy to any day. They’re proof that a humble dessert can carry meaning, color, and deliciousness all at once.
Feel free to make this recipe your own with the variations or tweaks that suit your taste and occasion. Whether you’re baking for a holiday, a neighbor, or just because, these brownies have a way of making moments feel a little sweeter.
I hope this recipe finds a place in your kitchen rituals, as it has in mine, bringing a touch of slow, thoughtful pleasure to your baking.
Don’t hesitate to share your tweaks or experiences—I always love hearing how these brownies turn out in your hands!
FAQs
Can I make these brownies ahead of time?
Yes, they actually taste better after resting for a few hours or overnight. Just store them in an airtight container at room temperature or in the fridge.
What can I use instead of white chocolate stars?
You can substitute fresh blueberries, white chocolate chips, or even small marshmallows for a different look and flavor.
How do I get the red color so vibrant?
Use gel-based red food coloring and add it after mixing the dry ingredients to avoid diluting the batter. Adding a little extra coloring won’t affect taste.
Can I make this recipe gluten-free?
Absolutely! Use a 1:1 gluten-free baking flour blend, and it should work just as well without changing the texture too much.
What’s the best way to store leftovers?
Keep them in an airtight container at room temperature for 2-3 days or freeze individually wrapped pieces for up to 3 months.
Pin This Recipe!
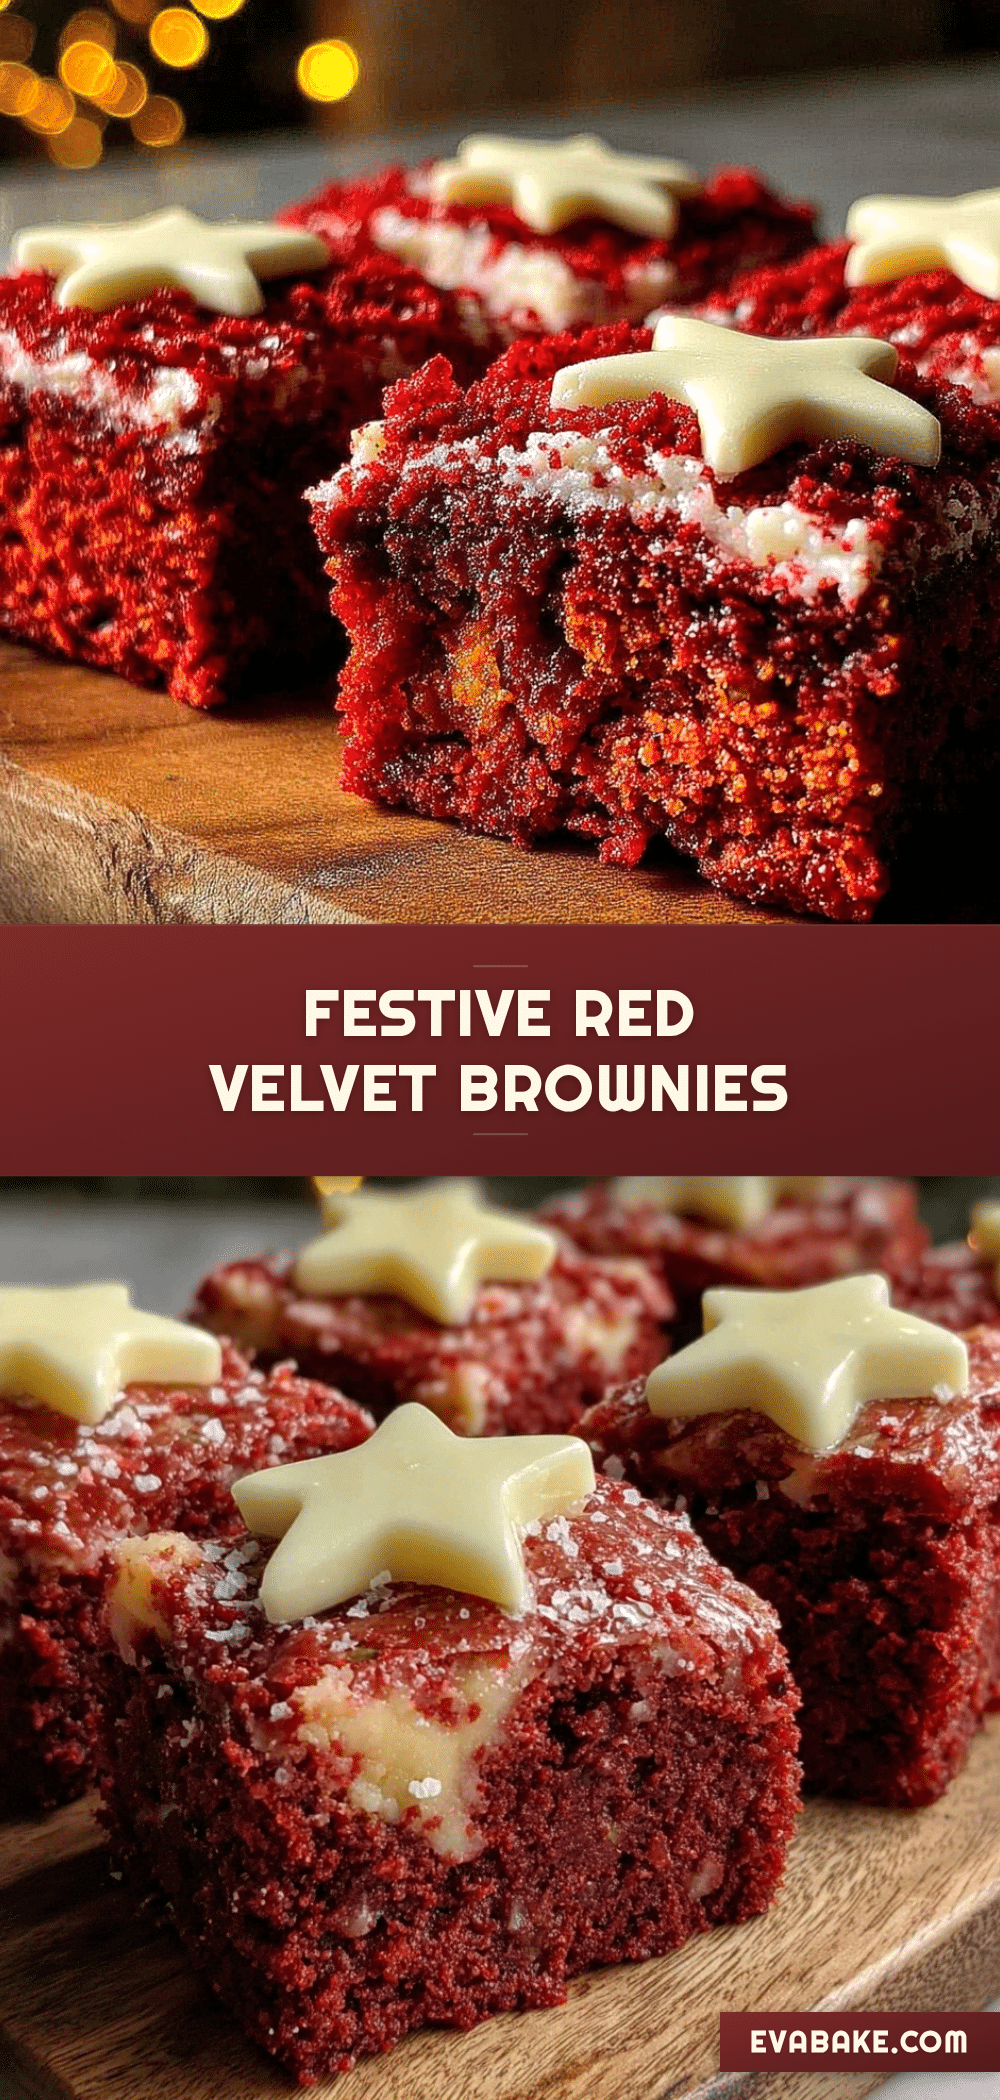
Perfect Red Velvet Flag Brownies Recipe with White Chocolate Stars
These Perfect Red Velvet Flag Brownies with White Chocolate Stars are a moist, velvety dessert featuring a rich red velvet base topped with sweet white chocolate stars, perfect for summer celebrations and quiet moments.
- Prep Time: 15 minutes
- Cook Time: 25-30 minutes
- Total Time: 40-45 minutes
- Yield: 16 servings 1x
- Category: Dessert
- Cuisine: American
Ingredients
- 1/2 cup (113g) unsalted butter, melted and slightly cooled
- 1 cup (200g) granulated sugar
- 2 large eggs, at room temperature
- 1 teaspoon vanilla extract
- 2 tablespoons unsweetened cocoa powder
- 1 cup (125g) all-purpose flour, sifted
- 1/4 teaspoon salt
- 2 tablespoons red food coloring (gel-based)
- 1 teaspoon white vinegar
- 1/2 teaspoon baking soda
- 1 cup (175g) white chocolate chips or chunks
- Optional: a small pinch of cornstarch
Instructions
- Preheat your oven to 350°F (175°C). Grease an 8×8-inch baking pan and line it with parchment paper, leaving some overhang for easy removal.
- Melt the butter gently and let it cool slightly until warm but not hot, about 3 minutes.
- In a medium bowl, whisk together the melted butter and sugar until combined. Add the eggs one at a time, whisking well after each addition. Stir in the vanilla extract and white vinegar.
- Whisk the cocoa powder into the wet mixture until fully incorporated and smooth, about 1-2 minutes.
- Sift the flour, baking soda, and salt into a separate bowl. Gradually fold this into the wet mixture using a rubber spatula, mixing just until combined.
- Add the red food coloring evenly into the batter and stir gently until the color is uniform.
- Pour the batter into the prepared pan and spread it out smoothly.
- Sprinkle the white chocolate chips or chunks evenly on top, pressing them gently into the batter. Optionally, shape some stars using a small star-shaped cutter or toothpick.
- Bake for 25-30 minutes, until the edges pull away slightly and a toothpick inserted in the center comes out with a few moist crumbs.
- Cool completely in the pan on a wire rack before lifting out with the parchment paper overhang. Cut into squares or rectangles.
Notes
Use gel-based red food coloring for vibrant color without thinning the batter. Whisk cocoa powder into wet ingredients to avoid lumps. Press white chocolate stars lightly into batter to prevent burning or sliding off. Let brownies cool completely before cutting for clean slices. For firmer stars, chill batter briefly before baking. Variations include gluten-free flour, blueberry stars, dairy-free options, and chocolate ganache drizzle.
Nutrition
- Serving Size: 1 piece (about 2x2 i
- Calories: 220
- Fat: 10
- Carbohydrates: 30
- Protein: 2
Keywords: red velvet brownies, white chocolate stars, flag brownies, summer dessert, patriotic dessert, easy brownies, festive brownies