I was leaning against the kitchen counter, clutching a glass of sparkling water, when I noticed the platter was nearly empty. It was 11:47 PM on New Year’s Eve. I hadn’t even had one yet. My sister-in-law, who had sworn she was “too full from dinner,” was reaching for a third one. That’s when I knew these bacon-wrapped date bites were something special. Not because they looked fancy—they do, honestly—but because people couldn’t stop eating them. I’d thrown them together that afternoon in a bit of a panic, using ingredients I’d bought on a whim at the grocery store two days before. I wasn’t expecting much. I got a lot more than I bargained for.
The funny thing is, I almost made something else. Every year, I stress about New Year’s Eve appetizers. You want them to feel festive but not fussy. You want people to mingle, not hover around the stove. These bacon-wrapped date bites solved all of that without me even trying. They’re salty, sweet, a little smoky, and somehow feel both indulgent and elegant at the same time. The dates get all soft and jammy in the oven, the bacon crisps up around them, and that little pop of heat from the chili or the creaminess from the cheese inside—it just works. It’s one of those recipes where the whole is much, much better than the sum of its parts.
I’ve made them three times since that New Year’s Eve. Once for a casual football watch party, once for a friend’s birthday, and once just because I had a leftover package of bacon and a lonely bag of dates in the pantry. They’ve never failed me. So if you’re looking for that one appetizer that’ll make you look like you tried really hard when you actually didn’t, this is it. Trust me on this one.
Why You’ll Love These Bacon-Wrapped Date Bites
I’ve tested this recipe more times than I care to admit. I’ve tried different dates, different bacon thicknesses, different fillings. I’ve baked them, broiled them, and even tried air-frying them. This version is the one I keep coming back to, and here’s why I think you’ll love it too.
- Quick & Easy : These come together in about 25 minutes from start to finish. Most of that is hands-off oven time. You can prep them earlier in the day and just pop them in the oven when guests arrive.
- Simple Ingredients : Dates, bacon, and a little cream cheese or goat cheese. That’s it. No weird specialty items, no last-minute trips to a fancy grocery store. You probably have most of this already.
- Perfect for Parties : New Year’s Eve, game day, birthday parties, holiday gatherings—these fit right in. They’re fancy enough for a cocktail party but easy enough for a casual get-together.
- Crowd-Pleaser : I’ve yet to meet someone who doesn’t like these. Even picky eaters go for them. The sweet-salty combo is basically irresistible. Kids and adults both love them.
- Unbelievably Delicious : The texture contrast is what gets me. Soft, sticky dates, crispy bacon, and a creamy, tangy center. It’s a flavor bomb in one bite.
What makes these different from other versions is the little trick I use to get the bacon extra crispy without overcooking the dates. I’ll share that in the tips section. Plus, the filling isn’t just cream cheese—I add a tiny pinch of something unexpected that takes it from good to “wait, what’s in this?” It’s a small thing, but it makes a big difference.
Honestly, these bites are the kind of appetizer that makes you close your eyes after the first bite. They’re comfort food in a fancy little package—indulgent, satisfying, and perfect for celebrating without the stress.
What Ingredients You Will Need
This recipe uses simple, wholesome ingredients to deliver bold flavor and satisfying texture without the fuss. Most of these are pantry staples or easy to find at any grocery store.
- Medjool dates, pitted – 16 large dates (about 8 oz or 225g). Medjool dates are the best choice here. They’re soft, large, and naturally sweet with a caramel-like flavor. Look for dates that are plump and moist, not dried out. If your dates feel a little firm, soak them in warm water for 10 minutes and pat them dry before using.
- Thick-cut bacon – 8 slices (about 8 oz or 225g). You’ll cut each slice in half crosswise, so you end up with 16 short pieces. Thick-cut bacon holds up better during baking and gives you a nice meaty bite. Thin bacon can get too crispy and brittle. I like using a good quality bacon like Wright Brand or Applegate Farms.
- Cream cheese, softened – 4 oz (113g), at room temperature. Full-fat cream cheese gives the best texture and flavor. Let it sit out for about 20 minutes before mixing so it’s easy to work with. You can also use goat cheese for a tangier, more sophisticated flavor.
- Honey – 1 tablespoon (15ml). Just a little sweetness to balance the tangy cream cheese. Use a mild honey like clover or orange blossom. You can also use maple syrup if that’s what you have.
- Red pepper flakes – ¼ teaspoon (or to taste). This is my secret ingredient. It’s not enough to make the bites spicy, but it adds a subtle warmth that makes the flavor more interesting. Leave it out if you’re sensitive to heat, or add a little more if you like a kick.
- Salt – A small pinch. The bacon and dates are already salty and sweet, so just a tiny pinch in the cream cheese mixture helps balance everything.
- Toothpicks – 16. Use wooden toothpicks to secure the bacon around the dates. Soak them in water for 10 minutes before using to prevent them from burning in the oven.
Optional additions: You can stuff the dates with a whole almond or a pecan half for a little crunch. Some people like to add a small piece of blue cheese or a drizzle of balsamic glaze at the end. All of these are delicious, but the classic version is already pretty perfect.
Ingredient substitution guidance: For a dairy-free version, use a plant-based cream cheese alternative. For a less sweet option, look for Deglet Noor dates instead of Medjool. They’re smaller and less sweet, but you’ll need to adjust the cooking time slightly. If you can’t find thick-cut bacon, regular bacon works too—just watch it closely so it doesn’t burn.
Equipment Needed
You don’t need much for this recipe, which is part of the appeal. Here’s what you’ll need:
- Baking sheet – A standard half-sheet pan (18×13 inches) works perfectly. Line it with parchment paper or aluminum foil for easy cleanup. I’ve used both, and parchment is my preference because the bacon doesn’t stick.
- Wire rack – This is optional but highly recommended. Placing a wire rack on top of the baking sheet allows the bacon to crisp up evenly on all sides. The fat drips down, and the bites don’t sit in their own grease. If you don’t have one, just flip the bites halfway through cooking.
- Small mixing bowl – For mixing the cream cheese filling. Any small bowl will do.
- Sharp knife – For cutting the bacon slices in half and for making a slit in each date if they’re not already pitted. A paring knife works well.
- Cutting board – For prepping the dates and bacon. Use a separate board for raw bacon to avoid cross-contamination.
- Toothpicks – As mentioned above, wooden toothpicks are essential for holding the bacon in place. Soak them first to prevent burning.
- Tongs – For flipping the bites halfway through baking. A spatula works too, but tongs give you more control.
I’ve made these without the wire rack before, and they still turn out great. The bacon just isn’t quite as crispy on the bottom. If you’re making these for a party and want them to look their best, the rack is worth the small investment. Most kitchen supply stores carry them for under $10.
Preparation Method
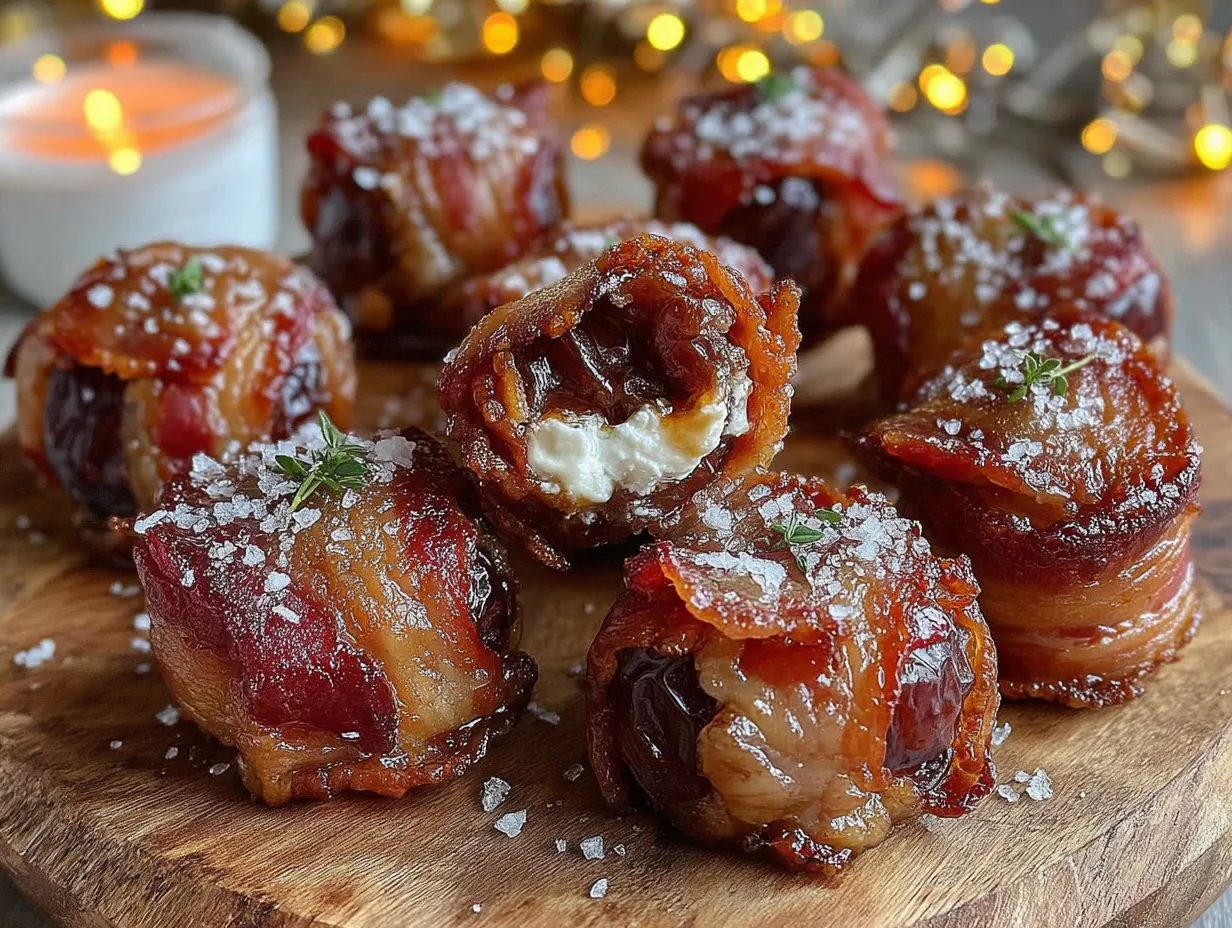
Let’s get to the fun part. I’ll walk you through each step so you get perfect results every time.
- Preheat your oven to 400°F (200°C). Position the rack in the middle of the oven. Line a baking sheet with parchment paper and place a wire rack on top if you’re using one. If not, just use the parchment-lined sheet.
- Prep the cream cheese filling. In a small bowl, combine 4 oz (113g) softened cream cheese, 1 tablespoon (15ml) honey, ¼ teaspoon red pepper flakes, and a small pinch of salt. Mix until smooth and well combined. Taste it and adjust the seasoning—you want it creamy, slightly sweet, and just a little warm from the pepper flakes. Set aside.
- Prep the dates. If your dates aren’t already pitted, use a small sharp knife to make a slit along the side of each date and remove the pit. Gently open the date like a little book. If they’re already pitted, just check to make sure no pit fragments are left behind. You want the dates to be soft and pliable. If they feel stiff, soak them in warm water for 5-10 minutes, then pat them dry with paper towels.
- Fill the dates. Using a small spoon or a piping bag (a zip-top bag with the corner snipped off works great), fill each date with about ½ teaspoon of the cream cheese mixture. Don’t overfill—you want just enough to fill the cavity without it squishing out everywhere. A little bit peeking out is totally fine and actually looks nice.
- Wrap with bacon. Cut each slice of bacon in half crosswise, so you have 16 short pieces. Take one piece of bacon and wrap it around the middle of a filled date, overlapping the ends slightly. Secure with a toothpick pushed through the overlap. The toothpick should go through both layers of bacon and into the date to hold everything together. Repeat with all the dates.
- Arrange on the baking sheet. Place the wrapped dates on the wire rack (or directly on the parchment-lined sheet) with the toothpick pointing up or to the side. Make sure they’re not touching each other so the bacon can crisp up evenly. If they’re crowded, use two baking sheets.
- Bake for 15 minutes. Place the baking sheet in the preheated oven and bake for 15 minutes. At this point, the bacon should be starting to brown and render its fat. The dates will be softening and getting jammy.
- Flip and continue baking. Using tongs, carefully flip each bite over. This helps the bacon cook evenly on both sides. Return to the oven and bake for another 5-10 minutes, depending on how crispy you like your bacon. I usually go for 8 minutes, which gives me crispy edges but still a little chewiness in the center. Watch them closely toward the end—bacon can go from perfect to burnt very quickly.
- Cool slightly before serving. Remove the baking sheet from the oven and let the bites rest for about 5 minutes. The dates will be very hot inside, and the cream cheese filling will be molten. Letting them cool a bit makes them safer to eat and allows the flavors to meld. Remove the toothpicks before serving, or leave them in for easy grabbing—your call.
- Optional finishing touch. If you want to get fancy, drizzle the warm bites with a little balsamic glaze or honey before serving. A sprinkle of flaky sea salt on top is also amazing. It adds a little crunch and enhances all the flavors.
Sensory cues to watch for: The dates should look puffed and glossy, almost like they’re about to burst. The bacon should be deep golden brown with crispy edges. The cream cheese might bubble out a little in places—that’s good, those bits get all caramelized and delicious. Your kitchen will smell like a combination of sweet, smoky, and savory that’s absolutely intoxicating.
Time breakdown: Prep takes about 15 minutes, baking takes 20-25 minutes, and resting takes 5 minutes. Total time: about 40-45 minutes. Most of that is hands-off.
Cooking Tips & Techniques
I’ve made these bacon-wrapped date bites more times than I can count, and I’ve definitely made my share of mistakes along the way. Here are the things I’ve learned so you don’t have to learn them the hard way.
Use room temperature cream cheese. This is non-negotiable. Cold cream cheese doesn’t mix smoothly, and you’ll end up with lumps. Just let it sit on the counter for 20 minutes before you start. If you forget, you can microwave it in 5-second bursts, but be careful not to melt it.
Don’t skip the wire rack. I know it’s an extra thing to wash, but it really does make a difference. The bacon gets crispy all the way around instead of just on top. The bottom stays soft and greasy if it’s sitting directly on the pan. If you don’t have a wire rack, flip the bites halfway through and drain the excess fat from the pan before returning them to the oven.
Soak your toothpicks. This is one of those little things that makes a big difference. Dry toothpicks can burn or even catch fire in a hot oven. Soaking them in water for 10 minutes before using prevents that. Trust me on this one—I learned the hard way when I had to fish a smoking toothpick out of the oven mid-party.
Watch the bacon thickness. Thick-cut bacon is ideal, but it can vary a lot between brands. If your bacon is on the thinner side, reduce the cooking time by a few minutes. If it’s extra thick, you might need to add a couple of minutes. The key is to look for that deep golden brown color and crispy edges.
Make ahead tip: You can assemble these up to 24 hours in advance. Just fill the dates, wrap them in bacon, secure with toothpicks, and refrigerate them on the baking sheet covered with plastic wrap. When you’re ready to bake, just pop them in the oven straight from the fridge. You might need to add 2-3 minutes to the baking time since they’re starting cold.
Don’t overfill the dates. I know it’s tempting to stuff as much cream cheese in there as possible, but less is more here. Too much filling will ooze out during baking and make a mess. A small spoonful is plenty.
My biggest failure: The first time I made these, I used thin-cut bacon and didn’t soak my toothpicks. The bacon burned before the dates were even warm, and I had to pick little bits of charred toothpick out of the bites. It was a mess. Now I always use thick-cut bacon and soaked toothpicks, and I’ve never had a problem since. Learn from my mistakes!
Variations & Adaptations
One of the best things about this recipe is how adaptable it is. Here are some variations I’ve tried and loved.
Goat Cheese & Fig Version: Swap the cream cheese for soft goat cheese and skip the honey. Add a tiny piece of dried fig inside the date along with the goat cheese. The tangy, earthy flavor of goat cheese pairs beautifully with the sweet dates and smoky bacon. This version feels a little more sophisticated and is perfect for adult parties.
Spicy Chorizo Style: Mix a tablespoon of cooked, crumbled chorizo into the cream cheese filling. The spicy, smoky chorizo adds another layer of flavor that’s incredible with the sweet dates. This is my go-to for game day gatherings. It’s a little heartier and more satisfying.
Nutty Crunch Version: Before wrapping the date in bacon, stuff a whole almond or pecan half into the center along with the cream cheese. The nut adds a lovely crunch that contrasts with the soft date and crispy bacon. I’ve also used pistachios, which add a beautiful green color when you bite into them.
Sweet & Spicy Glaze: After baking, brush the warm bites with a mixture of honey and sriracha (about 2 parts honey to 1 part sriracha). The sweet heat is addictive. This version is especially popular with people who like a little kick. Just be careful not to add too much sriracha—you want it to complement, not overpower.
Blue Cheese & Walnut: Replace the cream cheese with crumbled blue cheese and add a small piece of walnut. The pungent blue cheese is amazing with the sweet dates. This is a more adventurous version, but it’s a hit with cheese lovers. Use a mild blue cheese like Gorgonzola if you’re unsure about the intensity.
Air Fryer Method: You can make these in an air fryer for an even quicker version. Preheat the air fryer to 375°F (190°C). Place the wrapped dates in the basket in a single layer (you may need to work in batches). Cook for 8-10 minutes, flipping halfway through. The bacon gets incredibly crispy, and the cooking time is shorter. Just watch them closely toward the end.
I’ve tried all of these variations at one point or another, and they’re all delicious. My personal favorite is the goat cheese version—it feels a little fancy without being complicated. But honestly, you can’t go wrong with any of them.
Serving & Storage Suggestions
These bacon-wrapped date bites are best served warm, straight from the oven. That’s when the bacon is at its crispiest and the dates are soft and jammy. Let them cool for about 5 minutes before serving so nobody burns their mouth on the molten cream cheese filling.
Presentation ideas: Arrange them on a platter with the toothpicks pointing outward for easy grabbing. Sprinkle with a little fresh chopped parsley or chives for color. A drizzle of balsamic glaze or honey on the platter looks beautiful and adds extra flavor. You can also serve them on a bed of arugula for a nice contrast.
What to serve with them: These bites pair beautifully with a crisp white wine like Sauvignon Blanc or a dry sparkling wine. For cocktails, try a gin and tonic or a margarita. If you’re serving them as part of a larger spread, they go great with other appetizers like Caprese tortellini skewers with balsamic glaze or bacon jalapeño cream cheese sliders. For a complete party menu, I love pairing these with a stunning summer grazing board or some fresh watermelon feta skewers for a refreshing contrast.
Storage instructions: Leftover bites can be stored in an airtight container in the refrigerator for up to 3 days. The bacon will lose some of its crispness, but the flavor will still be great. To reheat, place them on a baking sheet in a 350°F (175°C) oven for 5-7 minutes, or until heated through and the bacon crisps up again. You can also reheat them in an air fryer at 350°F for 3-4 minutes. I don’t recommend microwaving them—the bacon will get rubbery.
Freezing instructions: You can freeze these either before or after baking. To freeze before baking, assemble the bites and place them on a baking sheet in the freezer until solid (about 1 hour). Transfer to a freezer-safe bag or container and freeze for up to 3 months. Bake from frozen, adding 5-7 minutes to the cooking time. To freeze after baking, let them cool completely, then freeze in a single layer on a baking sheet before transferring to a bag. Reheat from frozen in a 350°F oven for 8-10 minutes.
How flavors develop: Honestly, these are best fresh out of the oven. The texture is at its peak, and the flavors are bright and balanced. That said, they’re still really good the next day. The flavors meld together more, and the dates get even softer and more caramel-like. The bacon won’t be as crispy, but it’s still delicious.
Nutritional Information & Benefits
Let’s be real—these are an indulgence. But they’re not as bad as you might think. Here’s the estimated nutritional breakdown for one bite (based on 16 servings):
| Nutrient | Amount per bite |
|---|---|
| Calories | 95-110 |
| Total Fat | 5-7g |
| Saturated Fat | 2-3g |
| Protein | 2-3g |
| Carbohydrates | 10-12g |
| Fiber | 1-2g |
| Sugar | 8-10g |
| Sodium | 150-200mg |
Health benefits of key ingredients: Dates are actually pretty nutritious. They’re packed with fiber, potassium, and antioxidants. They’re a natural source of energy and can help with digestion. Bacon, while high in fat and sodium, does provide protein and B vitamins. The cream cheese adds calcium. It’s not health food, but it’s not terrible either.
Dietary considerations: These are naturally gluten-free, which makes them a great option for guests with celiac disease or gluten sensitivity. They’re also nut-free if you skip the optional nut fillings. If you’re watching your sugar intake, you can use smaller Deglet Noor dates, which are less sweet. For a lower-fat version, use turkey bacon and reduced-fat cream cheese. The texture won’t be exactly the same, but it’s still good.
Potential allergens: Dairy (cream cheese, bacon), and possibly nuts if you add them. The dates themselves are allergen-friendly. Always check your bacon label for any hidden ingredients or processing aids.
My personal perspective: I don’t make these every day, and I don’t pretend they’re a health food. But for a party or a celebration, they’re a wonderful treat. Food is about more than just nutrients—it’s about connection, celebration, and joy. These bites deliver all of that in one little package. Enjoy them mindfully and savor every bite.
Conclusion
These bacon-wrapped date bites are the kind of recipe that makes you look like a rockstar with almost no effort. They’re salty, sweet, smoky, and completely addictive. Whether you’re hosting a New Year’s Eve party, a game day gathering, or just a casual get-together with friends, these little bites will steal the show.
What I love most about this recipe is how forgiving it is. You can change the filling, adjust the spice level, use different types of bacon, and it’ll still turn out great. It’s a recipe that rewards experimentation, and I encourage you to make it your own. Try the goat cheese version, add a little heat, or stuff them with nuts—whatever sounds good to you.
I’d love to hear how these turn out for you. Did you try a variation? Did you serve them at a party? Drop a comment below and let me know. And if you’re looking for more easy appetizer ideas, check out some of my other recipes. Happy cooking, and here’s to a delicious New Year’s Eve!
Frequently Asked Questions
Can I make these bacon-wrapped date bites ahead of time?
Absolutely! You can assemble them up to 24 hours in advance. Just fill the dates, wrap them in bacon, secure with toothpicks, and refrigerate on a baking sheet covered with plastic wrap. Bake straight from the fridge, adding 2-3 minutes to the cooking time.
What if I can’t find Medjool dates?
No problem. Deglet Noor dates work well too, though they’re smaller and less sweet. You’ll need about 20 of them instead of 16, and you might need to reduce the baking time by a couple of minutes since they’re smaller. Just watch them closely.
Can I use turkey bacon instead of regular bacon?
Yes, you can. Turkey bacon is leaner, so it won’t get as crispy and might stick to the pan more. I recommend using a wire rack and brushing the turkey bacon with a little oil before baking to help it crisp up. The flavor will be different, but it’s still tasty.
How do I prevent the toothpicks from burning?
Soak your wooden toothpicks in water for at least 10 minutes before using them. This prevents them from burning or catching fire in the oven. It’s a simple step that makes a big difference.
Can I cook these in an air fryer?
Yes! Preheat your air fryer to 375°F (190°C). Place the wrapped dates in the basket in a single layer (you may need to work in batches). Cook for 8-10 minutes, flipping halfway through. The bacon gets incredibly crispy, and the cooking time is shorter than the oven method.
Pin This Recipe!

Best Easy Bacon-Wrapped Date Bites for New Year’s Eve

These bacon-wrapped date bites are salty, sweet, smoky, and completely addictive. They come together in about 25 minutes and are perfect for parties, from New Year’s Eve to game day.
- Prep Time: 15 minutes
- Cook Time: 20-25 minutes
- Total Time: 40-45 minutes
- Yield: 16 bites (serves 8 as an appetizer) 1x
- Category: Appetizer
- Cuisine: American
Ingredients
- 16 large Medjool dates, pitted (about 8 oz or 225g)
- 8 slices thick-cut bacon (about 8 oz or 225g), cut in half crosswise
- 4 oz (113g) cream cheese, softened
- 1 tablespoon (15ml) honey
- ¼ teaspoon red pepper flakes (or to taste)
- A small pinch of salt
- 16 wooden toothpicks, soaked in water for 10 minutes
Instructions
- Preheat your oven to 400°F (200°C). Position the rack in the middle of the oven. Line a baking sheet with parchment paper and place a wire rack on top if using.
- In a small bowl, combine softened cream cheese, honey, red pepper flakes, and a pinch of salt. Mix until smooth and well combined. Set aside.
- If your dates aren’t already pitted, use a small sharp knife to make a slit along the side of each date and remove the pit. Gently open the date like a little book. If they feel stiff, soak in warm water for 5-10 minutes, then pat dry.
- Using a small spoon or piping bag, fill each date with about ½ teaspoon of the cream cheese mixture. Don’t overfill.
- Cut each slice of bacon in half crosswise to get 16 short pieces. Wrap one piece of bacon around the middle of each filled date, overlapping the ends slightly. Secure with a soaked toothpick through the overlap.
- Place the wrapped dates on the wire rack (or directly on the parchment-lined sheet) with the toothpick pointing up or to the side. Make sure they are not touching each other.
- Bake for 15 minutes, until the bacon starts to brown and render its fat.
- Using tongs, carefully flip each bite over. Return to the oven and bake for another 5-10 minutes, depending on desired crispness. Watch closely toward the end.
- Remove from the oven and let the bites rest for about 5 minutes. Remove toothpicks before serving or leave them in for easy grabbing.
- Optional: Drizzle with balsamic glaze or honey, and sprinkle with flaky sea salt before serving.
Notes
For extra crispy bacon, use a wire rack. Soak toothpicks in water for 10 minutes to prevent burning. You can assemble these up to 24 hours in advance and refrigerate. For a dairy-free version, use plant-based cream cheese. For a less sweet option, use Deglet Noor dates. The cream cheese filling can be varied with goat cheese, blue cheese, or added nuts.
Nutrition
- Serving Size: 1 bite
- Calories: 95110
- Sugar: 810
- Sodium: 150200
- Fat: 57
- Saturated Fat: 23
- Carbohydrates: 1012
- Fiber: 12
- Protein: 23
Keywords: bacon-wrapped dates, date bites, New Year's Eve appetizer, party appetizer, easy appetizer, bacon appetizer, sweet and savory appetizer