My neighbor Kate wasn’t trying to impress anyone. I’d stopped by to borrow a bundt pan—mine had mysteriously vanished after last year’s holiday baking marathon—and the smell hit me before I even got through her screen door. It wasn’t turkey or pie. It was warm butter and something sweet, something that smelled like autumn had been distilled into a single breath. She was standing at her counter in an old sweatshirt, flour dusted across one cheek, sliding a tray of sugar cookies onto a cooling rack like it was absolutely nothing. Like she hadn’t just created the thing I’d be thinking about for the next eleven months.
I stood there, holding the bundt pan she’d already handed me, and just watched her work. She wasn’t measuring with precision. She wasn’t consulting a recipe card. She was scooping flour like she’d done it a thousand times, which, honestly, she probably had. Kate’s one of those cooks who makes everything look effortless—the kind of person who throws a dinner party for twelve and still has time to sit down with a glass of wine before anyone arrives. It’s infuriating and inspiring in equal measure. That day, she handed me a warm cookie dusted with a tiny pinch of flaky salt and said, “Here, try this. It’s just my Thanksgiving sugar cookie thing.”
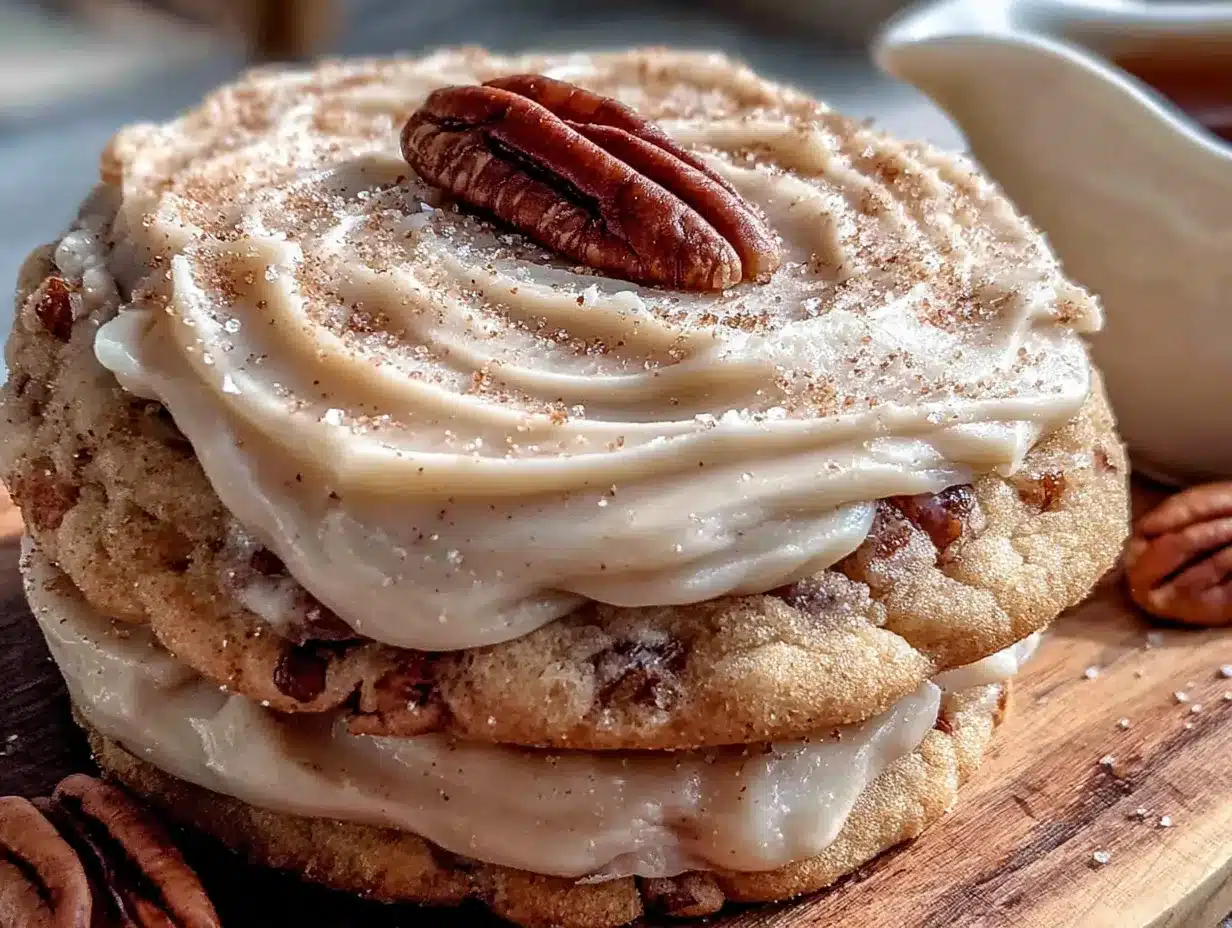
One bite. That’s all it took. The cookie was soft in the center with the slightest crackle of sugar on the edge, and that frosting—oh, that frosting. It was creamy and rich with this deep, warm maple flavor that didn’t hit you all at once. It crept up slowly, like the first real chill of October. I asked her what was in it, and she just shrugged. “Maple syrup, butter, powdered sugar. You know. Nothing special.” But it was special. You know that feeling when you taste something and immediately start planning when you’ll make it yourself? That was me, standing in her kitchen, trying not to ask for another one. Maybe you’ve been there—discovering a recipe in the most casual way, from someone who has no idea they just changed your baking game forever.
I’ve been making these cookies every Thanksgiving since. They’re the ones people hover around before dinner even starts, the ones that disappear from the platter before the turkey hits the table. And now I’m sharing them with you—because a recipe this good shouldn’t stay a secret.
Why You’ll Love This Recipe
Let me tell you why these cookies have earned a permanent spot on my Thanksgiving table. I’ve tested this recipe more times than I care to admit—through burnt batches, frosting that wouldn’t set, and one memorable incident where I confused maple extract with vanilla. (Don’t ask. It was a learning experience.) What I landed on is the version that works every single time, whether you’re baking for a crowd of twelve or just making a small batch for yourself on a quiet November afternoon.
- Soft, Bakery-Style Texture: These cookies stay tender for days, thanks to a trick I picked up from Kate herself—using a bit of cream cheese in the dough. It sounds weird, I know, but trust me on this one.
- That Maple Cream Frosting: It’s not too sweet, not too heavy. It’s the kind of frosting that makes you close your eyes after the first bite. Real maple syrup does all the heavy lifting here—no artificial stuff needed.
- Perfect for Hosting: You can make the dough three days ahead. You can bake the cookies two days ahead. You can frost them the morning of your party. This recipe was basically designed for people who want to look like they have it all together without actually losing their minds.
- Crowd-Pleaser, Guaranteed: I’ve brought these to potlucks, Friendsgivings, and actual Thanksgiving dinners. They disappear faster than the pumpkin pie. Kids love them. Adults love them. Even my cousin who “doesn’t do dessert” had three.
- No Fancy Equipment: You don’t need a stand mixer or a piping bag. A hand mixer and a butter knife for spreading the frosting? You’re golden.
What makes this recipe different from every other sugar cookie out there is the texture. Most sugar cookies are either too crunchy or too cakey. These hit that perfect middle ground—firm enough to hold their shape when you cut them out, but soft enough that they practically melt when you bite into them. And the frosting? It’s not just maple-flavored. It’s maple-forward, with that slightly caramelized richness you only get from using the real thing. This isn’t just another version of a sugar cookie. It’s the version you’ll come back to year after year.
Honestly, this recipe is comfort food reimagined. It’s the cookie you serve when you want to impress your guests without stress, when you want to offer something familiar but just a little bit special. It’s the kind of cookie that makes people pause mid-conversation and say, “Wait, what’s in this?” And that, my friends, is the best compliment a baker can get.
What Ingredients You Will Need
This recipe uses simple, mostly pantry-staple ingredients to create cookies that taste anything but ordinary. The magic is in how they come together—and in a few key choices that make all the difference. Here’s what you’ll need, broken down by component so you can stay organized.
For the Sugar Cookie Dough
- Unsalted butter, softened: 1 cup (2 sticks, or 226 grams). I use Kerrygold for baking because the higher butterfat content gives a richer flavor, but any good-quality unsalted butter works. Make sure it’s truly softened—leave it out for at least an hour, or cut it into small cubes and let it sit for 30 minutes.
- Cream cheese, softened: 2 ounces (about 56 grams). This is Kate’s secret ingredient, and honestly, it’s genius. The cream cheese adds tenderness without making the cookies taste like cheesecake. Use full-fat for the best texture.
- Granulated sugar: 1 cup (200 grams). Regular white sugar is perfect here. The slight crunch on the edges comes from rolling the dough balls in extra sugar before baking.
- Large egg: 1, at room temperature. If you forgot to take it out of the fridge, place it in a bowl of warm water for 5 minutes.
- Vanilla extract: 1 teaspoon. Pure vanilla extract, not imitation. It makes a difference.
- All-purpose flour: 2 and 1/2 cups (312 grams). Spoon and level your flour—don’t scoop directly from the bag, or you’ll end up with dry, dense cookies.
- Baking powder: 1/2 teaspoon. This gives the cookies a gentle lift.
- Baking soda: 1/4 teaspoon. Helps with spreading and browning.
- Salt: 1/2 teaspoon. I use fine sea salt. It balances the sweetness perfectly.
For the Maple Cream Frosting
- Unsalted butter, softened: 1/2 cup (1 stick, or 113 grams). Again, room temperature is crucial. Cold butter won’t cream properly and will leave you with lumpy frosting.
- Pure maple syrup: 1/4 cup (60 ml). This is non-negotiable. Do not use pancake syrup or maple-flavored syrup. Look for Grade A Dark Amber for the strongest maple flavor. I prefer the brand Runamok for their rich, complex taste.
- Powdered sugar: 2 cups (240 grams), sifted. Sifting prevents lumps and gives the frosting that silky-smooth texture.
- Heavy cream: 2 to 3 tablespoons (30 to 45 ml), as needed. This adjusts the consistency. Start with 2 tablespoons and add more if the frosting is too thick.
- Vanilla extract: 1/2 teaspoon. A small addition that rounds out the maple flavor.
- Pinch of salt: A tiny pinch to cut the sweetness. I use flaky sea salt for a subtle crunch if I’m feeling fancy.
For Rolling and Decorating (Optional but Recommended)
- Granulated sugar: 1/4 cup for rolling the dough balls before baking. This creates that sparkly, slightly crunchy exterior.
- Flaky sea salt: A light sprinkle on top of the frosted cookies. It’s not traditional, but it adds a wonderful contrast to the sweet maple frosting. Maldon is my go-to.
- Thanksgiving-themed sprinkles: Orange and gold jimmies, little leaf shapes, or even a dusting of cinnamon. Totally optional, but they make the cookies look festive on a serving platter.
Ingredient Selection Tips: When buying maple syrup, look for bottles that say “100% pure maple syrup” and check the ingredient list—it should only have one ingredient. The darker the syrup, the more intense the maple flavor. For the cream cheese, avoid low-fat or whipped varieties. They have too much water content and will affect the cookie texture. And please, I’m begging you, use real butter. Margarine or spreads will change the spread and flavor of these cookies in ways you won’t love.
Substitution Guidance: If you need a dairy-free version, use vegan butter sticks (not tub margarine) and a dairy-free cream cheese alternative like Miyoko’s. The texture will be slightly different, but still delicious. For a gluten-free option, use a 1:1 gluten-free baking flour blend that contains xanthan gum. I’ve had good results with King Arthur’s Measure for Measure flour. Just note that the cookies may spread a bit more, so chill the dough for an extra 15 minutes before baking.
Equipment Needed
You don’t need a professional bakery setup to make these cookies, which is exactly how I like it. Here’s what you’ll need, plus a few alternatives if you’re working with a limited kitchen.
- Electric hand mixer or stand mixer: A hand mixer works perfectly. I’ve made these cookies with a $20 hand mixer from Target for years before upgrading to my KitchenAid. If you’re mixing by hand, make sure your butter is very soft and be prepared to put in some elbow grease.
- Large mixing bowls: At least two—one for the wet ingredients, one for the dry.
- Baking sheets: Two standard half-sheet pans. I prefer Nordic Ware aluminum baking sheets for even heat distribution. If you only have one baking sheet, let it cool completely between batches, or the dough will start spreading before it hits the oven.
- Parchment paper or silicone baking mats: Parchment paper is cheaper and works great. Silicone mats are reusable and make cleanup even easier. Either way, don’t skip this—greasing the pan will make the cookies spread too much.
- Cooling rack: A wire rack is essential for letting the cookies cool evenly. If you don’t have one, you can cool them on a clean kitchen towel, but the bottoms might get a bit soggy.
- Cookie scoop: A 1.5-tablespoon scoop makes uniform cookies. I use my OXO Good Grips scoop for everything. If you don’t have one, use a regular spoon and try to make each ball about the same size.
- Small bowl for rolling sugar: Just a shallow dish or small bowl works fine.
- Offset spatula or butter knife: For spreading the frosting. An offset spatula gives you that nice swoopy look, but a butter knife does the job with more rustic charm.
Budget-Friendly Options: Don’t have a cookie scoop? Use two spoons to portion the dough. No cooling rack? Transfer cookies to a plate lined with paper towels. No parchment paper? Use aluminum foil lightly sprayed with non-stick spray. I’ve made these cookies in a borrowed kitchen with mismatched bowls and a whisk, and they turned out just fine. The recipe is forgiving—the equipment doesn’t have to be perfect.
Preparation Method
Alright, let’s get to the good part. Here’s how to make these cookies step by step, including all the little tricks I’ve learned from burning, underbaking, and generally messing up along the way.
Step 1: Make the Cookie Dough
In a large mixing bowl, beat the softened butter and cream cheese together with an electric mixer on medium speed until smooth and well combined—about 2 minutes. You want it to look like a pale, fluffy cloud. Add the granulated sugar and beat for another 2 to 3 minutes until the mixture is light and creamy. Scrape down the sides of the bowl with a spatula halfway through. Add the egg and vanilla extract, then beat until just combined. Don’t overmix here, or the cookies will be tough.
In a separate bowl, whisk together the flour, baking powder, baking soda, and salt. Gradually add the dry ingredients to the wet ingredients, mixing on low speed. I usually add it in three additions, mixing just until the flour disappears each time. The dough will be soft and slightly sticky—that’s exactly what you want. If it feels too sticky to handle, cover it and refrigerate for 15 minutes.
Step 2: Chill the Dough
This step is not optional, I promise you. Cover the bowl with plastic wrap and refrigerate for at least 1 hour, or up to 3 days. Chilling the dough firms up the butter and cream cheese, which prevents the cookies from spreading into flat, sad discs in the oven. I learned this the hard way when I skipped the chill time once and ended up with cookies that looked more like lace doilies. They still tasted good, but they weren’t pretty.
Step 3: Preheat and Prep
When you’re ready to bake, preheat your oven to 350°F (175°C). Line two baking sheets with parchment paper or silicone mats. Place about 1/4 cup of granulated sugar in a small bowl for rolling.
Step 4: Shape the Cookies
Scoop the chilled dough into 1.5-tablespoon portions (about the size of a walnut). Roll each portion into a smooth ball between your palms, then roll the ball in the bowl of granulated sugar until coated. Place the sugared dough balls on the prepared baking sheets, spacing them about 2 inches apart. I fit 12 cookies per sheet. Gently flatten each ball slightly with the bottom of a glass or the palm of your hand—just enough to create a small disc about 1/2 inch thick. Don’t flatten them too much, or they’ll spread too thin.
Step 5: Bake
Bake one sheet at a time on the center rack for 10 to 12 minutes. The cookies should look set around the edges but still slightly soft and puffy in the center. They will not look fully baked—that’s the point. The edges should be just barely golden. If you wait until the centers look done, you’ll end up with dry cookies. Remove from the oven and let the cookies cool on the baking sheet for 5 minutes. The residual heat will finish setting them. Then transfer to a wire rack to cool completely. Repeat with the remaining dough.
Sensory Cue: Your kitchen should smell like warm butter and vanilla, with just a hint of toasty sugar. The cookies should be pale gold on the bottom and barely colored on top. If they’re browning too quickly, your oven might run hot—try reducing the temperature by 25 degrees next batch.
Step 6: Make the Maple Cream Frosting
While the cookies cool, make the frosting. In a medium bowl, beat the softened butter with an electric mixer on medium speed until creamy and smooth—about 2 minutes. Add the maple syrup and beat until combined. It might look slightly separated at this point, but don’t panic. Gradually add the sifted powdered sugar, 1/2 cup at a time, beating on low speed after each addition. Once all the sugar is incorporated, add the vanilla extract and a pinch of salt. Beat on medium-high speed for 2 to 3 minutes until the frosting is light, fluffy, and spreadable. If it’s too thick, add heavy cream 1 tablespoon at a time until you reach your desired consistency. If it’s too thin, add more powdered sugar, 2 tablespoons at a time.
Step 7: Frost and Decorate
Once the cookies are completely cool—and I mean completely, or the frosting will slide right off—spread a generous layer of maple cream frosting on each one using an offset spatula or butter knife. I like to leave the edges slightly exposed so you can see the sparkly sugar crust. If you’re using sprinkles or flaky sea salt, add them immediately after frosting so they stick. Let the frosting set for about 15 minutes at room temperature before serving.
Prep Ahead Tip for Hosting: You can make the dough up to 3 days ahead and keep it in the fridge. You can bake the cookies up to 2 days ahead and store them unfrosted in an airtight container. Frost them the morning of your gathering—the frosting takes about 10 minutes and makes the kitchen smell incredible as guests start to arrive.
Cooking Tips & Techniques
I’ve made these cookies more times than I can count, and I’ve made just about every mistake you can imagine. Here’s what I’ve learned so you don’t have to learn the hard way.
Don’t Skip the Cream Cheese: I know it seems like an odd ingredient, but the cream cheese is what gives these cookies their signature softness. It inhibits gluten formation just enough to keep the cookies tender without making them cakey. I once tried making these without cream cheese because I was out, and they turned into regular sugar cookies—good, but not great. The cream cheese is the difference between “that’s nice” and “what’s your secret?”
Chill the Dough, No Exceptions: I can’t stress this enough. Warm dough spreads. Cold dough holds its shape. If you’re in a rush, you can chill the dough for 30 minutes in the freezer instead of 1 hour in the fridge, but don’t skip it entirely. I made this mistake once when I was running late for a Friendsgiving, and my cookies spread into giant, thin, crispy discs. They still tasted fine, but they looked like I’d accidentally made cookie brittle.
Use Real Maple Syrup: This is the most important tip for the frosting. Pancake syrup is mostly corn syrup with artificial flavoring. It will make your frosting taste fake and leave a weird aftertaste. Real maple syrup costs more, but it’s worth every penny. A 12-ounce bottle will give you enough for this recipe plus leftovers for your morning oatmeal. Look for Grade A Dark Amber for the strongest maple flavor—it’s usually the most affordable option too.
Room Temperature Ingredients Matter: Cold butter doesn’t cream properly. Cold cream cheese leaves lumps. Cold eggs can cause the batter to curdle. Set everything out on the counter at least 30 minutes before you start baking. I usually take out my butter, cream cheese, and egg when I start preheating the oven, even though the dough still needs to chill. It’s just easier to remember that way.
Bake One Sheet at a Time: I know it’s tempting to throw both sheets in the oven to save time, but the heat won’t circulate evenly. You’ll end up with one batch perfectly baked and the other overdone or underdone. If you’re baking for a crowd, just plan for multiple batches. The dough keeps well in the fridge between batches.
The Toothpick Test (Modified): For these cookies, don’t use a toothpick to check doneness. The centers should still look slightly underbaked when you pull them out. Instead, look for the edges to be just set and very lightly golden. The centers will look puffy and pale. If you wait until a toothpick comes out clean, you’ve waited too long.
My Biggest Failure: The first time I made these for a Thanksgiving potluck, I forgot to add the sugar to the dough. I was distracted, talking to my sister on the phone, and I just… skipped it. I realized my mistake when I tasted the raw dough and it was bland. I had to throw out the entire batch and start over. Now I use a small kitchen scale and measure everything into bowls before I start mixing. It takes an extra 5 minutes and saves me from disaster.
Variations & Adaptations
One of the best things about this recipe is how easily it adapts. Here are some variations I’ve tried and loved, plus a few ideas for different dietary needs.
Pumpkin Spice Sugar Cookies
Add 1 teaspoon of pumpkin pie spice to the dry ingredients and replace 2 tablespoons of the flour with 2 tablespoons of pumpkin puree. Reduce the butter by 1 tablespoon to compensate for the extra moisture. The cookies will have a warm, spiced flavor that pairs beautifully with the maple frosting. I made these for a fall baking swap last year, and they were gone in 20 minutes.
Gluten-Free Version
Substitute the all-purpose flour with a 1:1 gluten-free baking blend that contains xanthan gum. I’ve had the best results with King Arthur’s Measure for Measure flour. The dough will be slightly more delicate, so handle it gently and chill it for an extra 15 minutes before baking. The texture won’t be exactly the same, but it’s surprisingly close—my gluten-free friend couldn’t tell the difference.
Vegan Adaptation
Use vegan butter sticks (I like Miyoko’s or Earth Balance) and a dairy-free cream cheese alternative. Replace the egg with a flax egg (1 tablespoon ground flaxseed mixed with 3 tablespoons water, let sit for 5 minutes). For the frosting, use vegan butter and a plant-based heavy cream alternative. The cookies will be slightly less tender, but still delicious. I tested this version for a vegan friend’s birthday, and she asked for the recipe immediately.
Maple Pecan Crunch
After frosting each cookie, press a few chopped toasted pecans into the top. The nuts add a lovely crunch and a toasty flavor that complements the maple. Toast the pecans in a dry skillet over medium heat for 3 to 4 minutes until fragrant—don’t skip this step, as raw nuts don’t have the same depth of flavor.
Chocolate Drizzle
Melt 1/2 cup of dark chocolate chips with 1 teaspoon of coconut oil, then drizzle it over the frosted cookies. The combination of maple and dark chocolate is surprisingly good—it’s like a fancy coffee shop dessert. I did this for a Christmas party once, and people kept asking if I’d bought them from a bakery.
Spiced Maple Frosting
Add 1/4 teaspoon of cinnamon and a pinch of nutmeg to the frosting along with the powdered sugar. It gives the frosting a gentle warmth that’s perfect for fall. I prefer this version when I’m serving the cookies alongside a cup of hot apple cider.
Serving & Storage Suggestions
These cookies are at their best when served at room temperature, which makes them perfect for hosting. You can arrange them on a platter an hour before guests arrive and they’ll be just right.
Serving Temperature: Room temperature is ideal. The cookies are soft, the frosting is creamy, and the flavors are fully developed. If you’ve stored them in the fridge, let them sit out for 20 to 30 minutes before serving. I don’t recommend serving them warm—the frosting will melt into a puddle, and you’ll lose that beautiful texture contrast.
Presentation Ideas for Hosting: Arrange the cookies on a large wooden board or a white platter for maximum visual impact. Stack them in a slight pyramid or arrange them in neat rows. Sprinkle a few fresh cranberries and small rosemary sprigs around the platter for a festive look—it’s a simple trick that makes the whole setup look intentional and elegant. If you’re serving them at a Thanksgiving dinner, place them near the dessert table next to the pumpkin pie and apple crisp. They add a lighter option to the heavy pies.
What to Serve Alongside: These cookies pair beautifully with hot coffee, spiced chai, or a glass of cold milk. For a more adult pairing, try them with a bourbon old fashioned or a glass of dark rum. The maple flavor in the cookies complements the smoky sweetness of the spirits. I once served these at a Friendsgiving with a side of vanilla ice cream and a drizzle of caramel sauce—it was basically a deconstructed ice cream sandwich, and it was incredible.
Storage Instructions: Store the frosted cookies in an airtight container at room temperature for up to 3 days. If you need to stack them, place a sheet of parchment paper between layers to prevent the frosting from smudging. For longer storage, you can freeze the unfrosted cookies for up to 3 months. Place them in a single layer in a freezer-safe container, separated by parchment paper. When you’re ready to serve, thaw them at room temperature, then frost as directed. I do this every year for Thanksgiving—I bake the cookies in early November, freeze them, and then frost them the morning of the big day. It saves so much stress.
Reheating Tips: These cookies are meant to be eaten at room temperature, so reheating isn’t really necessary. If you want to refresh them after refrigeration, let them sit out for 20 minutes. Don’t microwave them—the frosting will melt, and the cookies will become soggy.
How Flavors Develop: Honestly, these cookies taste even better the day after they’re made. The maple flavor in the frosting deepens and melds with the cookie base overnight. If you can resist eating them all on day one, you’ll be rewarded on day two. I’ve tested this extensively, and I can confirm that day-old cookies are the best cookies.
Nutritional Information & Benefits
Let’s be real—these are sugar cookies with buttercream frosting. They’re a treat, not a health food. But that doesn’t mean they can’t fit into a balanced lifestyle, especially around the holidays when indulgence is part of the joy.
Estimated Nutritional Values (per cookie, based on 24 cookies):
- Calories: 185
- Total Fat: 9g
- Saturated Fat: 5g
- Cholesterol: 30mg
- Sodium: 95mg
- Total Carbohydrates: 25g
- Sugars: 17g
- Protein: 2g
Health Benefits of Key Ingredients: The cream cheese in the dough adds a small amount of protein and calcium. Real maple syrup contains antioxidants and minerals like zinc and manganese—though, to be fair, you’d need to eat a lot of cookies to get a meaningful amount. The butter provides vitamin A, and the egg adds a bit of protein and healthy fats. Look, these aren’t going to replace your green smoothie, but they’re made with real ingredients, no preservatives or artificial flavors. That counts for something.
Dietary Considerations: This recipe contains dairy (butter, cream cheese, heavy cream), gluten (all-purpose flour), and eggs. For gluten-free and vegan adaptations, see the Variations section above. The cookies are nut-free as written, but the Maple Pecan Crunch variation adds tree nuts. If you’re serving a crowd with allergies, I recommend making a separate batch without nuts and clearly labeling them.
Portion Perspective: I usually serve one cookie per person at a Thanksgiving gathering, and people are satisfied. They’re rich enough that a single cookie feels like a real dessert. If you’re watching your sugar intake, you can reduce the sugar in the dough by 2 tablespoons without affecting the texture too much—but honestly, Thanksgiving is not the day to count calories. Enjoy the cookie. You deserve it.
Frequently Asked Questions
Can I make the dough ahead of time?
Absolutely. You can refrigerate the dough for up to 3 days before baking. Just wrap it tightly in plastic wrap or store it in an airtight container. If the dough feels too firm to scoop after chilling, let it sit at room temperature for 10 to 15 minutes to soften slightly.
Why did my cookies spread too much?
This usually happens for one of three reasons: the dough wasn’t chilled long enough, the butter was too soft, or the baking sheet was too warm. Make sure you chill the dough for at least 1 hour, use properly softened butter (not melted), and let your baking sheets cool completely between batches. If your kitchen is warm, pop the shaped dough balls in the fridge for 10 minutes before baking.
Can I use maple extract instead of real maple syrup?
I don’t recommend it. Maple extract has a strong, artificial flavor that doesn’t have the depth and complexity of real maple syrup. If you’re in a pinch, you can use 1 teaspoon of maple extract plus 2 tablespoons of milk or cream, but the frosting won’t be as rich. Honestly, real maple syrup is worth the extra cost for this recipe.
How do I get perfectly round cookies?
After rolling the dough into balls, use the bottom of a glass to gently flatten them. If the edges crack slightly, just pinch them back together. For perfectly uniform cookies, use a cookie scoop to portion the dough—it ensures every cookie is the same size and bakes evenly.
Can I freeze the frosted cookies?
It’s better to freeze the unfrosted cookies and add the frosting after thawing. The frosting can become grainy or separate during freezing and thawing. If you’ve already frosted them, you can freeze them in a single layer in an airtight container for up to 1 month, but the texture won’t be as good. Place parchment paper between layers to prevent sticking.
Conclusion
These Thanksgiving sugar cookies with maple cream frosting have become my go-to holiday dessert for a reason. They’re simple enough to make on a busy weekday, but special enough to serve at your fanciest gathering. The soft, tender cookie paired with that rich, real-maple frosting is a combination that never gets old—and it always gets compliments.
I love that this recipe came from a completely unremarkable Tuesday afternoon at my neighbor’s house. No fancy presentation, no elaborate story. Just good food made by someone who didn’t realize how good it was. That’s the kind of recipe I want to pass along—the kind that feels like a secret worth sharing.
Whether you’re making these for a Thanksgiving feast, a Friendsgiving potluck, or just because it’s Tuesday and you deserve a cookie, I hope they bring you the same joy they’ve brought me. Don’t be afraid to make them your own—add a sprinkle of cinnamon, a drizzle of chocolate, or a handful of toasted pecans. The best recipes are the ones that evolve with the people who make them.
Now go preheat that oven. Your kitchen is about to smell incredible.
Have you tried these cookies? I’d love to hear how they turned out! Leave a comment below and let me know if you added your own twist. And if you’re looking for more Thanksgiving dessert ideas, don’t miss my homemade pumpkin pie recipe or these cranberry orange scones for a holiday brunch. Happy baking!
Pin This Recipe!
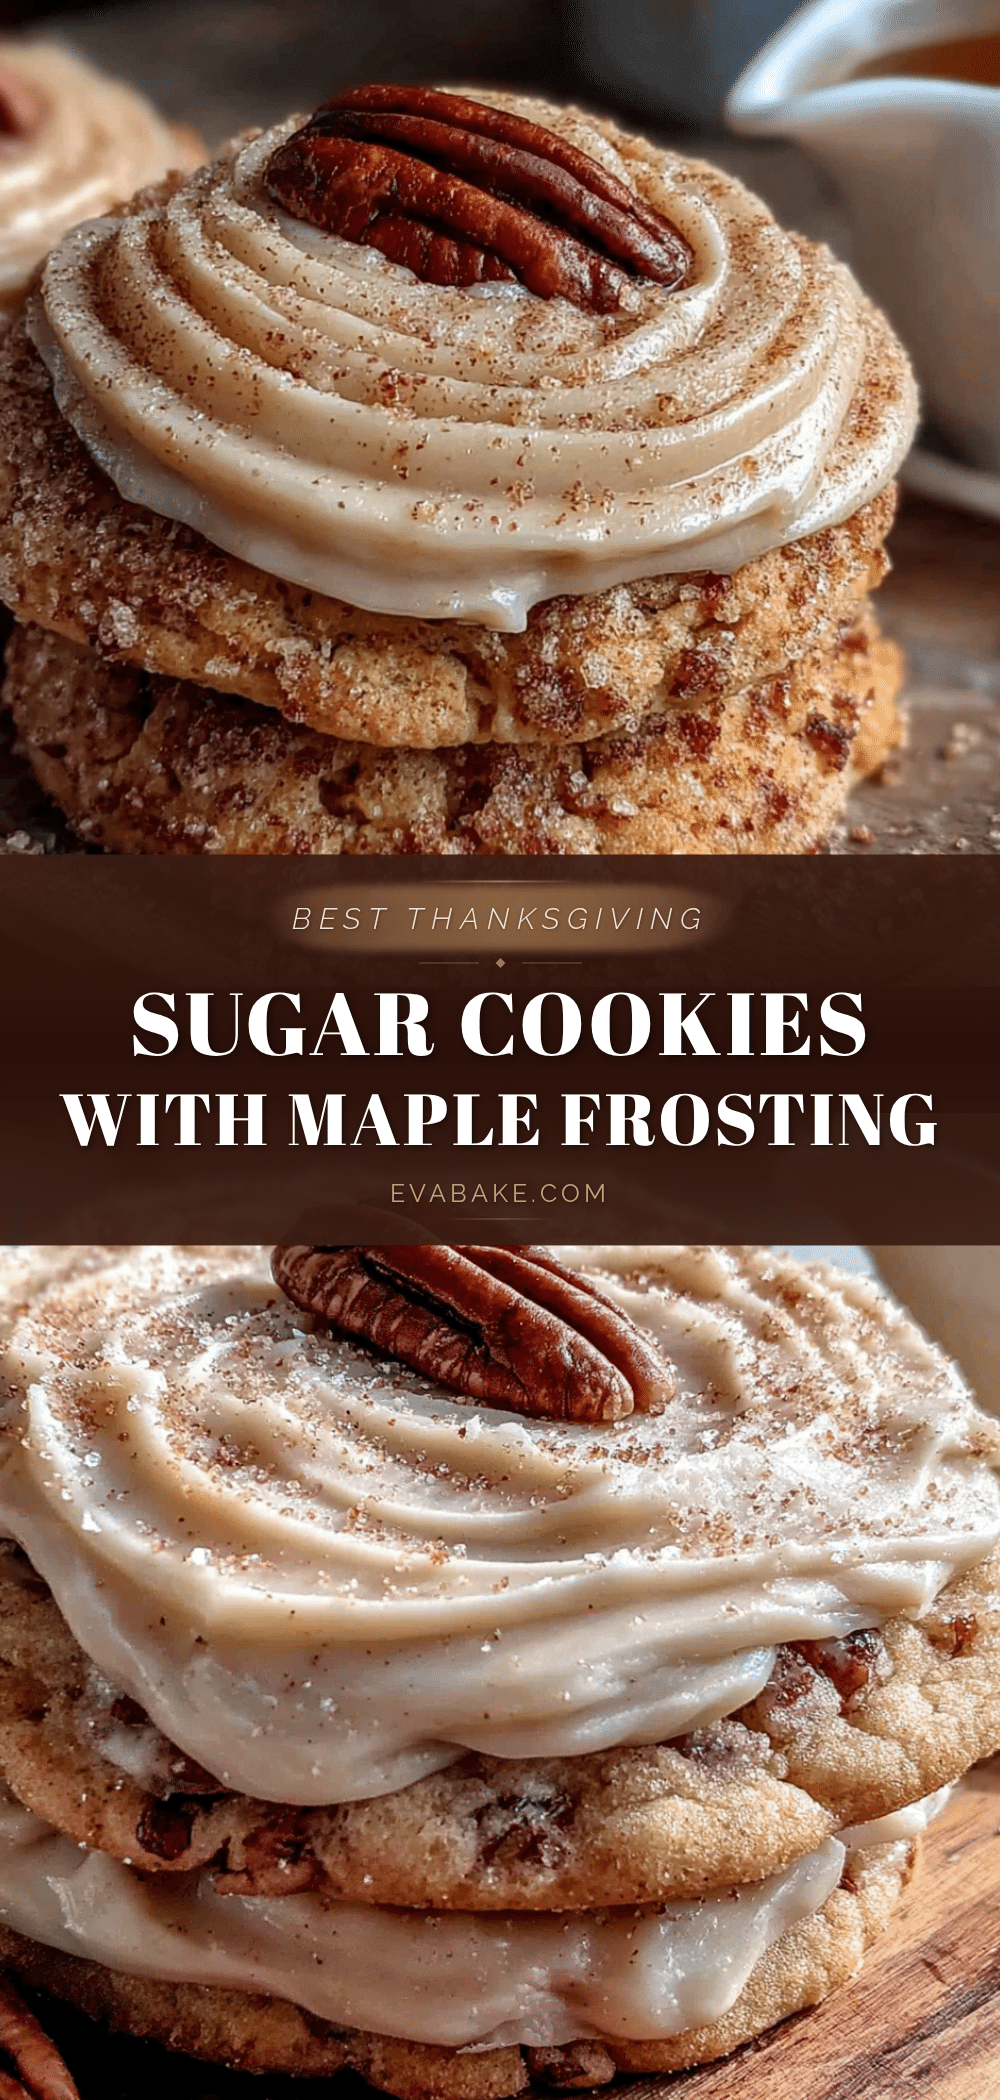
Best Thanksgiving Sugar Cookies with Easy Maple Frosting
Soft, bakery-style sugar cookies with a secret cream cheese ingredient, topped with a rich maple cream frosting made with real maple syrup. Perfect for Thanksgiving, Friendsgiving, or any fall gathering.
- Prep Time: 20 minutes
- Cook Time: 12 minutes
- Total Time: 1 hour 32 minutes (includes 1 hour chilling)
- Yield: 24 cookies 1x
- Category: Dessert
- Cuisine: American
Ingredients
- 1 cup (2 sticks, 226g) unsalted butter, softened
- 2 ounces (56g) cream cheese, softened
- 1 cup (200g) granulated sugar
- 1 large egg, at room temperature
- 1 teaspoon pure vanilla extract
- 2 and 1/2 cups (312g) all-purpose flour, spooned and leveled
- 1/2 teaspoon baking powder
- 1/4 teaspoon baking soda
- 1/2 teaspoon fine sea salt
- 1/2 cup (1 stick, 113g) unsalted butter, softened (for frosting)
- 1/4 cup (60ml) pure maple syrup (Grade A Dark Amber preferred)
- 2 cups (240g) powdered sugar, sifted
- 2 to 3 tablespoons (30-45ml) heavy cream, as needed
- 1/2 teaspoon vanilla extract
- Pinch of salt (flaky sea salt optional)
- 1/4 cup granulated sugar (for rolling)
- Flaky sea salt (optional, for garnish)
- Thanksgiving-themed sprinkles (optional)
Instructions
- In a large mixing bowl, beat the softened butter and cream cheese together with an electric mixer on medium speed until smooth and well combined, about 2 minutes.
- Add the granulated sugar and beat for another 2 to 3 minutes until light and creamy. Scrape down the sides of the bowl halfway through.
- Add the egg and vanilla extract, then beat until just combined. Do not overmix.
- In a separate bowl, whisk together the flour, baking powder, baking soda, and salt.
- Gradually add the dry ingredients to the wet ingredients in three additions, mixing on low speed until just combined. The dough will be soft and slightly sticky.
- Cover the bowl with plastic wrap and refrigerate for at least 1 hour, or up to 3 days.
- When ready to bake, preheat oven to 350°F (175°C). Line two baking sheets with parchment paper or silicone mats.
- Place about 1/4 cup of granulated sugar in a small bowl for rolling.
- Scoop the chilled dough into 1.5-tablespoon portions (about the size of a walnut). Roll each portion into a smooth ball, then roll in the sugar to coat.
- Place the sugared dough balls on the prepared baking sheets, spacing them about 2 inches apart. Gently flatten each ball slightly with the bottom of a glass or your palm to about 1/2 inch thick.
- Bake one sheet at a time on the center rack for 10 to 12 minutes. The edges should be just set and very lightly golden; the centers will look slightly underbaked.
- Remove from the oven and let the cookies cool on the baking sheet for 5 minutes, then transfer to a wire rack to cool completely.
- While the cookies cool, make the frosting: In a medium bowl, beat the softened butter with an electric mixer on medium speed until creamy, about 2 minutes.
- Add the maple syrup and beat until combined. Gradually add the sifted powdered sugar, 1/2 cup at a time, beating on low speed after each addition.
- Add the vanilla extract and a pinch of salt. Beat on medium-high speed for 2 to 3 minutes until light, fluffy, and spreadable. If too thick, add heavy cream 1 tablespoon at a time; if too thin, add more powdered sugar.
- Once cookies are completely cool, spread a generous layer of frosting on each cookie using an offset spatula or butter knife.
- If desired, immediately add sprinkles or a light sprinkle of flaky sea salt. Let frosting set for about 15 minutes at room temperature before serving.
Notes
Do not skip chilling the dough—it prevents spreading. Use real maple syrup, not pancake syrup. The cream cheese is the secret to the soft texture. Cookies can be baked 2 days ahead and stored unfrosted; frost the morning of serving. For best flavor, make the dough up to 3 days ahead.
Nutrition
- Serving Size: 1 cookie
- Calories: 185
- Sugar: 17
- Sodium: 95
- Fat: 9
- Saturated Fat: 5
- Carbohydrates: 25
- Protein: 2
Keywords: Thanksgiving sugar cookies, maple frosting, soft sugar cookies, cream cheese sugar cookies, fall cookies, holiday cookies, maple cream cookies