I burned the first batch of these mummy hot dogs so badly the smoke alarm went off, and my kids still bring it up every October. It wasn’t even a complicated mistake—I just got distracted by a phone call and forgot crescent dough browns faster than you think. That was three Halloweens ago, and honestly, that disaster taught me everything I needed to know about getting these right. Now they’re the one recipe I never skip when we throw our annual spooky movie night, and I’ve made enough batches to know exactly where things can go wrong (and how to fix them before they do).
These easy mummy hot dogs with crescent dough wraps are exactly what a Halloween appetizer should be—cute enough to make the kids squeal, simple enough that you’re not stuck in the kitchen while everyone else is having fun, and genuinely tasty in that nostalgic, buttery, salty way that hits different when you’re wrapped up in a blanket watching Hocus Pocus. The crescent dough gets golden and flaky, the hot dogs get those little crispy edges, and those tiny mustard or ketchup eyes staring back at you? Pure ridiculous joy.
I’ve tweaked this recipe over the years to make it practically foolproof. No more burned wrappers. No more dough unraveling in the oven. Just a solid, reliable little snack that comes together in twenty minutes flat and disappears even faster. It’s the kind of recipe you don’t have to think twice about—and honestly, that’s exactly what Halloween entertaining should feel like.
Why You’ll Love This Recipe
Let me tell you why these little guys have earned a permanent spot in my Halloween rotation. I’ve tested this recipe with three different brands of crescent dough, two types of hot dogs, and even a vegan sausage experiment (which worked, by the way), so I can say with confidence that this version is the one.
- Ready in 20 Minutes Flat : From fridge to table in the time it takes to watch one episode of a sitcom. No marinating, no chilling, no complicated steps.
- Only 3 Main Ingredients : Crescent dough, hot dogs, and something for the eyes. You probably already have everything in your kitchen right now.
- Perfect for Halloween Parties : They look impressive on a platter but take almost no effort. Great for school parties, potlucks, or just a fun dinner before trick-or-treating.
- Kid-Approved and Adult-Friendly : My nephew calls them “spooky snacks” and my brother-in-law eats about eight of them every year. They cross generations effortlessly.
- Endlessly Customizable : Swap the hot dogs for cheese sticks, use different doughs, change up the eyes—you can make these your own without breaking the recipe.
What makes this recipe different from other versions you’ll find online is the wrapping technique. Most recipes tell you to cut the dough into thin strips, but I figured out that cutting them slightly wider—about half an inch instead of a quarter inch—gives you that perfect balance of dough-to-dog ratio. The thinner strips tend to burn before the hot dog is heated through, and the wider ones leave too much naked hot dog showing. Half an inch is the sweet spot, and I’ll show you exactly how to get it right.
These mummy hot dogs aren’t just cute—they’re the kind of food that makes people smile before they even take a bite. And when they do take a bite, that warm, buttery, slightly salty crescent dough wrapped around a juicy hot dog? It’s comfort food in costume. That’s the whole point of Halloween, isn’t it?
What Ingredients You Will Need
This recipe keeps things simple with just a handful of ingredients, and that’s honestly the beauty of it. You don’t need anything fancy or hard to find—just basic grocery staples that come together to make something unexpectedly adorable.
- 1 can (8 oz) refrigerated crescent roll dough — I use Pillsbury Original, but any brand works. The key is keeping it cold until you’re ready to use it. Warm dough gets sticky and hard to cut into clean strips. If you’re using store brand, just check that it’s the perforated triangle style—some generic versions come as a solid sheet, which actually works even better for this recipe since you don’t have to press the seams together.
- 8 hot dogs — Standard size works best. I prefer beef hot dogs for flavor, but turkey, chicken, or even vegetarian sausages work fine. Just avoid the jumbo ones—they throw off the dough-to-dog ratio and take longer to heat through. My personal favorite is Nathan’s Famous, but honestly, whatever brand you normally buy will work perfectly.
- Mustard or ketchup for the eyes — You only need a tiny dot per eye, so a squeeze bottle makes this way easier than trying to dip a toothpick. Yellow mustard gives that classic mummy look, but ketchup works too. I’ve also used sriracha for spicy eyes and even melted dark chocolate for a dessert version (more on that in the variations section).
- Optional: Everything bagel seasoning or sesame seeds — Not traditional, but I love sprinkling a little on before baking for extra texture. It makes them look slightly more finished without any extra effort.
- Optional: Melted butter for brushing — If you want that extra golden, shiny finish, brush the dough strips with melted butter before baking. I do this when I’m serving them at parties because they look more polished, but skip it for casual weeknight dinners.
That’s literally it. Three main ingredients, two optional upgrades, and you’re on your way to the cutest Halloween appetizer on the block. I love recipes like this because they prove you don’t need a long ingredient list to make something memorable.
Equipment Needed
You don’t need any fancy kitchen gadgets for this recipe, which is part of why I love it. Here’s what you’ll need:
- Baking sheet — A standard half-sheet pan works perfectly. Line it with parchment paper or a silicone baking mat for easy cleanup. I’ve made these directly on an ungreased pan too, and they come off fine, but the parchment makes life easier.
- Sharp knife or pizza cutter — A pizza cutter is honestly my favorite tool for cutting crescent dough strips. It glides through without dragging or tearing the delicate dough. If you’re using a knife, make sure it’s sharp—a dull blade will squish the dough layers together.
- Ruler (optional but helpful) — I’m not saying you need to be precise, but if you want those perfectly even half-inch strips, a quick measurement helps. After a few batches you’ll be able to eyeball it, but for your first time, grab a ruler.
- Small bowl for melted butter — If you’re brushing with butter, you’ll need a small bowl and a pastry brush. A silicone brush works better than a natural bristle one for this—less cleanup and no bristles left behind.
- Toothpicks (optional) — If your dough strips keep unraveling during baking, a toothpick through the end of the strip will hold everything in place. Remove them before serving, obviously.
I’ve made these in a toaster oven before too, and they work great—just keep an eye on them because toaster ovens run hot and the dough can brown faster. Budget-friendly tip: if you don’t have a pizza cutter, a clean pair of kitchen scissors works surprisingly well for cutting dough strips.
Preparation Method
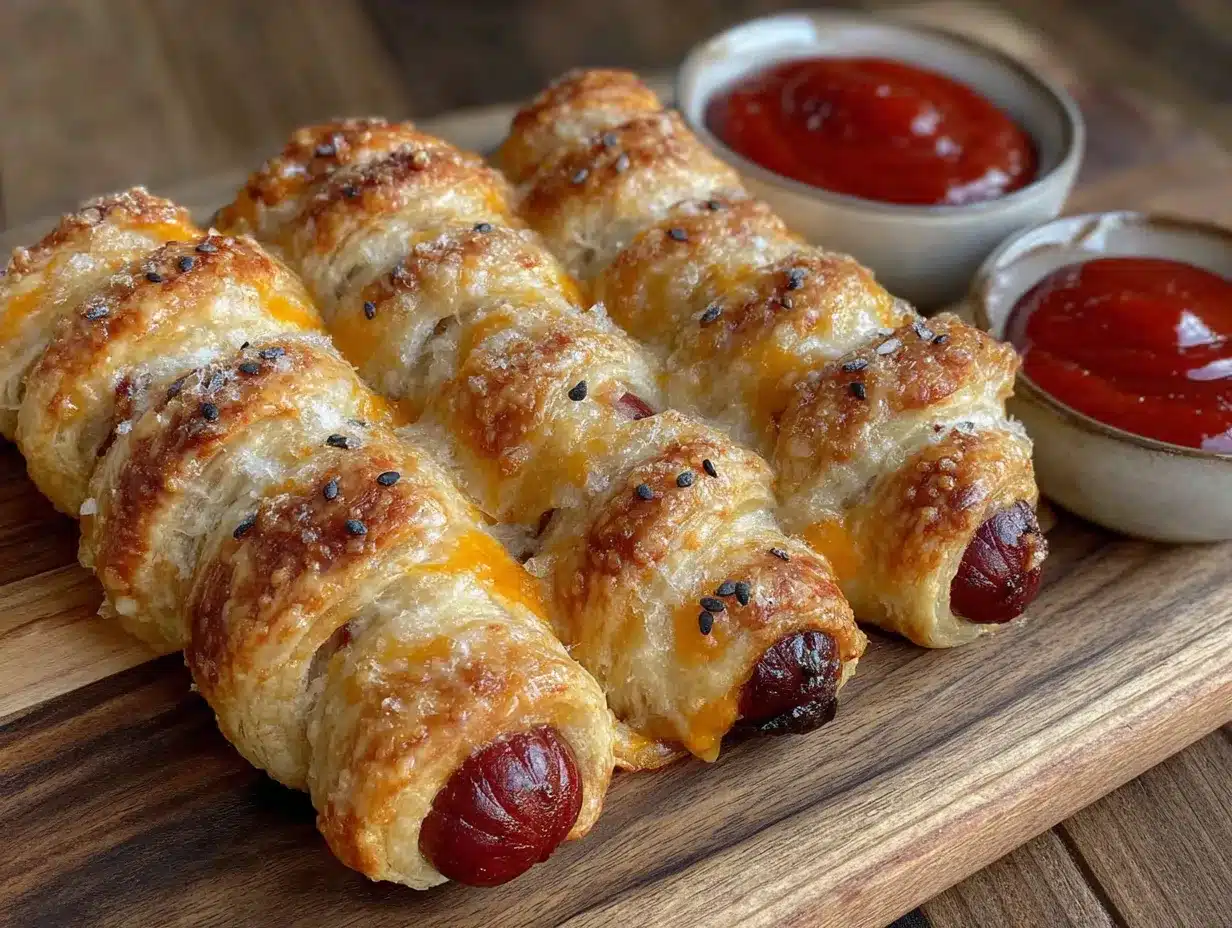
Okay, let’s get into the actual making of these little guys. I’ve broken this down step by step so you can follow along without any guesswork. Trust me on the wrapping technique—it took me a few burned batches to figure out, but once you get the rhythm, it goes fast.
- Preheat your oven to 375°F (190°C). Line a baking sheet with parchment paper and set it aside. Getting the oven hot before you start wrapping is important—cold dough sitting out while you preheat can get too soft and lose its structure.
- Unroll the crescent dough and separate it into triangles. If your dough comes perforated into triangles, press the seams together to form rectangles. If you’re using the solid sheet version, just cut it into 8 equal rectangles. Work quickly here—the colder the dough stays, the easier it is to handle.
- Cut each rectangle into thin strips, about half an inch wide. Using a pizza cutter or sharp knife, slice lengthwise down each rectangle. You should get about 4-5 strips per rectangle depending on the size. Don’t stress about perfection—slightly uneven strips just make the mummies look more rustic and homemade.
- Wrap each hot dog with the dough strips. Start at one end and wrap the strip around the hot dog at a slight angle, overlapping slightly as you go. Leave a small gap at the top for the face—about an inch of exposed hot dog. The strip should cover most of the hot dog but not completely, so it looks like a mummy with bandages. If a strip breaks, just press it back together—crescent dough is forgiving.
- Place the wrapped hot dogs on the prepared baking sheet. Leave about an inch of space between each one—they don’t spread much, but you want air to circulate so the dough gets crispy all around. If any ends of the dough are sticking up, tuck them under or press them down gently.
- Optional: Brush with melted butter. If you want that golden, glossy finish, lightly brush the dough strips with melted butter. This step is totally optional but makes them look bakery-level pretty. I usually do it for parties and skip it for family dinners.
- Bake for 12-15 minutes, until the dough is golden brown and the hot dogs are heated through. Start checking at 12 minutes—ovens vary, and you want the dough golden, not dark brown. The hot dogs will be plump and slightly sizzling when they’re done. If the dough is browning too fast on top but the hot dogs aren’t hot yet, tent loosely with foil for the last few minutes.
- Let them cool for 2-3 minutes on the baking sheet. This is important—the dough is fragile right out of the oven and can tear if you move them too soon. After a couple minutes, transfer to a serving platter.
- Add the eyes. Using mustard or ketchup, dot two small eyes on the exposed hot dog at the top. A squeeze bottle makes this way easier than trying to dip a toothpick. If you want a spookier look, make the eyes slightly uneven or different sizes—imperfect mummies are more charming.
- Serve warm and watch them disappear. These are best eaten within 15-20 minutes of coming out of the oven, when the dough is still flaky and the hot dogs are juicy. Set them out on a platter and don’t be surprised if they’re gone before you finish putting out the rest of the snacks.
A few things I’ve learned the hard way: don’t overwork the dough. The more you handle it, the tougher it gets. If your kitchen is warm, pop the wrapped hot dogs in the fridge for 5 minutes before baking to firm up the dough. And if a strip unravels during baking, just push it back into place with a spatula right when they come out of the oven—the residual heat will set it.
Cooking Tips & Techniques
I’ve made these mummy hot dogs probably forty times by now, and I’ve collected a few tricks that make the process smoother and the results better. Here’s what I wish someone had told me before my first attempt.
The cold dough rule is non-negotiable. Crescent dough that’s been sitting out for more than 10 minutes gets sticky, stretchy, and impossible to cut cleanly. Keep it in the fridge until the moment you’re ready to work with it. If you’re making a big batch, only take out one can at a time. I learned this after a particularly frustrating afternoon where my dough turned into a sticky mess and I had to start over.
Don’t wrap too tightly. The dough expands as it bakes, so if you wrap it too tight, it can tear or squeeze the hot dog. Leave a little breathing room between the layers. You want the mummy to look bandaged, not vacuum-sealed. A loose wrap also creates those little air pockets that make the dough extra flaky.
Use the convection setting if you have it. Convection ovens circulate air and help the dough crisp up evenly. If using convection, reduce the temperature to 350°F (175°C) and start checking at 10 minutes. The difference in texture is noticeable—crispier, flakier, and more evenly browned.
Watch for the hot dog sweat. Sometimes hot dogs release moisture during baking, which can make the dough soggy on the bottom. To prevent this, pat the hot dogs dry with a paper towel before wrapping. It takes two seconds and makes a real difference in the final texture.
Multitasking hack: While the first batch is baking, wrap the second batch. These come together so fast that you can easily make two or three batches back to back without any downtime. I usually double the recipe for parties and just rotate pans through the oven.
One of my biggest failures happened when I tried to make these ahead of time and reheat them. They’re fine within a few hours, but they’re really best straight from the oven. The dough loses its flakiness as it sits, and the hot dogs get a little rubbery. If you absolutely must make them ahead, underbake by about 2 minutes and finish them in the oven right before serving.
Variations & Adaptations
One of the best things about this recipe is how easy it is to change up. I’ve tried quite a few variations over the years, and some of them have become favorites in their own right.
Cheesy Mummy Dogs: Before wrapping, cut a slit lengthwise down the center of each hot dog and stuff it with a strip of cheddar or mozzarella cheese. The cheese melts out slightly during baking and looks like mummy goo. My kids go absolutely crazy for these, and honestly, so do I. Just be careful—the cheese gets molten hot.
Spicy Mummy Dogs: Brush the hot dogs with sriracha or your favorite hot sauce before wrapping, then add a sprinkle of red pepper flakes to the dough. For extra heat, use jalapeño cheddar hot dogs as the base. I made a batch of these for a Halloween party and they were the first thing to disappear. If you’re looking for more spicy appetizer ideas, you might enjoy our savory mummy jalapeño popper hot dogs—they take the spice factor up another notch.
Breakfast Mummy Sausages: Swap the hot dogs for breakfast sausage links and use crescent dough strips to wrap them. Serve with maple syrup for dipping. These are perfect for Halloween morning before school or for a spooky brunch. The sweet and salty combo is dangerously good.
Vegetarian Mummy Dogs: Use your favorite plant-based hot dogs or sausages. I’ve tried several brands, and the ones that work best are the firmer varieties—soft veggie dogs tend to fall apart during wrapping. Field Roast and Beyond Meat both hold up well. Everything else stays the same.
Dessert Mummy Dogs: This one sounds weird but trust me. Swap the hot dogs for banana halves (firm but ripe) and use cinnamon-sugar dusted crescent dough strips. Bake as directed, then drizzle with melted chocolate for the eyes. They’re basically banana-chocolate crescents in mummy form. My niece requests these every year for her Halloween sleepover.
I’ve also experimented with different doughs. Puff pastry works but takes longer to bake and gets greasier. Pizza dough is too thick and bready. Crescent dough really is the perfect texture and flavor for this application—light, flaky, buttery, and quick to bake. Don’t overthink it.
Serving & Storage Suggestions
These mummy hot dogs are best served warm, right when they come out of the oven. The dough is at its flakiest, the hot dogs are juicy, and the mustard eyes are still fresh and bright. I like to arrange them on a platter with a small bowl of ketchup or mustard for dipping in the center. For a full Halloween spread, pair them with easy candy corn Rice Krispie treats for a sweet contrast, or serve alongside spiderweb Halloween cookie cake for a dessert that matches the spooky theme.
If you’re serving these at a party, keep them warm in a 200°F (95°C) oven on the baking sheet for up to 30 minutes. Cover loosely with foil to prevent the dough from drying out. They won’t be quite as crispy as fresh-baked, but they’ll still be delicious.
For storage, let any leftovers cool completely, then place them in an airtight container in the refrigerator for up to 3 days. The dough will soften as it sits, but they’re still tasty cold or reheated. To reheat, pop them in a 350°F (175°C) oven for about 5 minutes, or in an air fryer at 325°F (160°C) for 3 minutes. The air fryer actually crisps them back up nicely—better than the oven for reheating, in my experience.
I don’t recommend freezing these after baking. The texture suffers too much—the dough gets soggy and the hot dogs become rubbery. If you want to prep ahead, you can wrap the hot dogs and freeze them unbaked on a baking sheet. Once frozen solid, transfer to a freezer bag and store for up to 2 months. Bake from frozen at 375°F (190°C) for about 15-17 minutes, adding a couple extra minutes to make sure the hot dogs heat through. This is actually my preferred method for parties—I just pull out what I need and bake fresh.
Flavor-wise, these are best within the first hour. The dough starts to soften as it cools, and the mustard eyes can sink in or dry out. But honestly, in my house, leftovers are rare. These things disappear fast.
Nutritional Information & Benefits
Let’s be real—these are not health food. They’re a fun Halloween treat, and I think it’s okay to enjoy things without overanalyzing the numbers. That said, here’s the approximate nutritional breakdown for one mummy hot dog (using standard ingredients):
- Calories: 220-250
- Protein: 8-10g
- Carbohydrates: 18-22g
- Fat: 14-16g
- Sodium: 500-600mg
If you’re looking to lighten them up, use turkey hot dogs and low-fat crescent dough. The difference in taste is minimal, and you save about 60 calories and 5 grams of fat per serving. You can also skip the butter wash to save a few calories without sacrificing much flavor.
On the plus side, hot dogs do provide some protein and iron, and crescent dough offers carbohydrates for quick energy—perfect for fueling up before a night of trick-or-treating. The portion control is built in, since each one is a single serving. I usually serve 2-3 per person for a meal or 1-2 as an appetizer.
For those with dietary concerns, these contain gluten (crescent dough), dairy (in the dough and optional butter), and soy (often in hot dogs). Check your specific brands for allergen information. Gluten-free crescent dough is available from some brands, and there are plenty of hot dog options that accommodate various dietary needs. The recipe is flexible enough to work with most substitutions.
Conclusion
These easy mummy hot dogs with crescent dough wraps have become a Halloween tradition in my house, and I think they deserve a spot in yours too. They’re simple enough that you can make them on a busy school night, cute enough to impress at a party, and genuinely tasty in that nostalgic, comforting way that makes you reach for another one without thinking.
I love that this recipe doesn’t take itself too seriously. It’s fun food, made for laughing and dipping and eating with your hands while wearing a costume. The best part is watching people’s faces when they see the little mustard eyes staring up at them—kids light up, adults crack a smile, and suddenly everyone’s in a better mood. That’s what Halloween entertaining should be about.
I’d love to hear how yours turn out! Did you try any fun variations? Did your kids help with the wrapping? Drop a comment below and let me know—I read every single one, and your ideas might inspire someone else’s Halloween spread. And if you’re looking for more spooky snacks, check out our Halloween party charcuterie board or these Halloween sugar cookies for a complete spooky spread.
Happy Halloween, and happy snacking!
Frequently Asked Questions
Can I make these mummy hot dogs ahead of time?
Yes, but with some caveats. You can wrap the hot dogs up to 24 hours in advance and keep them covered in the refrigerator. Bake them fresh just before serving for the best texture. If you need to prep even further ahead, freeze the wrapped, unbaked mummy dogs for up to 2 months and bake from frozen, adding a few extra minutes to the cooking time.
Why did my crescent dough burn before the hot dogs were hot?
This usually happens when the dough strips are too thin or the oven temperature is too high. Cut your strips about half an inch wide and make sure your oven is actually at 375°F—invest in an oven thermometer if you don’t have one, because oven temperatures can be off by 25 degrees or more. If the dough is browning too fast, tent loosely with foil for the last few minutes of baking.
Can I use puff pastry instead of crescent dough?
You can, but the results are different. Puff pastry takes longer to bake (about 18-20 minutes), gets greasier, and doesn’t have the same buttery flavor that crescent dough gives. If you do use puff pastry, cut it into thinner strips and bake at 400°F (200°C) until golden and puffed. Just know it won’t taste quite the same.
What should I serve with mummy hot dogs for a Halloween party?
These pair well with other finger foods like chips and dip, veggie platters, and other spooky-themed snacks. For a full Halloween menu, try serving them alongside our easy candy corn Rice Krispie treats for a sweet contrast, or our creamy white chicken chili for something warm and hearty. A Halloween charcuterie board rounds out the spread nicely.
How do I keep the dough strips from unraveling during baking?
Make sure the end of each strip is tucked under the hot dog or pressed firmly against the dough layer beneath it. If you’re still having trouble, use a toothpick to secure the end of the strip—just remember to remove the toothpicks before serving. Chilling the wrapped hot dogs for 5-10 minutes before baking also helps the dough hold its shape.
Pin This Recipe!
Easy Mummy Hot Dogs: Best 20-Minute Halloween Recipe

These easy mummy hot dogs with crescent dough wraps are exactly what a Halloween appetizer should be—cute enough to make the kids squeal, simple enough that you’re not stuck in the kitchen while everyone else is having fun, and genuinely tasty in that nostalgic, buttery, salty way that hits different when you’re wrapped up in a blanket watching Hocus Pocus.
- Prep Time: 5 minutes
- Cook Time: 12-15 minutes
- Total Time: 20 minutes
- Yield: 8 servings 1x
- Category: Appetizer
- Cuisine: American
Ingredients
- 1 can (8 oz) refrigerated crescent roll dough
- 8 hot dogs (standard size, preferably beef)
- Mustard or ketchup for the eyes
- Optional: Everything bagel seasoning or sesame seeds
- Optional: Melted butter for brushing
Instructions
- Preheat your oven to 375°F (190°C). Line a baking sheet with parchment paper and set it aside.
- Unroll the crescent dough and separate it into triangles. Press the seams together to form rectangles.
- Cut each rectangle into thin strips, about half an inch wide, using a pizza cutter or sharp knife.
- Wrap each hot dog with the dough strips, starting at one end and wrapping at a slight angle, overlapping slightly. Leave a small gap at the top for the face.
- Place the wrapped hot dogs on the prepared baking sheet, leaving about an inch of space between each one.
- Optional: Brush with melted butter for a golden, glossy finish.
- Bake for 12-15 minutes, until the dough is golden brown and the hot dogs are heated through.
- Let them cool for 2-3 minutes on the baking sheet before transferring to a serving platter.
- Add the eyes using mustard or ketchup, dotting two small eyes on the exposed hot dog at the top.
- Serve warm and watch them disappear.
Notes
Keep crescent dough cold until ready to use. Cut strips about half an inch wide for the perfect dough-to-dog ratio. Don’t wrap too tightly—leave breathing room for expansion. Pat hot dogs dry before wrapping to prevent soggy dough. For best results, serve within 15-20 minutes of baking. To reheat, use an air fryer at 325°F (160°C) for 3 minutes or oven at 350°F (175°C) for 5 minutes.
Nutrition
- Serving Size: 1 mummy hot dog
- Calories: 220250
- Sugar: 35
- Sodium: 500600
- Fat: 1416
- Saturated Fat: 57
- Carbohydrates: 1822
- Fiber: 1
- Protein: 810
Keywords: mummy hot dogs, Halloween recipe, crescent dough hot dogs, easy Halloween appetizer, spooky snacks, kid-friendly Halloween food


