My brother-in-law Mark had claimed to hate pumpkin desserts for a solid fifteen years. Fifteen years of Thanksgiving pies pushed to the side of his plate. Fifteen years of pumpkin bread being politely declined. “It’s the texture,” he’d say, making a face. “Too mushy. And the spice mix tastes like a candle shop.” Then last October, I made this no-bake pumpkin cheesecake with a gingersnap crust, mostly because I wanted something easy for a Sunday dinner and didn’t feel like turning on the oven. I set it on the counter to chill and walked away. Ten minutes later, I came back to find Mark standing over the springform pan, a fork in his hand, with a guilty look on his face. “I was just checking if it set properly,” he mumbled, crumbs all over his shirt. Honestly, I’ve never felt more validated in my entire life. That’s the moment I knew this recipe was something special—it converted a man who once compared pumpkin pie to “eating a wet sweater.” And it can do the same for anyone who thinks they’ve had enough pumpkin desserts to last a lifetime.
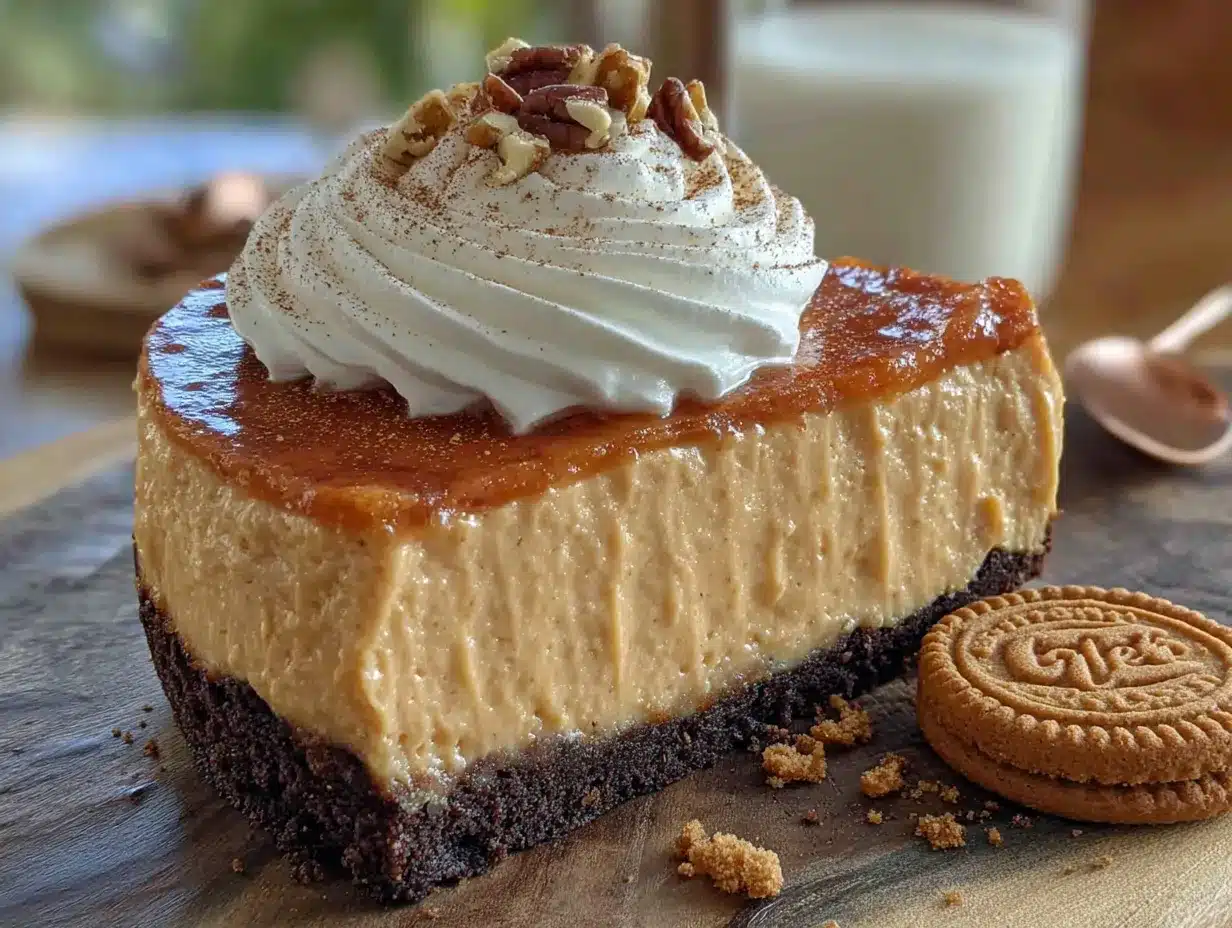
This isn’t your typical heavy, overly sweet pumpkin cheesecake. The filling is light and airy, thanks to a clever mixing technique, and it has this incredible tang from the cream cheese that cuts through the sweetness of the pumpkin. The crust, oh the crust—crunchy, spiced gingersnaps mixed with melted butter, pressed into a perfect, crumbly foundation. No baking required, which means no cracked tops, no water baths, and no stress. You just mix, pour, chill, and wait. That wait is the hardest part, let me tell you. But when you finally slice into that creamy, spiced filling with the crisp crust underneath? Worth every agonizing hour of staring at the refrigerator door.
I’ve made this cheesecake for everything from casual Tuesday night cravings to full-blown Thanksgiving dinners, and it never fails to get that same reaction—the quiet pause after the first bite, the wide eyes, the inevitable question: “Can I have the recipe?” It’s the kind of dessert that makes people forget about the complicated, oven-baked versions. And honestly? It tastes better the next day. The flavors meld together overnight, the texture firms up perfectly, and the spices settle into something warm and deeply comforting. Maybe you’ve been there, standing in front of your fridge at 10 p.m., sneaking a sliver of cheesecake you were supposed to save for tomorrow. I’m not judging. I’ve done it too. This recipe was made for moments like that.
Why You’ll Love This Recipe
Let me break down exactly why this no-bake pumpkin cheesecake has become my most-requested fall recipe. I’ve tested this version at least a dozen times, tweaking the ratios, swapping ingredients, and even accidentally leaving it out overnight once (don’t ask, it was a long day). Here’s what makes it stand out:
- No Oven Required : This is the ultimate fall dessert when you don’t want to heat up the kitchen. The gingersnap crust sets in the fridge, and the filling firms up without any baking. Perfect for those warm autumn afternoons when you still want something cozy but don’t want to sweat over a hot oven.
- Simple Ingredients : You probably have most of these in your pantry right now. Gingersnap cookies, cream cheese, pumpkin puree, heavy cream, and a few spices. No fancy extracts, no hard-to-find specialty items. I use store-brand cream cheese all the time and it works perfectly.
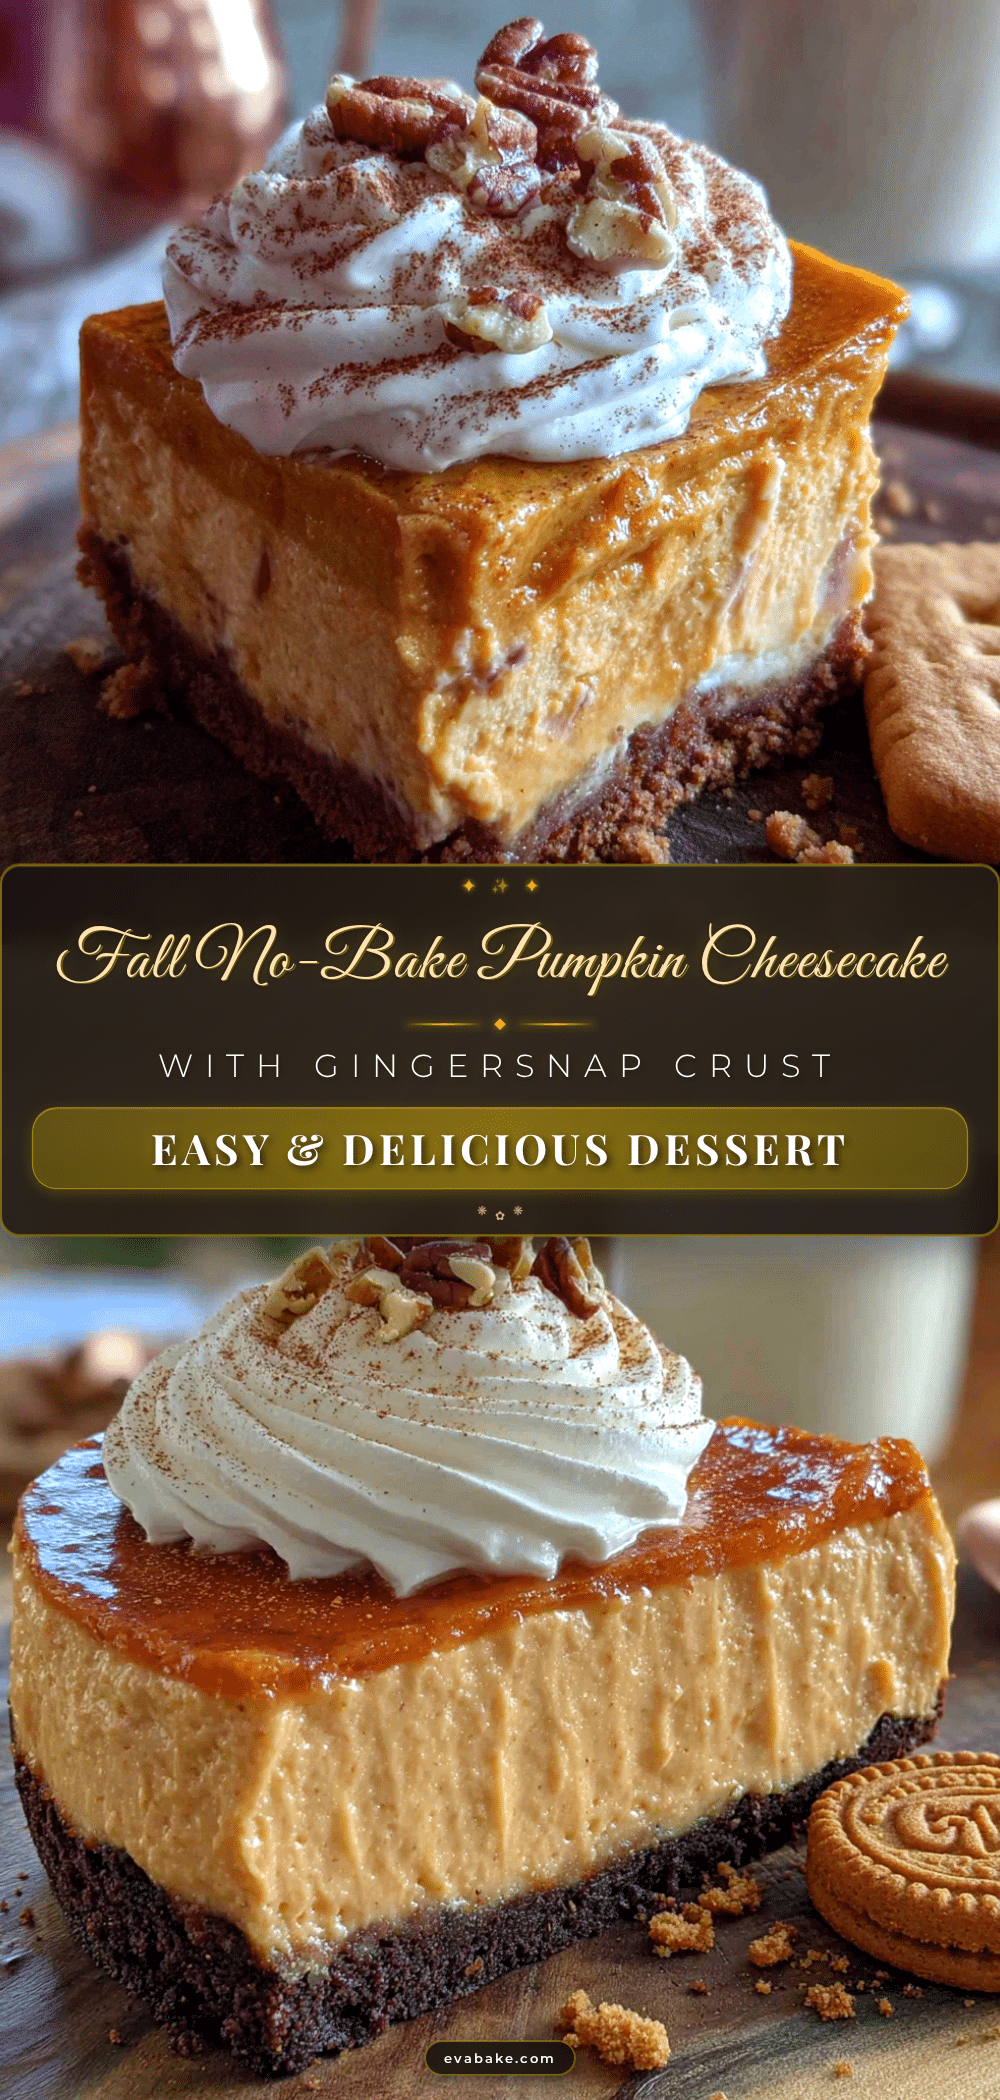
- Perfect for Thanksgiving : This cheesecake is a lifesaver when your oven is already packed with turkey, stuffing, and casseroles. You can make it a day or two ahead, and it actually gets better with time. Plus, it’s a showstopper on the dessert table—that creamy orange filling against the dark, crunchy crust is gorgeous.
- Crowd-Pleaser : I’ve served this to pumpkin lovers and pumpkin skeptics alike, and everyone goes back for seconds. The texture is smooth and mousse-like, not dense or heavy. Even my brother-in-law Mark asked for the leftovers—and he’s the one who “hated” pumpkin desserts for fifteen years.
- Unbelievably Delicious : The combination of tangy cream cheese, sweet pumpkin, and warm spices like cinnamon, ginger, and nutmeg is pure comfort. The gingersnap crust adds this extra layer of spicy crunch that takes it over the top. It’s the kind of dessert that makes you close your eyes after the first bite.
This recipe isn’t just another pumpkin dessert—it’s the one that changes minds. The texture is light enough that you don’t feel weighed down, but rich enough to satisfy that deep fall craving. It’s comfort food reimagined: faster, easier, and just as soul-soothing as anything that comes out of the oven. Perfect for impressing guests without the stress, or turning a simple weeknight into something special.
What Ingredients You Will Need
This recipe uses simple, wholesome ingredients that come together to create something truly special. I’ve tested each component carefully, so let me walk you through what you’ll need and why each one matters.
For the Gingersnap Crust
- 2 cups (200g) gingersnap cookie crumbs (about 30-35 cookies, crushed finely) – I recommend using store-bought gingersnaps for convenience. My personal favorite is the Anna’s Ginger Thins brand—they have just the right amount of spice and crunch. You can also use a food processor to crush them, or place them in a zip-top bag and crush with a rolling pin. It’s a little arm workout, but honestly, it’s satisfying.
- 1/4 cup (50g) granulated sugar – This adds a touch of sweetness to balance the spicy cookies. You can reduce it to 3 tablespoons if you prefer a less sweet crust.
- 6 tablespoons (85g) unsalted butter, melted – Use salted butter if that’s all you have, just reduce the added salt in the filling slightly. Melt the butter gently in the microwave or on the stovetop—you don’t want it bubbling or brown.
- 1/4 teaspoon ground cinnamon – This reinforces the warm spice notes from the gingersnaps. Fresh cinnamon is best, but the jarred stuff works fine.
For the Pumpkin Cheesecake Filling
- 16 ounces (450g) cream cheese, softened to room temperature – This is crucial. Cold cream cheese will leave you with lumpy filling. Leave it on the counter for at least an hour before you start. I’ve used both full-fat and reduced-fat versions, and full-fat gives the creamiest, richest texture. Philadelphia brand is my go-to, but store brands work too.
- 1 cup (200g) packed light brown sugar – Brown sugar adds a deeper, molasses-like sweetness that pairs beautifully with pumpkin. Dark brown sugar works too, but it will give a slightly stronger flavor.
- 1 cup (240g) pumpkin puree – Make sure you’re using 100% pumpkin puree, not pumpkin pie filling. The pie filling has added sugar and spices that will throw off the balance. Libby’s is the gold standard here—it’s consistent and has the right moisture content.
- 1 teaspoon vanilla extract – Pure vanilla extract is worth the splurge here. Imitation vanilla can taste artificial, especially in a no-bake dessert where the flavors aren’t cooked off.
- 1 1/2 teaspoons ground cinnamon – This is the backbone of the spice blend. I like to use Ceylon cinnamon for its milder, more complex flavor, but Cassia cinnamon works perfectly too.
- 1/2 teaspoon ground ginger – Adds a gentle warmth that complements the gingersnap crust. Fresh ground ginger is lovely, but dried works just fine.
- 1/4 teaspoon ground nutmeg – Freshly grated nutmeg is amazing if you have it—just grate a little over the mixture. It makes a noticeable difference.
- 1/4 teaspoon salt – Don’t skip this. Salt balances the sweetness and enhances all the other flavors. I use fine sea salt.
- 1 1/2 cups (360ml) heavy cream, cold – This is what gives the cheesecake its light, mousse-like texture. Make sure it’s very cold—pop it in the freezer for 10 minutes before whipping if your kitchen is warm. I don’t recommend substituting with half-and-half or milk; the fat content is essential for stability.
Optional Toppings
- Whipped cream – Homemade is best, but store-bought works in a pinch. I like to add a pinch of cinnamon to my whipped cream.
- Caramel sauce – Drizzle over the top for extra decadence. Store-bought or homemade, both are delicious.
- Crushed gingersnaps – A sprinkle on top adds crunch and visual appeal.
- Pecans or walnuts – Toasted and chopped, they add a lovely nutty contrast.
Equipment Needed
You don’t need a lot of fancy equipment for this recipe, which is one of the reasons I love it. Here’s what you’ll need:
- 9-inch springform pan – This is essential for easy removal. The sides release cleanly, giving you perfect slices. If you don’t have one, you can use a deep-dish pie plate, but the slices won’t be as neat. I’ve had my springform pan for years—it’s a basic non-stick one from a kitchen supply store, and it still works perfectly.
- Electric hand mixer or stand mixer – You need this to whip the cream and beat the cream cheese until smooth. A whisk will work if you have very strong arms, but honestly, your arm will get tired. I use a hand mixer for convenience.
- Food processor or zip-top bag and rolling pin – For crushing the gingersnaps. A food processor gives the most consistent crumbs, but a bag and rolling pin work fine—just make sure there are no large chunks left.
- Mixing bowls – You’ll need a large bowl for the cream cheese mixture and a medium bowl for whipping the cream. Glass or stainless steel work best because they stay cool.
- Rubber spatula – For scraping down the sides of the bowl and folding in the whipped cream. A flexible silicone spatula is ideal.
- Measuring cups and spoons – Accuracy matters in baking, even no-bake baking. Use dry measuring cups for dry ingredients and liquid measuring cups for the cream.
- Plastic wrap – To cover the cheesecake while it chills. Press it directly onto the surface of the filling to prevent a skin from forming.
Budget-friendly tip: If you don’t have a springform pan, you can use a 9-inch pie dish. The cheesecake will be slightly shallower, and you’ll have a harder time getting clean slices, but it will taste just as good. I’ve done this in a pinch, and no one complained.
Preparation Method
Let me walk you through this step by step. I’ve made this cheesecake more times than I can count, so I’ll share all the little tricks I’ve learned along the way.
- Prepare the crust : In a medium bowl, combine the gingersnap crumbs, granulated sugar, and cinnamon. Pour the melted butter over the mixture and stir with a fork until all the crumbs are evenly moistened. It should look like wet sand. Press the mixture firmly into the bottom and about 1 inch up the sides of a 9-inch springform pan. Use the bottom of a measuring cup to press it down evenly—this gives you a compact, stable crust. Place the pan in the refrigerator while you prepare the filling. Pro tip: If your crumbs are too loose, add another tablespoon of melted butter. The mixture should hold together when you squeeze it in your fist.
- Soften the cream cheese : Take your cream cheese out of the refrigerator at least 1 hour before you start. It should be soft enough that you can easily press your finger into it. If you’re in a hurry, cut the cream cheese into cubes and microwave it in 10-second bursts until just softened. Be careful not to melt it—you want it soft, not liquidy.
- Whip the heavy cream : In a large, chilled bowl, pour the cold heavy cream. Using an electric hand mixer or stand mixer with the whisk attachment, beat the cream on medium-high speed until stiff peaks form. This usually takes about 3-5 minutes. You’ll know it’s ready when the cream holds its shape when you lift the beaters. Be careful not to over-whip, or you’ll end up with butter. Set the whipped cream aside in the refrigerator while you prepare the filling. Sensory cue: The cream should look billowy and soft, with peaks that stand up straight without flopping over.
- Make the pumpkin filling : In another large bowl, beat the softened cream cheese with an electric mixer on medium speed until smooth and creamy, about 2 minutes. Scrape down the sides of the bowl with a spatula. Add the brown sugar and beat until well combined, another minute or so. Add the pumpkin puree, vanilla extract, cinnamon, ginger, nutmeg, and salt. Beat on medium speed until everything is fully incorporated and the mixture is smooth. Scrape down the sides again to make sure there are no hidden lumps. Pro tip: If you see small lumps of cream cheese, don’t panic. Just keep beating for another minute—they’ll break down. If they don’t, your cream cheese wasn’t soft enough.
- Fold in the whipped cream : Remove the whipped cream from the refrigerator. Add about one-third of it to the pumpkin mixture and gently fold it in using a rubber spatula. Use a cutting motion—down through the center, across the bottom, and up the side. Rotate the bowl as you go. This lightens the mixture and makes it easier to incorporate the rest. Add the remaining whipped cream and fold gently until no white streaks remain. The mixture should be light, fluffy, and uniform in color. Warning: Don’t over-mix at this stage, or you’ll deflate the whipped cream and end up with a dense cheesecake. Stop as soon as it’s combined.
- Assemble the cheesecake : Remove the springform pan with the crust from the refrigerator. Pour the pumpkin filling into the crust and spread it evenly with a spatula. Give the pan a gentle tap on the counter to release any air bubbles. Smooth the top with the spatula. Cover the pan loosely with plastic wrap, making sure the wrap doesn’t touch the surface of the filling. Pro tip: If you want perfectly smooth top, run a hot knife or offset spatula over the surface after spreading.
- Chill the cheesecake : Refrigerate the cheesecake for at least 6 hours, but preferably overnight. The longer it chills, the firmer and cleaner the slices will be. I know it’s tempting to rush this step, but trust me—patience pays off. The filling needs time to set properly. Time estimate: 6-8 hours minimum. Overnight is ideal.
- Serve : When ready to serve, run a thin knife around the edge of the pan to loosen the cheesecake. Release the springform clasp and carefully remove the sides. Slice with a sharp knife, wiping the blade clean between cuts for neat slices. Serve cold, topped with whipped cream, caramel sauce, or crushed gingersnaps if desired.
Cooking Tips & Techniques
Over the years, I’ve learned a few things the hard way. Here are my best tips to ensure your no-bake pumpkin cheesecake turns out perfectly every time.
Room temperature ingredients are non-negotiable. I learned this lesson the hard way when I tried to rush the process and ended up with a lumpy filling. Cold cream cheese doesn’t blend smoothly, and you’ll be left with white specks throughout your otherwise beautiful cheesecake. Take the cream cheese out of the fridge at least an hour before you start. If you forget, cut it into small cubes and let it sit for 20 minutes—it’ll soften faster.
Don’t over-whip the cream. This is probably the most common mistake I see. You want stiff peaks, but if you keep going past that point, the cream will start to separate and turn into butter. The texture will become grainy, and your cheesecake won’t be as light. Watch closely—when the cream leaves visible trails and holds its shape when you lift the beaters, stop immediately.
Press the crust firmly. A loose crust will crumble when you try to slice the cheesecake. Use the bottom of a measuring cup or a flat-bottomed glass to press the crumbs down with authority. I press the bottom first, then the sides. Make sure the edges are compact and even. If the crust feels too sandy, add a little more melted butter.
Chill overnight for best results. I know six hours seems like a long time, but overnight is even better. The flavors meld together, the texture firms up perfectly, and the crust sets completely. I’ve made this cheesecake two days ahead of Thanksgiving, and it was the best version yet. The spices mellow and deepen, and the cream cheese flavor becomes more pronounced.
Use a sharp knife for clean slices. Run the knife under hot water, dry it, then slice. Wipe the blade clean between each cut. This gives you those beautiful, Instagram-worthy slices. If the cheesecake sticks to the knife, it’s still too soft—pop it back in the fridge for another hour.
One mistake I made : I once used pumpkin pie filling instead of pure pumpkin puree. The cheesecake came out overly sweet and had a weird, gelatinous texture. The pre-added spices threw off the balance completely. Learn from my mistake—always check the label. You want 100% pumpkin puree, nothing else.
Variations & Adaptations
One of the best things about this recipe is how adaptable it is. Here are some variations I’ve tried and loved:
- Gluten-Free Version : Use gluten-free gingersnap cookies for the crust. I’ve tested this with several brands, and they all work well. Just make sure to check the labels—some gluten-free cookies are softer and may need a little less butter. The filling is naturally gluten-free, so this is an easy swap.
- Dairy-Free Version : Substitute the cream cheese with a high-quality dairy-free cream cheese alternative. I’ve had good results with the Kite Hill brand. Use coconut cream (the solid part from a can of full-fat coconut milk) instead of heavy cream. The texture will be slightly different—a little denser—but still delicious. Make sure your dairy-free cream cheese is softened before mixing.
- Low-Sugar Version : Replace the brown sugar with a granulated monk fruit sweetener or erythritol. Use a sugar-free vanilla extract. The sweetness will be a bit less complex, but the pumpkin and spices still shine through. I’ve made this for a friend with diabetes, and she loved it.
- Spice It Up : Add a pinch of cloves or allspice to the filling for a more complex spice profile. You can also add a tablespoon of bourbon or dark rum for a grown-up twist—just reduce the heavy cream by a tablespoon to compensate for the extra liquid.
- Chocolate Gingersnap Crust : Mix 1 cup of gingersnap crumbs with 1 cup of chocolate wafer crumbs for a richer, more decadent crust. The chocolate pairs beautifully with the pumpkin and spices. I tried this once for a friend’s birthday, and it was a hit.
- Mini Cheesecakes : Use a muffin tin lined with paper liners instead of a springform pan. Press the crust into the bottom of each liner, fill with the pumpkin mixture, and chill. These are perfect for parties or portion control. Reduce the chilling time to about 4 hours.
Serving & Storage Suggestions
This cheesecake is best served cold, straight from the refrigerator. The texture is firm but creamy, and the flavors are most pronounced when chilled. Here’s how I like to serve it:
Presentation : Place the cheesecake on a beautiful cake stand or platter. Top with a generous dollop of whipped cream, a drizzle of caramel sauce, and a sprinkle of crushed gingersnaps. For a more elegant look, pipe the whipped cream in rosettes around the edge. A few fresh mint leaves add a pop of green that contrasts beautifully with the orange filling.
Complementary Dishes : This cheesecake pairs wonderfully with a warm cup of spiced apple cider or a strong coffee. For a full fall dessert spread, serve it alongside a warm apple crisp or a slice of pecan pie. The creamy, cool texture of the cheesecake is a nice contrast to warm, baked desserts.
Storage : Cover the cheesecake tightly with plastic wrap or aluminum foil and store it in the refrigerator for up to 5 days. The flavors actually improve after the first day, so don’t be afraid to make it ahead. If you have leftovers, press a piece of plastic wrap directly onto the cut surface to prevent it from drying out.
Freezing : This cheesecake freezes beautifully. Wrap the entire cheesecake (or individual slices) tightly in plastic wrap, then in a layer of aluminum foil. Freeze for up to 3 months. To thaw, transfer to the refrigerator overnight. The texture will be just as creamy and delicious. I often make two cheesecakes at once—one for now, one for later.
Reheating : This is a no-bake cheesecake, so there’s no need to reheat it. Serve it cold. If you’ve frozen it, let it thaw in the fridge overnight. Don’t try to microwave it—the texture will become runny and weird.
Flavor Development : The spices in this cheesecake mellow and deepen over time. On day one, the ginger and cinnamon are quite forward. By day three, they’ve melded into a more harmonious, rounded flavor. The cream cheese tang also becomes more pronounced. Honestly, this is one of those desserts that tastes better on day two or three.
Nutritional Information & Benefits
Here’s the approximate nutritional breakdown for one slice (based on 12 servings):
- Calories : 380
- Fat : 26g
- Saturated Fat : 16g
- Carbohydrates : 33g
- Sugar : 24g
- Protein : 5g
- Fiber : 1g
- Sodium : 280mg
This cheesecake is a treat, but it does have some redeeming qualities. Pumpkin is packed with vitamin A, which is great for eye health and immune function. It’s also a good source of fiber and antioxidants. The cream cheese provides calcium and protein, while the heavy cream adds a touch of healthy fats that help keep you full.
Dietary Considerations : This recipe contains gluten (from the gingersnaps), dairy (from the cream cheese and heavy cream), and eggs (if you choose to add them—though this version doesn’t use eggs). For a gluten-free version, use gluten-free gingersnaps. For a dairy-free version, use dairy-free alternatives as noted in the variations section. This cheesecake is naturally egg-free and can be made nut-free by omitting any nut toppings.
Personal Wellness Perspective : I believe in balance. This cheesecake is a celebration of fall flavors, and it’s meant to be enjoyed in moderation. I don’t stress about the numbers—I focus on the joy of sharing good food with people I love. That said, if you’re watching your sugar intake, the low-sugar version is a great option that doesn’t sacrifice flavor.
Conclusion
This no-bake pumpkin cheesecake with gingersnap crust is more than just a dessert—it’s a fall tradition in the making. It’s the kind of recipe that brings people together, that changes minds, that makes you feel like a kitchen genius without any of the stress. The creamy, spiced filling, the crunchy, buttery crust, the way it all comes together in one bowl with no oven required—it’s pure autumn magic.
I love this recipe because it’s forgiving. You can make it ahead, you can customize it, and it always turns out beautiful. It’s the dessert I bring to every fall gathering, the one people ask for by name, the one that makes me feel like I’ve got this whole cooking thing figured out. And honestly? You will too.
I’d love to hear how yours turns out. Did you try any variations? Did you serve it with something special? Drop a comment below and let me know—I read every single one, and I love seeing your creations. And if you really love it, share the recipe with a friend. That’s what fall is all about, right? Good food, good company, and a little bit of pumpkin in every bite.
Happy fall baking, friends. You’ve got this.
Frequently Asked Questions
Can I use pumpkin pie filling instead of pumpkin puree?
No, I don’t recommend it. Pumpkin pie filling has added sugar and spices that will throw off the balance of this recipe. The cheesecake will come out overly sweet and have a different texture. Stick with 100% pure pumpkin puree for the best results.
How long does this cheesecake need to chill?
At least 6 hours, but overnight is ideal. The longer it chills, the firmer and cleaner the slices will be. I’ve made it two days ahead of time, and it was perfect. Don’t rush this step—patience is key for a no-bake cheesecake.
Can I freeze this no-bake pumpkin cheesecake?
Absolutely! Wrap the entire cheesecake or individual slices tightly in plastic wrap, then in aluminum foil. Freeze for up to 3 months. Thaw in the refrigerator overnight before serving. The texture stays creamy and delicious.
My cheesecake filling is too soft. What went wrong?
This usually happens for one of two reasons: either the cream cheese wasn’t softened enough, or the whipped cream wasn’t whipped to stiff peaks. Make sure your cream cheese is at room temperature and your heavy cream is very cold before whipping. Also, be gentle when folding—over-mixing can deflate the cream.
Can I make this without a springform pan?
Yes, you can use a deep-dish pie plate instead. The slices won’t be as neat, and the cheesecake will be slightly shallower, but it will taste just as good. You can also use a 9-inch square baking dish for a different shape. Just adjust the chilling time as needed.
Pin This Recipe!
Easy No-Bake Pumpkin Cheesecake with Gingersnap Crust
A light and airy no-bake pumpkin cheesecake with a crunchy gingersnap crust. This easy, crowd-pleasing dessert requires no oven and is perfect for fall gatherings or Thanksgiving.
- Prep Time: 20 minutes
- Cook Time: 0 minutes
- Total Time: 6 hours 20 minutes (includes chilling time)
- Yield: 12 servings 1x
- Category: Dessert
- Cuisine: American
Ingredients
- 2 cups (200g) gingersnap cookie crumbs (about 30–35 cookies)
- 1/4 cup (50g) granulated sugar
- 6 tablespoons (85g) unsalted butter, melted
- 1/4 teaspoon ground cinnamon
- 16 ounces (450g) cream cheese, softened to room temperature
- 1 cup (200g) packed light brown sugar
- 1 cup (240g) pumpkin puree (100% pure, not pie filling)
- 1 teaspoon vanilla extract
- 1 1/2 teaspoons ground cinnamon
- 1/2 teaspoon ground ginger
- 1/4 teaspoon ground nutmeg
- 1/4 teaspoon salt
- 1 1/2 cups (360ml) heavy cream, cold
- Whipped cream, caramel sauce, crushed gingersnaps, or pecans for topping (optional)
Instructions
- Prepare the crust: In a medium bowl, combine gingersnap crumbs, granulated sugar, and cinnamon. Pour melted butter over the mixture and stir with a fork until all crumbs are evenly moistened (like wet sand). Press firmly into the bottom and about 1 inch up the sides of a 9-inch springform pan. Use the bottom of a measuring cup to press it down evenly. Refrigerate while preparing the filling.
- Soften the cream cheese: Take cream cheese out of the refrigerator at least 1 hour before starting. It should be soft enough to easily press a finger into it. If in a hurry, cut into cubes and microwave in 10-second bursts until just softened (do not melt).
- Whip the heavy cream: In a large chilled bowl, pour cold heavy cream. Using an electric hand mixer or stand mixer with whisk attachment, beat on medium-high speed until stiff peaks form (about 3-5 minutes). Set whipped cream aside in the refrigerator.
- Make the pumpkin filling: In another large bowl, beat softened cream cheese with an electric mixer on medium speed until smooth and creamy (about 2 minutes). Scrape down sides. Add brown sugar and beat until well combined (about 1 minute). Add pumpkin puree, vanilla extract, cinnamon, ginger, nutmeg, and salt. Beat on medium speed until fully incorporated and smooth. Scrape down sides again.
- Fold in the whipped cream: Remove whipped cream from refrigerator. Add about one-third to the pumpkin mixture and gently fold with a rubber spatula using a cutting motion (down through center, across bottom, up the side). Add remaining whipped cream and fold gently until no white streaks remain. Do not over-mix.
- Assemble the cheesecake: Remove springform pan with crust from refrigerator. Pour pumpkin filling into crust and spread evenly with a spatula. Gently tap pan on counter to release air bubbles. Smooth top. Cover loosely with plastic wrap, ensuring wrap does not touch the filling surface.
- Chill the cheesecake: Refrigerate for at least 6 hours, but preferably overnight. The longer it chills, the firmer and cleaner the slices will be.
- Serve: When ready to serve, run a thin knife around the edge of the pan to loosen. Release springform clasp and carefully remove sides. Slice with a sharp knife, wiping blade clean between cuts. Serve cold, topped with whipped cream, caramel sauce, or crushed gingersnaps if desired.
Notes
Room temperature cream cheese is crucial for a smooth filling. Chill overnight for best flavor and texture. Use 100% pumpkin puree, not pumpkin pie filling. For clean slices, run a hot knife and wipe between cuts. Can be made 2 days ahead and freezes well for up to 3 months.
Nutrition
- Serving Size: 1 slice (1/12 of che
- Calories: 380
- Sugar: 24
- Sodium: 280
- Fat: 26
- Saturated Fat: 16
- Carbohydrates: 33
- Fiber: 1
- Protein: 5
Keywords: no-bake pumpkin cheesecake, pumpkin cheesecake, gingersnap crust, no-bake dessert, fall dessert, Thanksgiving dessert, easy cheesecake