There used to be a tiny bakery tucked between a laundromat and a vintage shop three blocks from my first apartment that made a peppermint cheesecake that ruined me for all others. When they closed—just a handwritten sign on the door one Tuesday that said “Thanks for the memories”—I honestly felt a little lost. That first winter without their peppermint cheesecake, every holiday gathering felt incomplete. Something was missing. After seven tries—three of which ended up in the trash, one that my neighbor politely called “interesting”—I finally cracked the code on this Perfect Peppermint Cheesecake with Chocolate Cookie Crust.
The secret, let me tell you, wasn’t in some fancy technique I learned in a cooking class. It was in paying attention to the small things: the way the peppermint should hit your tongue just after the chocolate, not before it. The way the crust needs to be pressed with real conviction, not just patted down. I spent a whole Saturday afternoon obsessing over the texture of the filling alone. Maybe you’ve been there—that feeling when a recipe becomes a mission rather than just something to eat for dessert.
This Perfect Peppermint Cheesecake with Chocolate Cookie Crust is that bakery’s spirit living on in my kitchen. It’s the dessert I bring to every holiday dinner party, the one that makes people close their eyes on the first bite. Honestly, I keep making it because it reminds me that some good things don’t disappear—they just wait for you to figure them out yourself.
Why You’ll Love This Perfect Peppermint Cheesecake with Chocolate Cookie Crust
This isn’t just another cheesecake recipe you’ll pin and forget. This is the dessert that will have your guests asking for the recipe before they’ve even finished their slice. I’ve tested this Perfect Peppermint Cheesecake with Chocolate Cookie Crust for three holiday seasons now, and it never fails to steal the show.
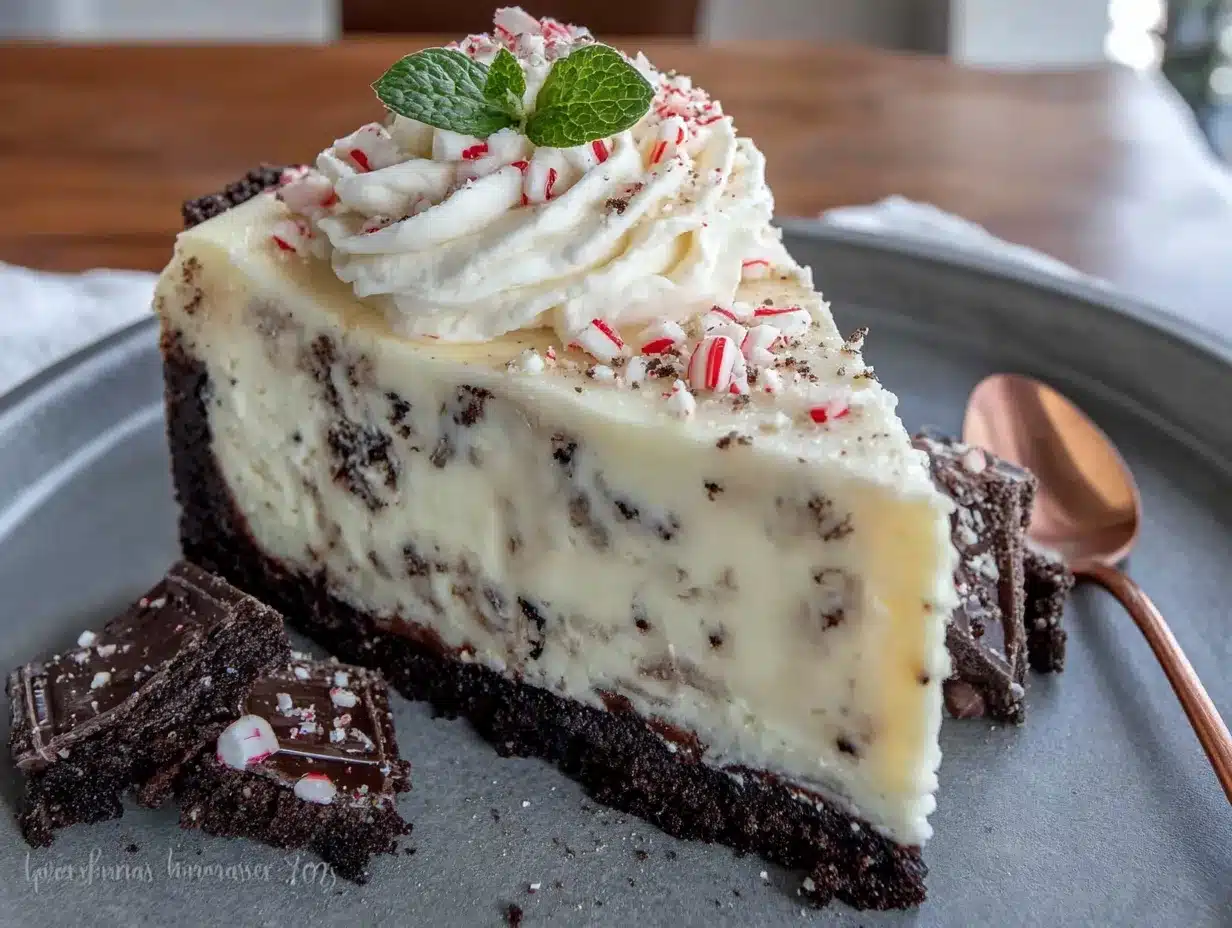
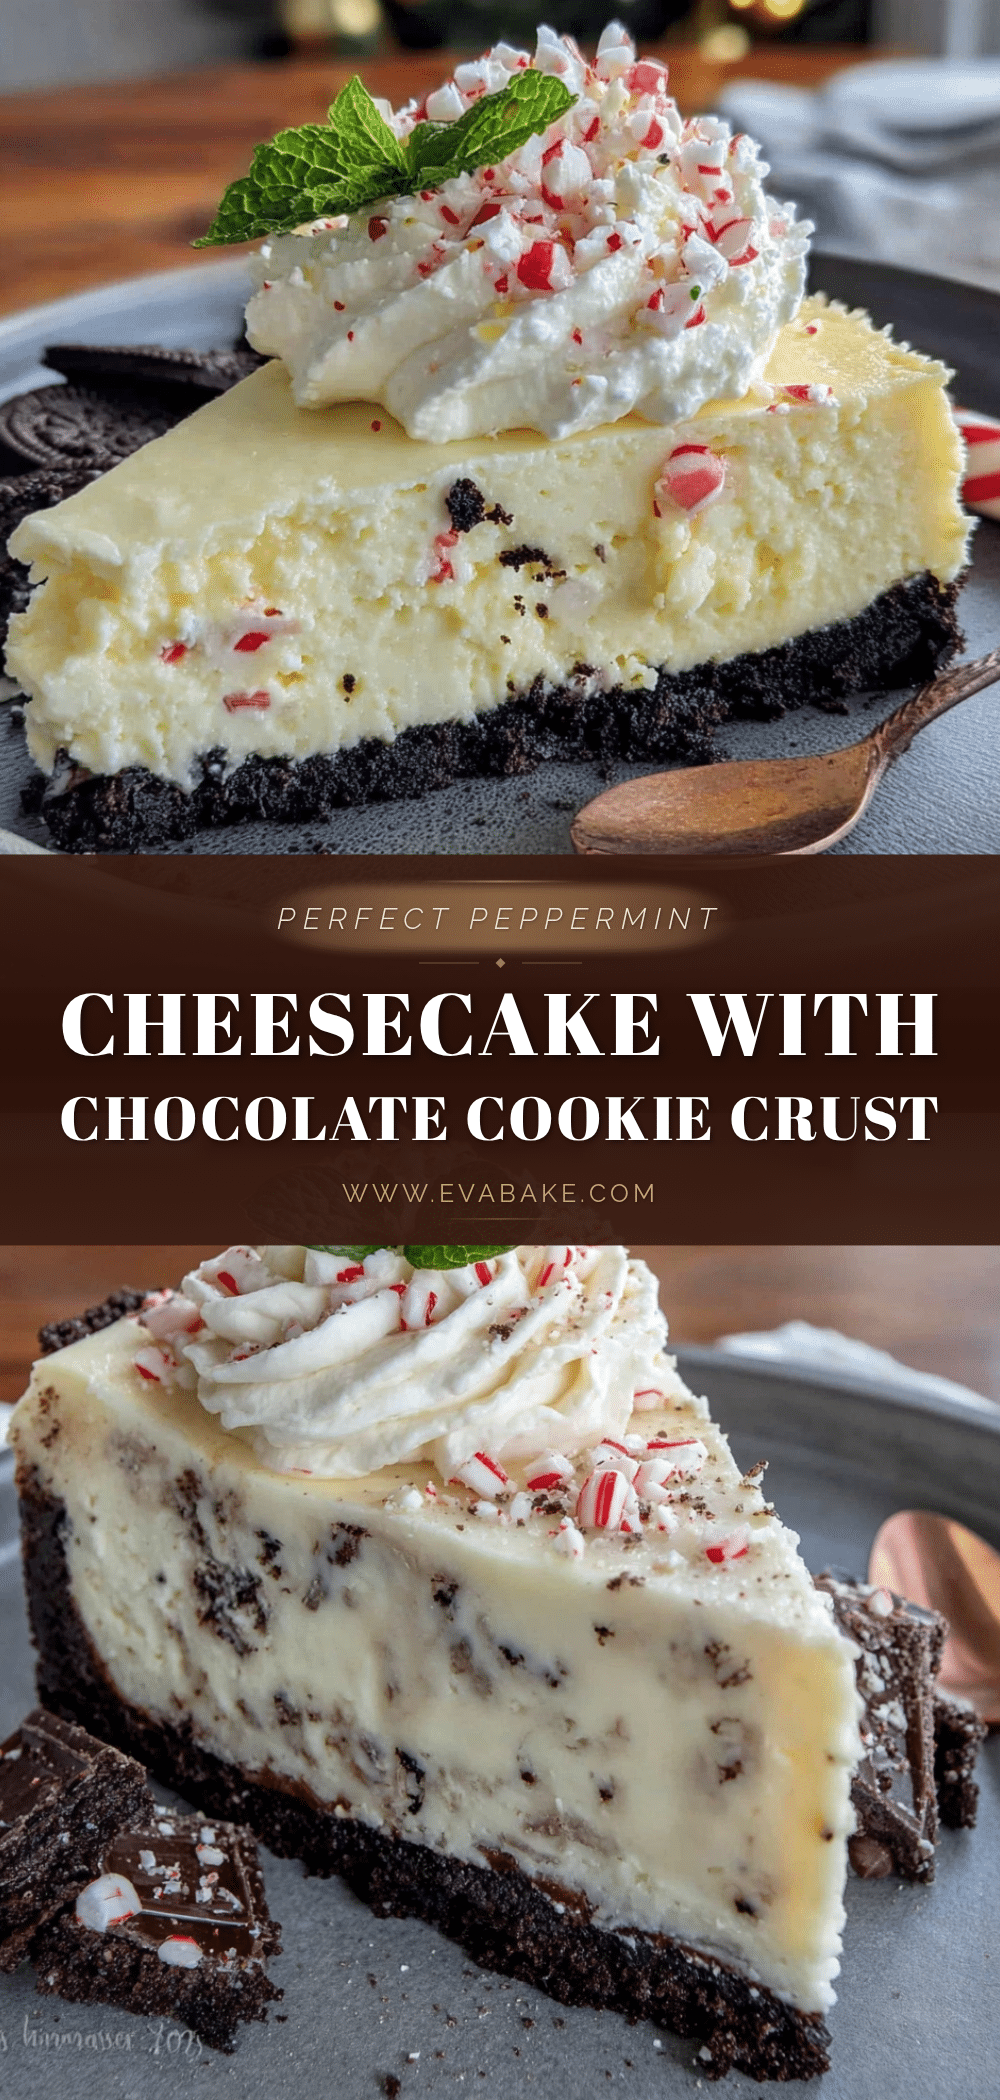
- Show-Stopping Presentation: The contrast between the creamy, pale peppermint filling and the dark chocolate cookie crust is visually stunning. It looks like you spent hours on it—and you will, but it’s worth every minute.
- Perfect for Holiday Hosting: This cheesecake is designed for gatherings. It serves a crowd, can be made a day ahead (which takes so much pressure off your hosting schedule), and slices beautifully. Your guests will think you’re a pastry chef.
- Balanced Flavors: The peppermint is refreshing without being overpowering, and the chocolate crust provides a rich, grounding counterpoint. It’s not a sugar bomb—it’s a sophisticated dessert that adults and kids both love.
- Make-Ahead Magic: Cheesecake actually gets better after a day in the fridge. The flavors meld, the texture firms up perfectly, and you free up your oven on the day of your party. This is a host’s best friend.
- Customizable Toppings: You can go classic with whipped cream and crushed candy canes, or dress it up with chocolate shavings, a drizzle of white chocolate, or even a sprinkle of edible glitter for extra holiday magic.
This recipe is the one that makes you look like you’ve been making cheesecakes your whole life. It’s the kind of dessert that has people leaning across the table for another look before they’ve even tasted it. And when they do taste it—that first creamy, minty, chocolatey bite—you’ll see it. That’s the look every host wants.
What Ingredients You Will Need
This Perfect Peppermint Cheesecake with Chocolate Cookie Crust relies on simple, quality ingredients that work together to create something truly special. Most of these are pantry staples for a baker, but a few deserve a little extra attention.
For the Chocolate Cookie Crust
- 2 cups (200g) chocolate cookie crumbs — I prefer Oreo cookies (filling removed) or chocolate wafer cookies. Pulse them in a food processor until they’re fine crumbs. (Using a good brand like Nabisco gives the most consistent texture.)
- 6 tablespoons (85g) unsalted butter, melted — Make sure it’s melted but not hot, or it will make the crumbs greasy instead of binding them.
- 2 tablespoons (25g) granulated sugar — Just a touch to balance the bitterness of the dark chocolate cookies.
- 1/4 teaspoon salt — Don’t skip this! Salt makes the chocolate flavor pop.
For the Peppermint Cheesecake Filling
- 32 ounces (904g) cream cheese, softened to room temperature — This is non-negotiable. Cold cream cheese will give you a lumpy filling. I use Philadelphia brand for the creamiest results. Let it sit on the counter for at least 2 hours.
- 1 cup (200g) granulated sugar — Standard white sugar works perfectly here.
- 1 cup (240g) full-fat sour cream, room temperature — Adds tanginess and a silky texture. Don’t use low-fat; it changes the consistency.
- 1 teaspoon vanilla extract — Pure vanilla extract, not imitation. It rounds out the peppermint flavor beautifully.
- 1 teaspoon peppermint extract — This is where you need to be careful. Not all peppermint extracts are created equal. I recommend using a trusted brand like McCormick or Nielsen-Massey. Start with 1 teaspoon and taste the filling before adding more.
- 4 large eggs, room temperature — Cold eggs will seize the batter. If you forgot to take them out, place them in a bowl of warm water for 5 minutes.
- 2-3 drops green food coloring (optional) — For that classic pale green peppermint look. You can also leave it white for a more natural appearance.
For the Topping (Optional but Recommended)
- 1 cup (240ml) heavy whipping cream — For homemade whipped cream. Store-bought works in a pinch, but homemade is so much better.
- 2 tablespoons (15g) powdered sugar — Stabilizes the whipped cream.
- 1/2 cup (60g) crushed candy canes or peppermint candies — For that festive crunch on top.
- Chocolate shavings or curls — Because you can never have too much chocolate.
Equipment Needed
You don’t need a professional bakery setup to make this Perfect Peppermint Cheesecake with Chocolate Cookie Crust, but having the right tools makes the process much smoother.
- 9-inch springform pan — This is essential for easy removal. I’ve used a regular cake pan before, and let me tell you, it’s a disaster trying to get the cheesecake out in one piece. Spend the $15 on a good springform pan.
- Electric hand mixer or stand mixer — You can mix by hand if you have incredible arm strength, but an electric mixer makes the filling silky smooth without overworking it. I prefer a stand mixer with the paddle attachment.
- Food processor — For turning cookies into fine crumbs. A rolling pin and a zip-top bag work too, but a food processor is faster and gives more consistent results.
- Large mixing bowls — One for the crust mixture, one for the filling. Glass or stainless steel works best.
- Rubber spatula — For scraping down the bowl and folding in ingredients gently.
- Measuring cups and spoons — Accuracy matters in baking. Use dry measuring cups for dry ingredients and liquid measuring cups for wet ingredients.
- Large roasting pan — For the water bath. It needs to be big enough to hold your springform pan.
- Aluminum foil — To wrap the bottom of the springform pan and prevent water from seeping in.
- Cooling rack — For cooling the cheesecake gradually after baking.
Preparation Method
Making this Perfect Peppermint Cheesecake with Chocolate Cookie Crust is a process, but every step is straightforward. Take your time, and you’ll be rewarded with a dessert that looks and tastes incredible.
Step 1: Prepare the Crust
- Preheat your oven to 350°F (175°C).
- In a food processor, pulse the chocolate cookies until they become fine crumbs. You should have about 2 cups.
- In a medium bowl, combine the cookie crumbs, melted butter, sugar, and salt. Stir with a fork until the mixture resembles wet sand. It should hold together when you squeeze a handful.
- Press the mixture firmly into the bottom of a 9-inch springform pan. Use the bottom of a measuring cup or a flat-bottomed glass to press it down evenly. Don’t forget to go slightly up the sides of the pan—about 1 inch up is perfect.
- Bake the crust for 10 minutes. Remove from the oven and let it cool completely on a wire rack. Leave the oven on.
Step 2: Prepare the Water Bath
- While the crust cools, wrap the outside of the springform pan with two layers of heavy-duty aluminum foil. Make sure the foil comes up at least 2 inches on the sides. This prevents water from leaking into your cheesecake.
- Place the wrapped pan in a large roasting pan. Set a kettle of water to boil—you’ll need it later.
Step 3: Make the Filling
- In a large mixing bowl, beat the softened cream cheese with an electric mixer on medium speed until smooth and creamy, about 2 minutes. Scrape down the sides and bottom of the bowl with a rubber spatula.
- Add the sugar and beat for another 2 minutes until light and fluffy. Scrape the bowl again.
- Add the sour cream, vanilla extract, and peppermint extract. Beat on low speed until just combined. Taste the filling at this point—if you want a stronger peppermint flavor, add another 1/4 teaspoon of extract.
- Add the eggs one at a time, beating on low speed after each addition until just combined. Overmixing at this stage will incorporate too much air, which can cause cracks. If using food coloring, add it with the last egg and mix until the color is even.
- Pour the filling over the cooled crust. Use a spatula to spread it evenly. Tap the pan gently on the counter a few times to release any air bubbles.
Step 4: Bake the Cheesecake
- Place the roasting pan with the cheesecake in the oven. Carefully pour the boiling water into the roasting pan until it reaches about halfway up the sides of the springform pan. Be careful not to splash water onto the cheesecake.
- Bake at 350°F (175°C) for 55-65 minutes. The edges should be set and slightly puffed, but the center should still jiggle slightly when you gently shake the pan. It will continue to set as it cools.
- Turn off the oven and crack the door open. Let the cheesecake sit in the oven for 1 hour. This gradual cooling helps prevent cracks.
- Remove the cheesecake from the water bath and take off the aluminum foil. Place it on a wire rack to cool completely to room temperature, about 2 hours.
- Once cool, cover the pan with plastic wrap and refrigerate for at least 6 hours, but overnight is best. This is when the magic happens—the flavors meld and the texture becomes perfectly creamy.
Step 5: Add the Topping
- Just before serving, make the whipped cream. In a chilled bowl, beat the heavy cream and powdered sugar with an electric mixer on high speed until stiff peaks form.
- Spread or pipe the whipped cream over the chilled cheesecake.
- Sprinkle crushed candy canes and chocolate shavings on top. Serve immediately or return to the fridge until ready to serve.
Cooking Tips & Techniques
I’ve made this Perfect Peppermint Cheesecake with Chocolate Cookie Crust more times than I can count, and I’ve learned a few things the hard way. Here are my best tips for success.
Room temperature ingredients are not optional. Cold cream cheese and eggs will give you a lumpy, curdled-looking filling. Trust me on this—I once tried to rush it, and the texture was grainy and awful. Take the cream cheese out at least 2 hours before you start, and let the eggs sit in warm water for 5 minutes if you forgot.
Don’t overmix the filling. Once you add the eggs, mix on low speed and stop as soon as each egg is incorporated. Overmixing incorporates too much air, which causes the cheesecake to puff up during baking and then collapse, creating cracks. If you see small bubbles on the surface after pouring, tap the pan gently to release them.
The water bath is your friend. I know it seems fussy, but it’s the secret to a crack-free cheesecake. The steam from the hot water creates a humid environment that prevents the top from drying out and cracking. Just make sure your foil wrapping is secure—I learned that lesson when I had to fish foil out of a pan of water.
Let it cool slowly. The gradual cooling process—first in the turned-off oven, then at room temperature, then in the fridge—is crucial. Rapid temperature changes cause cracks. Be patient. This is not a recipe you can rush.
Slice with a hot knife. For clean, beautiful slices, run your knife under hot water, wipe it dry, then make your cut. Clean the knife between each slice. This gives you those perfect, Instagram-worthy pieces.
Variations & Adaptations
This Perfect Peppermint Cheesecake with Chocolate Cookie Crust is versatile enough to adapt for different tastes and dietary needs. Here are a few ways I’ve customized it over the years.
Gluten-Free Version: Use gluten-free chocolate sandwich cookies for the crust. The filling is naturally gluten-free, so this is an easy swap that doesn’t sacrifice any flavor. I’ve served this to gluten-sensitive guests, and they couldn’t tell the difference.
White Chocolate Peppermint: Melt 4 ounces of white chocolate and swirl it into the filling before baking. The sweetness of the white chocolate pairs beautifully with the peppermint. Just fold it in gently to create a marbled effect.
Dark Chocolate Ganache Topping: Instead of whipped cream, pour a dark chocolate ganache over the chilled cheesecake. Heat 1/2 cup heavy cream until simmering, pour over 4 ounces of chopped dark chocolate, let sit for 2 minutes, then stir until smooth. Pour over the cheesecake and let it set before serving. It’s incredibly decadent.
No-Bake Version: For a lighter, no-bake option, skip the eggs and use 2 cups of heavy cream whipped to stiff peaks, folded into the cream cheese mixture with 1 packet of unflavored gelatin dissolved in 1/4 cup cold water. Pour into the crust and chill for at least 8 hours. It’s not as dense as the baked version, but it’s perfect for hot summer days.
Mini Cheesecakes: Use a muffin tin with cupcake liners instead of a springform pan. Press the crust into each liner, fill with the cheesecake mixture, and bake for 18-22 minutes. These are perfect for parties where guests want individual servings.
Serving & Storage Suggestions
This Perfect Peppermint Cheesecake with Chocolate Cookie Crust is best served cold, straight from the refrigerator. The texture is firm but creamy, and the flavors are at their peak when the cheesecake is thoroughly chilled.
Serving Temperature: Remove the cheesecake from the fridge about 15-20 minutes before serving to take the chill off slightly. This allows the flavors to open up a bit. Don’t leave it out longer than 30 minutes, or it will start to soften too much.
Presentation Tips: Run a thin knife around the edge of the pan before releasing the springform clasp. For clean slices, use the hot knife technique I mentioned earlier. Serve each slice with an extra dollop of whipped cream and a sprinkle of crushed candy canes for that festive look.
What to Serve Alongside: This cheesecake is rich, so pair it with something light. A cup of strong black coffee or a peppermint tea is perfect. For a dessert spread, serve it alongside fresh berries or a simple fruit compote to cut through the richness.
Storage: Store leftover cheesecake in the refrigerator, covered, for up to 5 days. The flavor actually improves after a day or two as the peppermint mellows and melds with the cream cheese. Cover the cut edge with plastic wrap to prevent it from drying out.
Freezing: This cheesecake freezes beautifully. Wrap the entire cheesecake (or individual slices) tightly in plastic wrap, then in aluminum foil. Freeze for up to 3 months. Thaw overnight in the refrigerator before serving. Add the whipped cream topping after thawing, not before.
Nutritional Information & Benefits
While this Perfect Peppermint Cheesecake with Chocolate Cookie Crust is an indulgent treat, it does offer a few surprising benefits. Here’s a rough nutritional breakdown per slice (based on 12 servings).
| Nutrient | Amount per Slice |
|---|---|
| Calories | 480 |
| Total Fat | 32g |
| Saturated Fat | 18g |
| Cholesterol | 135mg |
| Sodium | 380mg |
| Total Carbohydrates | 42g |
| Dietary Fiber | 1g |
| Sugars | 32g |
| Protein | 8g |
The cream cheese provides a good amount of protein and calcium, while the peppermint extract can aid digestion and provide a refreshing sensation. The dark chocolate in the crust contains antioxidants. Of course, this is a dessert meant for special occasions—enjoy it in moderation as part of a balanced diet.
For those watching their sugar intake, you can reduce the sugar in the filling to 3/4 cup without affecting the texture too much. The chocolate crust already provides plenty of sweetness.
Conclusion
This Perfect Peppermint Cheesecake with Chocolate Cookie Crust is more than just a holiday dessert—it’s a showstopper that will have everyone at your table talking. It’s the recipe I turn to when I want to impress, when I want to celebrate, and when I want to feel like I’ve truly mastered something in the kitchen. The combination of cool, creamy peppermint and rich, dark chocolate is simply unbeatable.
I’d love to hear how yours turns out! Did you add any twists? Did your guests go back for seconds? Drop a comment below and let me know—I read every single one. And if you share a photo on Pinterest, tag me so I can see your beautiful creation. Happy baking, and here’s to making memories around the table this holiday season!
Frequently Asked Questions
Can I use store-bought whipped cream instead of making my own?
Yes, you absolutely can. Store-bought whipped topping works fine, but homemade whipped cream is lighter and has a better flavor. If you’re short on time, go ahead and use the store-bought version—no one will judge you.
Why did my cheesecake crack on top?
Cracks usually happen because of overmixing the filling, rapid temperature changes, or overbaking. Make sure you mix on low speed once the eggs are added, let the cheesecake cool slowly in the oven, and don’t bake it until the center is completely set—it should still jiggle slightly.
Can I use mint extract instead of peppermint extract?
Technically yes, but they have different flavors. Peppermint extract has a stronger, cooler, more intense mint flavor. Mint extract is usually a blend of spearmint and peppermint and has a milder, sweeter taste. For this recipe, peppermint is the better choice for that classic holiday flavor.
How far in advance can I make this cheesecake?
You can make this cheesecake up to 2 days in advance. In fact, it tastes better after a day in the fridge because the flavors have time to meld. Just wait to add the whipped cream and toppings until right before serving.
Can I make this without a water bath?
You can, but the risk of cracking increases significantly. If you skip the water bath, place a pan of hot water on the oven rack below the cheesecake to create steam. This helps keep the surface moist. The texture won’t be quite as creamy, but it will still be delicious.
Pin This Recipe!
Perfect Peppermint Cheesecake with Chocolate Crust
A creamy, minty cheesecake with a rich chocolate cookie crust, perfect for holiday gatherings. This show-stopping dessert features a balanced peppermint flavor and a stunning presentation.
- Prep Time: 30 minutes
- Cook Time: 1 hour 5 minutes
- Total Time: 10 hours 35 minutes (includes cooling and chilling)
- Yield: 12 servings 1x
- Category: Dessert
- Cuisine: American
Ingredients
- 2 cups (200g) chocolate cookie crumbs
- 6 tablespoons (85g) unsalted butter, melted
- 2 tablespoons (25g) granulated sugar
- 1/4 teaspoon salt
- 32 ounces (904g) cream cheese, softened to room temperature
- 1 cup (200g) granulated sugar
- 1 cup (240g) full-fat sour cream, room temperature
- 1 teaspoon vanilla extract
- 1 teaspoon peppermint extract
- 4 large eggs, room temperature
- 2–3 drops green food coloring (optional)
- 1 cup (240ml) heavy whipping cream
- 2 tablespoons (15g) powdered sugar
- 1/2 cup (60g) crushed candy canes or peppermint candies
- Chocolate shavings or curls
Instructions
- Preheat oven to 350°F (175°C).
- In a food processor, pulse chocolate cookies into fine crumbs. Combine crumbs, melted butter, sugar, and salt in a bowl; stir until mixture resembles wet sand.
- Press mixture firmly into bottom and about 1 inch up sides of a 9-inch springform pan. Bake 10 minutes; cool completely on a wire rack. Leave oven on.
- Wrap outside of springform pan with two layers of heavy-duty aluminum foil, coming up at least 2 inches. Place in a large roasting pan. Boil water for water bath.
- In a large bowl, beat cream cheese on medium speed until smooth, about 2 minutes. Add sugar; beat 2 minutes until light and fluffy. Scrape bowl.
- Add sour cream, vanilla, and peppermint extract; beat on low until combined. Taste and adjust peppermint if desired.
- Add eggs one at a time, beating on low after each until just combined. Add food coloring with last egg if using. Pour filling over crust; tap pan to release air bubbles.
- Place roasting pan with cheesecake in oven. Carefully pour boiling water into roasting pan until halfway up springform pan sides.
- Bake 55-65 minutes until edges are set but center jiggles slightly. Turn off oven, crack door, and let cheesecake sit 1 hour.
- Remove from water bath, take off foil, and cool completely on wire rack (about 2 hours). Cover with plastic wrap and refrigerate at least 6 hours or overnight.
- Just before serving, beat heavy cream and powdered sugar in a chilled bowl until stiff peaks form. Spread or pipe over cheesecake. Sprinkle with crushed candy canes and chocolate shavings.
Notes
Room temperature ingredients are essential for a smooth filling. Do not overmix once eggs are added. The water bath helps prevent cracks. Cool slowly to avoid cracking. Slice with a hot knife for clean cuts. Cheesecake can be made up to 2 days ahead; add toppings just before serving.
Nutrition
- Serving Size: 1 slice
- Calories: 480
- Sugar: 32
- Sodium: 380
- Fat: 32
- Saturated Fat: 18
- Carbohydrates: 42
- Fiber: 1
- Protein: 8
Keywords: peppermint cheesecake, chocolate crust, holiday dessert, cheesecake recipe, peppermint dessert