That first crunch of a pretzel stick snapped in half, the soft give of brie under your thumb, and the way the black grapes caught the dim kitchen light like tiny polished stones—that is the exact moment I knew I had nailed Halloween entertaining. It wasn’t the elaborate costume or the carved pumpkins that stole the show that October night. It was the board. I had thrown it together an hour before guests arrived, panicking slightly because I had promised a “spread” and all I had was a cutting board, some cheese, and a bag of candy eyes that stared up at me like tiny accusatory marbles. But something clicked when I arranged the blackberries in a crooked line that looked like a fence. People gathered around it before they even took off their coats. They didn’t just eat; they played. They picked at the “graveyard” of rosemary sprigs and dug for “worms” made of licorice. That night, this spooky Halloween charcuterie board was born from pure necessity and a dash of theatrical desperation.
Honestly, I have never looked back. Every year since, this boo-themed grazing board has become the unofficial centerpiece of our Halloween party. It is the thing guests photograph first and finish last. And the best part? It looks like it took hours of meticulous planning, but between you and me, it is the easiest, most forgiving recipe you will ever assemble. You do not need fancy cheese or imported crackers. You just need a little imagination, a good eye for color, and the willingness to let a few gummy worms crawl over your brie. That is the spirit of Halloween, right?
This spooky Halloween charcuterie board is not just a snack platter. It is an invitation to graze, to laugh, and to dig your fingers into something delightfully creepy. It works for kids and adults alike, and the best part is that everyone gets to build their own perfect bite. So grab your biggest board, and let’s make something wonderfully weird together.
Why You’ll Love This Recipe
I have tested this particular configuration at three different Halloween parties now, and I can tell you with confidence—it disappears faster than the candy bowl. Here is why this boo-themed grazing board works so well:
- No Cooking Required : Seriously. If you can unwrap cheese and open a bag of pretzels, you can make this. It comes together in under 20 minutes, which leaves you more time for costume malfunctions and apple bobbing.
- Completely Customizable : You are not tied to a rigid ingredient list. Swap out the cheddar for gouda, trade the blackberries for figs, or use gluten-free crackers. The board adapts to whatever you have on hand.
- Perfect for Parties : It is a self-serve masterpiece. Guests can nibble while they mingle, and there is no need for plates or forks (though napkins are recommended, especially if someone gets too enthusiastic with the beet dip).
- Visually Stunning : The contrast of black, orange, purple, and white creates a natural Halloween palette that photographs beautifully. Your Instagram will thank you.
- Crowd-Pleaser : I have watched picky kids bypass the candy bowl to grab a cheese-stuffed olive, and adults who swore they were “not hungry” somehow finish half a wheel of brie. It is magic, I tell you.
What makes this version different from the usual cheese board is the themed storytelling. I do not just throw ingredients on a slab. I create little vignettes—a graveyard of rosemary, a spiderweb of prosciutto, a swamp of green olives. Every element has a role. It turns snacking into an activity, and honestly, that is what makes it so memorable. You are not just serving food; you are serving an experience. And let’s face it, that is the whole point of Halloween.
What Ingredients You Will Need
This spooky Halloween charcuterie board relies on simple, readily available ingredients that you can find at any grocery store. The trick is in the selection and arrangement, not the rarity of the items. Here is what you will need to build your boo-themed grazing board:
For the Cheese Selection
- Brie or Camembert (8 oz wheel) – I love the soft, buttery texture. It acts as the creamy anchor of the board. You can leave it whole or cut a wedge out to create a “bite mark” effect. (I recommend Président or a local creamery brand for best melt-in-your-mouth quality.)
- Sharp White Cheddar (6 oz block) – Cut it into cubes or use a crinkle cutter for a jagged, monster-tooth look. The sharpness balances the creamy brie perfectly.
- Smoked Gouda (6 oz) – The smoky flavor adds depth, and the orange rind fits the Halloween color scheme beautifully. Slice it into thin triangles.
- Goat Cheese Log (4 oz) – Roll it in black sesame seeds or crushed black peppercorns to make it look like a spooky fossil. The tanginess cuts through the richness.
For the Meats
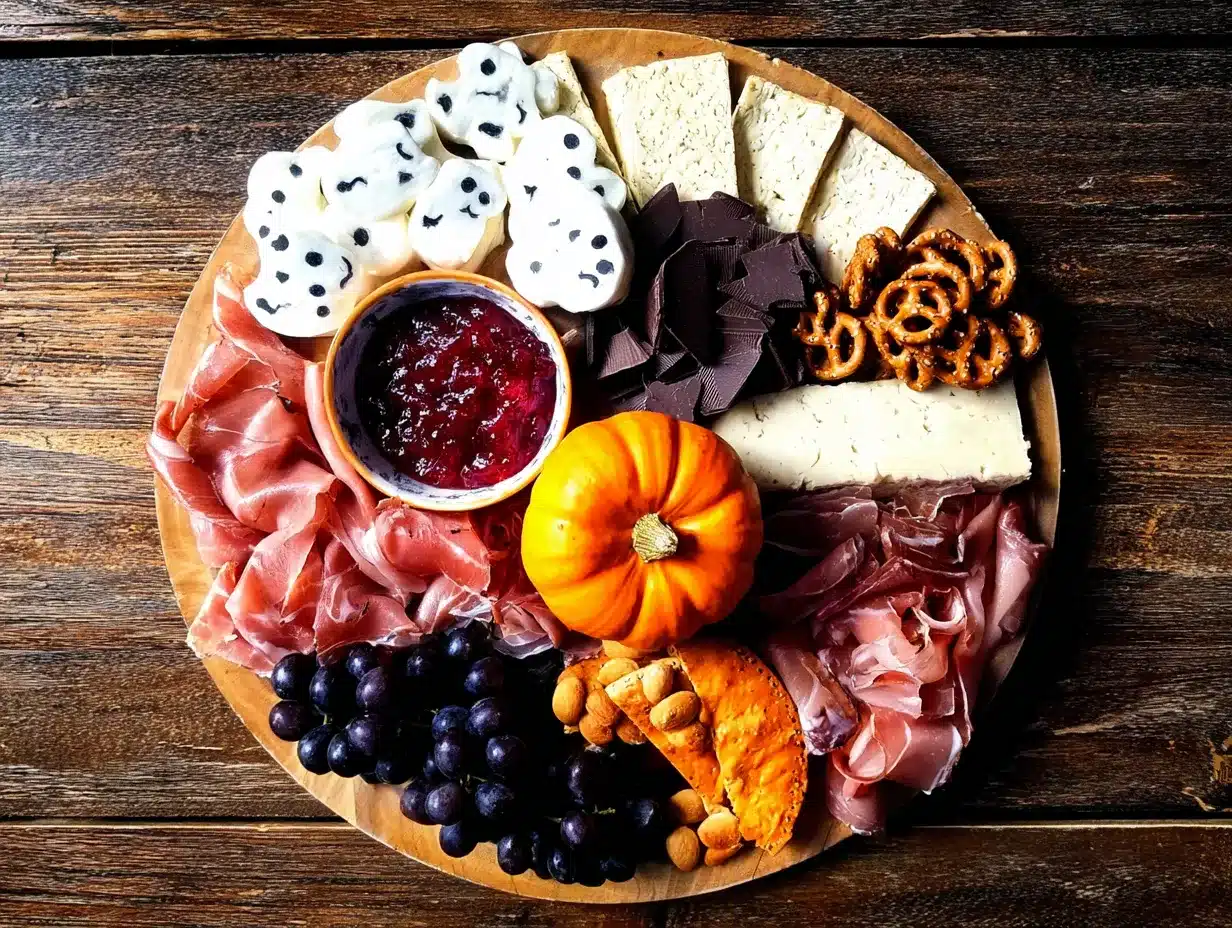
- Prosciutto (4-6 slices) – Drape it in loose, wavy folds to resemble spiderwebs or ghostly shrouds. It is salty and delicate.
- Salami or Genoa Salami (8-10 slices) – Fold them into triangles or roll them into little “mummy” shapes. The deep red color adds a nice pop.
- Pepperoni (optional, 10-12 slices) – Great for kids and adds a spicy kick. I sometimes cut them into bat shapes using a tiny cookie cutter.
For the “Spooky” Elements
- Black Olives (1/2 cup, pitted) – They look like little eyeballs. Scatter them around the board for a creepy touch.
- Green Olives Stuffed with Pimento (1/2 cup) – The bright orange center looks like a glowing jack-o’-lantern eye. Perfect for a pop of color.
- Grapes (1 cup, black or red) – They look like tiny witch’s jewels. I like to leave them in small clusters.
- Blackberries or Blueberries (1/2 cup) – These mimic little beetles or charcoal gems. They add a dark, moody element.
- Dried Apricots or Dried Mango (1/4 cup) – The bright orange color screams Halloween. They also add a chewy sweetness.
- Candy Eyes (1 small bag) – These are non-negotiable. Stick them onto cheese cubes or olives with a dab of cream cheese for instant character.
- Gummy Worms or Gummy Spiders (1/2 cup) – Tuck them between cheese wedges or let them “crawl” over the edge of the board.
- Pretzel Sticks or Pretzel Twists (1 cup) – These act as “bones” or “fence posts.” They are also perfect for scooping up soft cheese.
- Pumpkin Seeds (Pepitas) (1/4 cup, roasted and salted) – Scatter them like little fallen leaves or grave dirt.
For the Crackers and Bread
- Assorted Crackers (about 2 cups) – Use a mix of plain, seeded, and black sesame crackers for visual interest. I love the black charcoal crackers for a truly spooky look.
- Baguette Slices (1 small baguette, sliced and lightly toasted) – Provides a sturdy base for heartier toppings.
- Breadsticks (4-6) – They look like witch’s broomsticks. Wrap a chive around the top to complete the look.
For the Dips and Spreads
- Pumpkin Butter or Fig Jam (1/4 cup) – The deep orange or dark purple color fits the theme. It also pairs beautifully with brie.
- Honey (a small drizzle) – Drizzle over the brie or goat cheese for a sweet-savory contrast.
- Beet Hummus or Roasted Red Pepper Dip (1/2 cup) – The vibrant red or deep purple color adds a “bloody” or “witchy” element. (I sometimes use store-bought spinach dip and add a few drops of black food coloring for a “swamp” effect.)
Substitution guidance: If you are dairy-free, use a wheel of cashew-based brie and plant-based cheese slices. For a nut-free board, skip the almonds and pepitas and double up on the olives and pickles. The key is to keep the color palette dark, orange, and white—that is what makes it read as “Halloween” instantly.
Equipment Needed
You do not need a lot of fancy gear to build this boo-themed grazing board. In fact, the simpler, the better. Here is what I use every time:
- A Large Wooden Board or Slate Platter (at least 12×18 inches) – This is your canvas. A wooden cutting board works beautifully. If you do not have one, a large baking sheet lined with parchment paper does the trick. I have even used a clean pizza stone in a pinch.
- Small Bowls or Ramekins (3-4) – For the dips, honey, and olives. I like using small black or orange bowls to reinforce the theme.
- Cheese Knives or Spreaders (2-3) – One for soft cheese, one for hard cheese, and one for the jam. It keeps things tidy.
- Tongs or Small Spoons – For the olives and gummy worms. Trust me, nobody wants to fish a gummy worm out of a dip bowl with their fingers.
- A Small Cookie Cutter (bat, pumpkin, or ghost shape) – Totally optional, but it makes for adorable cheese or fruit shapes. I found a set at a dollar store that I use every October.
- Parchment Paper or Cheese Paper – If your board is not food-safe, line it with parchment. It also makes cleanup a breeze.
Honestly, I have built this spooky Halloween charcuterie board on a cutting board that was supposed to be for bread. Do not overthink it. The arrangement matters more than the platter.
Preparation Method
Building a charcuterie board is an art form, but it is a very forgiving one. Follow these steps, and you will have a stunning boo-themed grazing board in under 25 minutes. I promise, the hardest part is not eating the gummy worms before you arrange them.
- Set the Stage (5 minutes) – Place your board on a clean, flat surface. Put your small bowls or ramekins on the board first. This is your foundation. Fill one bowl with the beet hummus or spinach dip, one with the honey or fig jam, and one with the olives. Position them in a triangle or scattered around the board so they break up the visual space. This creates natural “zones” for your guests to explore.
- Place the Cheese (3 minutes) – Cheese is the star of the show, so it goes on first. Place the brie wheel whole in a prominent spot, maybe slightly off-center. Cut the cheddar into cubes and arrange them in a small pile or a line. Fan out the smoked gouda slices next to the cheddar. Place the goat cheese log on the opposite side of the board. If you are using a cookie cutter, now is the time to cut a few cheddar slices into bat or pumpkin shapes. I usually stick a candy eye onto the brie wheel with a tiny dab of honey—it instantly gives it a face.
- Add the Meats (3 minutes) – Fold the prosciutto slices into loose, wavy ribbons and place them near the brie. I like to create a little “nest” of prosciutto. Fold the salami slices into quarters and arrange them in a line or a small pile. If you have pepperoni, scatter those around too. The meat adds savory depth and a pop of red that contrasts nicely with the dark elements.
- Scatter the Fruits and Veggies (4 minutes) – Now you fill in the gaps. Place the clusters of black grapes in one area and the blackberries in another. Tuck the dried apricots near the cheddar. Scatter the green and black olives around the bowls. This is where you start to see the color palette come together—dark purples, blacks, and bright oranges.
- Add the Crunch (3 minutes) – Crackers and breadsticks are your fillers. Arrange the assorted crackers in small groups or lines around the cheese and meats. Place the baguette slices in a neat stack or fan. Stand a few breadsticks upright in a small glass or just lay them across the board like fallen logs. The pretzel sticks can be arranged in a bundle that looks like a pile of bones.
- Incorporate the Spooky Details (4 minutes) – This is where the magic happens. Take the candy eyes and gently press them onto a few of the cheese cubes, olives, or even a cracker. Drape a few gummy worms over the edge of the brie or let them “crawl” out of the olive bowl. Scatter the pumpkin seeds (pepitas) like little grave dirt across any empty spaces. If you have rosemary sprigs, break them into small pieces and stick them into the cheese or dip to look like tiny dead trees. This is the part that makes people gasp and laugh.
- Drizzle and Garnish (2 minutes) – Drizzle a little honey over the brie or the goat cheese. Sprinkle a pinch of flaky sea salt over the entire board (it enhances everything). Add a few fresh herb sprigs like thyme or rosemary for a touch of green that contrasts with the dark theme. Step back and look at your board. If you see any empty spots, fill them with extra crackers, berries, or pretzels. The board should look abundant, not sparse.
- Final Touch (1 minute) – Place the cheese knives and spreaders near the appropriate cheeses. Add a small spoon to the honey and jam bowls. Stand back, take a photo, and then let your guests loose. Honestly, the board looks best when it starts to get a little messy—that is when you know it is a hit.
Cooking Tips & Techniques
I have made this spooky Halloween charcuterie board at least a dozen times, and I have learned a few things the hard way. Here are my best tips to ensure your boo-themed grazing board is a success:
- Let the Cheese Breathe – Take the brie and goat cheese out of the fridge about 30 minutes before you assemble the board. Room temperature cheese has a much better texture and flavor. Cold brie is rubbery; warm brie is practically a hug on a cracker.
- Don’t Overcrowd the Board – I know it is tempting to pile everything on, but leave a little bit of negative space. It makes the board look curated rather than chaotic. If you have too many ingredients, use a second smaller board or a plate.
- Use the “Three-Bite” Rule – For each type of cheese, make sure you have enough for at least three bites per guest. For a party of 8, that means about 2 ounces of cheese per person total. It sounds like a lot, but it goes fast.
- Keep the Wet and Dry Separate – Do not let the grapes touch the crackers directly, or you will end up with soggy croutons. Use the cheese or a small bowl as a barrier. The olives should always be in a bowl to contain the brine.
- Prep Everything Before You Start – Have all your ingredients washed, sliced, and ready to go before you touch the board. Once you start arranging, you do not want to stop to wash grapes. Trust me, I have made that mistake, and it breaks the flow.
- Embrace the Imperfect – A charcuterie board that looks too perfect can feel intimidating. Let a few gummy worms dangle off the edge. Let a slice of salami curl in on itself. The imperfect, organic look is what makes it feel inviting and fun.
One time, I forgot to take the brie out of the fridge, and it was rock hard. I ended up microwaving it for 15 seconds, which worked in a pinch, but it was not the same. Learn from my failure. Plan ahead.
Variations & Adaptations
This boo-themed grazing board is endlessly adaptable. Here are a few variations I have tried and loved:
- Sweet Tooth Board – Swap all the savory meats and cheeses for Halloween-themed sweets. Use chocolate-covered pretzels, candy corn, ghost-shaped marshmallows, and brownie bites. Add a bowl of caramel dip and a bowl of chocolate sauce. It is a dessert charcuterie board that kids go absolutely wild for. For a fun twist, try pairing it with my easy candy corn Rice Krispie treats for an extra sweet punch.
- Vegan Halloween Board – Use vegan cheese wheels (cashew brie is amazing), plant-based pepperoni, and a creamy spinach and artichoke dip. Replace honey with agave syrup. Use vegan dark chocolate pieces and fresh fruit. It is just as beautiful and satisfying.
- Breakfast Grazing Board – Yes, you can do a Halloween breakfast board! Use mini pumpkin donuts, cinnamon rolls shaped like mummies, apple slices with caramel dip, and bacon strips arranged like spider legs. It is a fun way to start Halloween morning. My cozy pumpkin spice cold foam coffee cake would be a perfect addition to this board.
- Spicy Fiesta Board – Add jalapeño poppers, chorizo slices, pepper jack cheese, and a spicy mango salsa. The heat pairs surprisingly well with the sweet elements like dried apricots. It is a grown-up twist that always gets compliments.
- Gluten-Free Board – Use gluten-free crackers, rice cakes, and vegetable sticks (carrot, celery, bell pepper) as the base. Most cheeses and meats are naturally gluten-free, so just check the labels on the dips and pretzels.
Personally, I love the sweet board variation because it feels like a second Halloween dessert. I once made it for a movie night, and my friends ate the entire thing before the first scary scene even ended.
Serving & Storage Suggestions
This spooky Halloween charcuterie board is best served immediately after assembly, but you can prep components ahead of time to make party day stress-free.
Serving Temperature – Serve the board at room temperature. The cheese will be soft and flavorful, and the crackers will stay crisp. If you have any dips that were refrigerated, let them sit out for 15 minutes before serving. I usually assemble the board about 20 minutes before guests arrive, then let it sit while I answer the door.
Presentation Tips – Place the board in the center of your table or coffee table. Make sure there are small plates and napkins nearby. I like to put out a few small cocktail forks for the olives and a spoon for the honey. If you are feeling extra festive, add a few battery-operated candles or a small string of fairy lights around the board. It makes the whole setup look magical in low light.
Complementary Dishes – This board pairs beautifully with a warm bowl of creamy homemade tomato soup with grilled cheese for a cozy fall meal. For drinks, a cozy pumpkin chai latte with steamed oat milk is a non-alcoholic option that feels very Halloween.
Storage Instructions – If you have leftovers (unlikely, but possible), store the components separately. Wrap the cheese in wax paper and place it in an airtight container. Store the meats in a sealed bag. The crackers and pretzels can go in a ziplock bag at room temperature. The fruit should be refrigerated. Assemble a smaller “leftover board” the next day for a snack—it is almost as fun as the original.
Reheating Tips – Do not reheat the board itself, but if you have leftover brie, you can pop it in the oven at 350°F for 5-7 minutes to make it warm and gooey again. Serve it with the leftover crackers for a quick dessert.
Flavor Development – Interestingly, the flavors of the cheese and meat actually meld together a bit if the board sits out for an hour. The prosciutto gets slightly chewier, and the brie becomes almost spreadable. It is a different experience than the fresh board, but equally delicious.
Nutritional Information & Benefits
While a charcuterie board is definitely a treat, it does offer some surprising nutritional benefits when you balance it right. Here is a rough estimate per serving (based on 8 servings from the full board):
- Calories: Approximately 350-450 per serving
- Protein: 15-20g (from cheese and meat)
- Fat: 25-30g (healthy fats from cheese and olives)
- Carbohydrates: 20-25g (from crackers, fruit, and honey)
- Fiber: 3-5g (from fruit and seeds)
Health Benefits – Cheese is a great source of calcium and protein, which supports bone health and muscle function. Olives provide healthy monounsaturated fats and antioxidants. Blackberries and grapes are packed with vitamins C and K, as well as fiber. Pumpkin seeds are rich in magnesium and zinc, which are great for immunity—perfect for the cold season.
Dietary Considerations – This board can be made gluten-free by using gluten-free crackers. It is naturally low-carb if you skip the crackers and breadsticks and focus on the cheese, meat, and olives. For a lower-calorie version, use more vegetables (like cucumber rounds and bell pepper strips) as scoops instead of crackers.
Potential Allergens – This recipe contains dairy (cheese) and gluten (crackers, pretzels). It may also contain tree nuts if you add almonds or other nuts. Always check labels if you are serving guests with allergies. I usually put a small card next to the board listing the main allergens.
Personally, I love that this board feels indulgent but also has some redeeming qualities. It is not a health food, but it is not junk food either. It is a balanced snack that keeps everyone happy and full without weighing them down.
Conclusion
This spooky Halloween charcuterie board is more than just a recipe—it is a centerpiece, a conversation starter, and a memory-maker. It is the kind of thing that makes your guests pause, smile, and pull out their phones before they even take a bite. And honestly, that is the best compliment a host can get.
I love this board because it is completely forgiving. You cannot mess it up. If something looks out of place, just add more candy eyes. If you run out of crackers, use pretzels. It is designed to be flexible and fun, just like Halloween itself. Whether you are hosting a big party or just having a quiet night with a scary movie, this boo-themed grazing board will make the evening feel special.
So go ahead—grab your biggest board, raid your pantry, and let your inner ghoul guide the arrangement. Stick a gummy worm on a piece of brie and call it art. I promise, your guests will love it. And when they ask for the recipe, just smile and say it is a family secret. (Between us, the secret is just having fun.)
I would love to see your creations! Tag me in your photos or leave a comment below telling me what spooky elements you added. Did you use a spiderweb of prosciutto? A graveyard of rosemary? Let me know—I am always looking for new ideas!
Frequently Asked Questions
Can I make this spooky Halloween charcuterie board ahead of time?
Yes, you can prep the components up to 24 hours in advance. Wash and dry the fruit, slice the cheese, and store everything separately in the fridge. Assemble the board about 20 minutes before serving to keep the crackers crisp and the cheese at room temperature.
How many people does this boo-themed grazing board serve?
This board is designed to serve 8 to 10 people as a snack or appetizer. If it is the main dish for a light meal, it will serve about 4 to 6 people. I always recommend making a little extra—leftovers are a treat the next day.
What if I cannot find candy eyes?
No problem! You can use small dollops of cream cheese or goat cheese with a tiny piece of black olive on top to create homemade “eyes.” Alternatively, use edible marker pens to draw eyes on cheese cubes. It is a fun activity to do with kids.
Can I use a different type of board?
Absolutely. A large wooden cutting board is ideal, but you can use a slate platter, a marble slab, a baking sheet, or even a clean pizza stone. If you are using a baking sheet, line it with parchment paper for a rustic look and easy cleanup.
How do I keep the crackers from getting soggy?
Place the crackers and pretzels away from the wet ingredients like the grapes, olives, and dips. Use the cheese and meat as a barrier. If you are serving the board for a long party, consider adding a small refill bowl of crackers halfway through to keep them fresh.
Pin This Recipe!
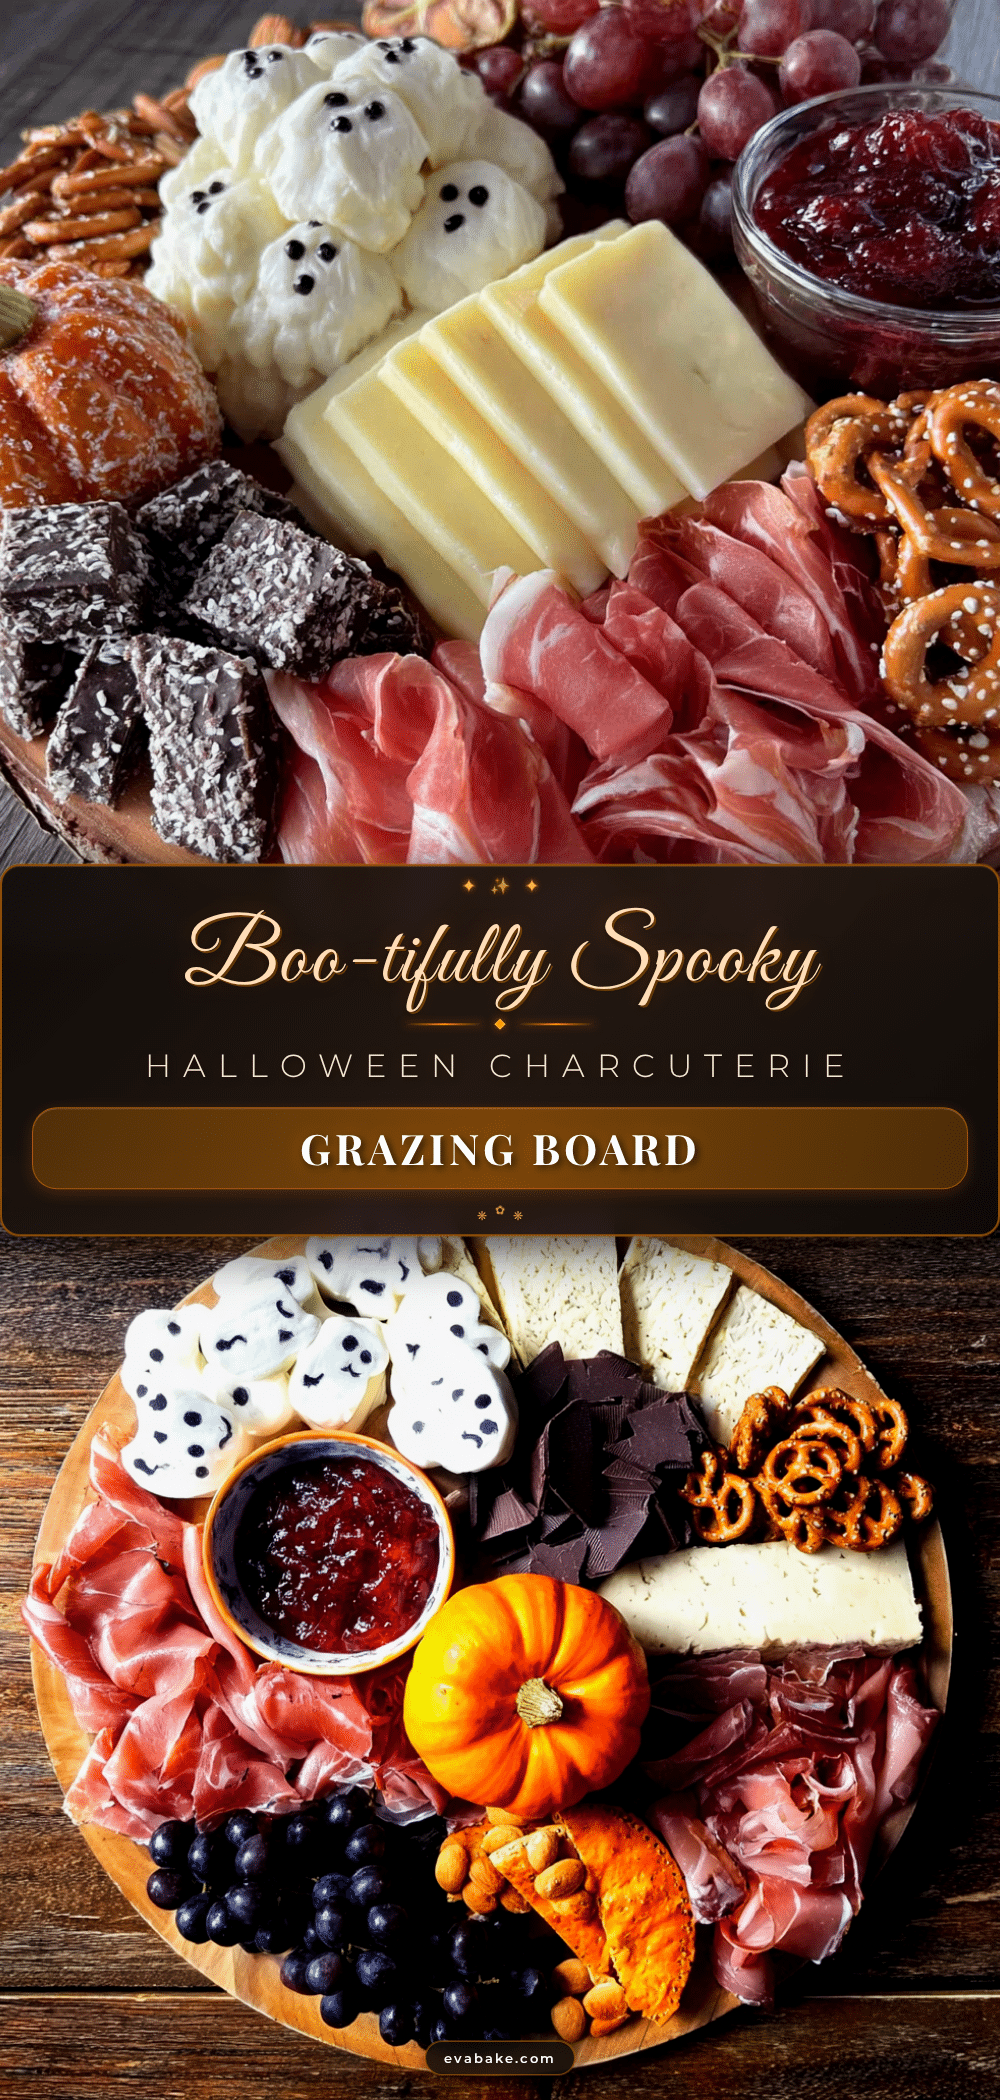
Best Easy Spooky Halloween Charcuterie Board Recipe
A no-cook, customizable Halloween charcuterie board that comes together in under 20 minutes. Featuring cheese, meats, spooky treats, and a visually stunning presentation, it’s the perfect centerpiece for any Halloween party.
- Prep Time: 20 minutes
- Cook Time: 0 minutes
- Total Time: 20 minutes
- Yield: 8 servings 1x
- Category: Appetizer
- Cuisine: American
Ingredients
- 8 oz wheel Brie or Camembert
- 6 oz block Sharp White Cheddar
- 6 oz Smoked Gouda
- 4 oz Goat Cheese Log
- 4–6 slices Prosciutto
- 8–10 slices Salami or Genoa Salami
- 10–12 slices Pepperoni (optional)
- 1/2 cup Black Olives, pitted
- 1/2 cup Green Olives Stuffed with Pimento
- 1 cup Black or Red Grapes
- 1/2 cup Blackberries or Blueberries
- 1/4 cup Dried Apricots or Dried Mango
- 1 small bag Candy Eyes
- 1/2 cup Gummy Worms or Gummy Spiders
- 1 cup Pretzel Sticks or Pretzel Twists
- 1/4 cup Roasted and Salted Pumpkin Seeds (Pepitas)
- 2 cups Assorted Crackers
- 1 small Baguette, sliced and lightly toasted
- 4–6 Breadsticks
- 1/4 cup Pumpkin Butter or Fig Jam
- Honey, for drizzling
- 1/2 cup Beet Hummus or Roasted Red Pepper Dip
- Fresh rosemary sprigs (optional, for garnish)
- Flaky sea salt, for finishing
Instructions
- Set the Stage (5 minutes): Place your board on a clean, flat surface. Put small bowls or ramekins on the board first. Fill one bowl with the beet hummus or spinach dip, one with the honey or fig jam, and one with the olives. Position them in a triangle or scattered around the board to create natural ‘zones’.
- Place the Cheese (3 minutes): Place the brie wheel whole in a prominent spot, slightly off-center. Cut the cheddar into cubes and arrange them in a small pile or line. Fan out the smoked gouda slices next to the cheddar. Place the goat cheese log on the opposite side. If using a cookie cutter, cut a few cheddar slices into bat or pumpkin shapes. Stick a candy eye onto the brie wheel with a tiny dab of honey.
- Add the Meats (3 minutes): Fold the prosciutto slices into loose, wavy ribbons and place them near the brie. Fold the salami slices into quarters and arrange them in a line or small pile. Scatter pepperoni around if using.
- Scatter the Fruits and Veggies (4 minutes): Place clusters of black grapes in one area and blackberries in another. Tuck dried apricots near the cheddar. Scatter green and black olives around the bowls.
- Add the Crunch (3 minutes): Arrange assorted crackers in small groups or lines around the cheese and meats. Place baguette slices in a neat stack or fan. Stand breadsticks upright in a small glass or lay them across the board. Arrange pretzel sticks in a bundle that looks like a pile of bones.
- Incorporate the Spooky Details (4 minutes): Press candy eyes onto a few cheese cubes, olives, or crackers. Drape gummy worms over the edge of the brie or let them ‘crawl’ out of the olive bowl. Scatter pumpkin seeds across empty spaces. Break rosemary sprigs into small pieces and stick them into cheese or dip to look like tiny dead trees.
- Drizzle and Garnish (2 minutes): Drizzle honey over the brie or goat cheese. Sprinkle flaky sea salt over the entire board. Add fresh herb sprigs like thyme or rosemary for a touch of green. Fill any empty spots with extra crackers, berries, or pretzels.
- Final Touch (1 minute): Place cheese knives and spreaders near the appropriate cheeses. Add a small spoon to the honey and jam bowls. Stand back, take a photo, and let guests enjoy.
Notes
Let cheese come to room temperature for best flavor. Prep components up to 24 hours in advance. Keep wet and dry ingredients separate to avoid soggy crackers. Embrace imperfections for a more inviting look.
Nutrition
- Serving Size: 1 serving (based on
- Calories: 400
- Sugar: 10
- Sodium: 800
- Fat: 28
- Saturated Fat: 12
- Carbohydrates: 22
- Fiber: 4
- Protein: 18
Keywords: Halloween charcuterie board, spooky grazing board, Halloween appetizer, no-cook recipe, party platter, boo-themed board