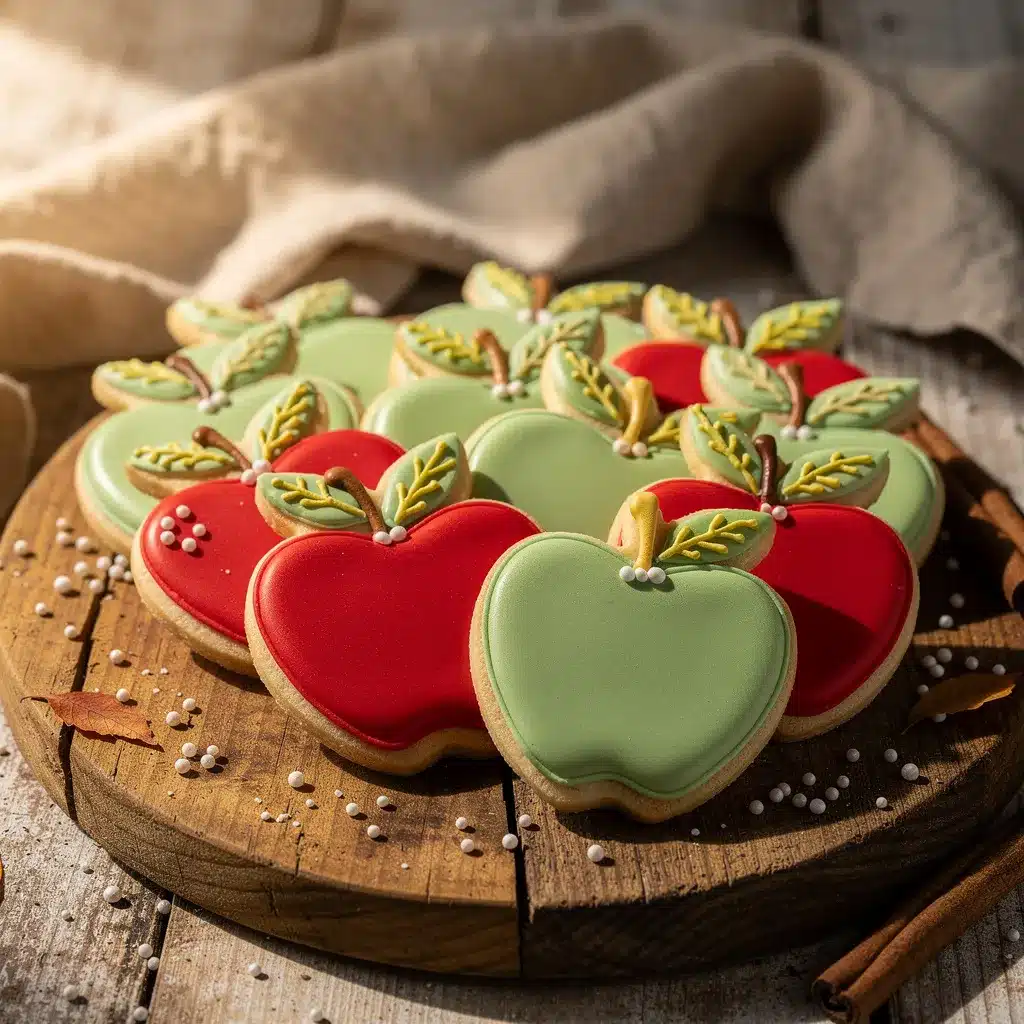
“Could you believe I nearly tossed these out?” my friend texted me last week, sending a blurry photo of some oddly shaped, undecorated sugar cookies. Honestly, the first time I attempted apple-shaped sugar cookies, they looked more like lumpy blobs than crisp little apples. I was skeptical about using royal icing to decorate them, thinking it might be too fiddly or dry out the cookies. But after a couple of rounds—some with burnt edges, others with cracked icing—I finally nailed that perfect balance: sturdy yet tender sugar cookies shaped just like apples, topped with glossy royal icing that sets beautifully without cracking.
It’s funny how a baking mishap turned into a mini obsession. I found myself making these apple-shaped sugar cookies multiple times in one week, tweaking the dough texture and icing consistency until they looked just right. The smell of vanilla and cinnamon in the kitchen, paired with the vibrant red icing gleaming under the light, made the whole process feel cozy and satisfying. These cookies ended up being a hit at a casual gathering, with everyone asking for the recipe—and that quiet moment of realizing something simple could bring that much joy stuck with me.
So here I am, sharing my perfected recipe for Perfect Apple-Shaped Decorated Sugar Cookies with Royal Icing, hoping it will bring you the same delight (minus the first-batch disasters). Whether you’re baking for a back-to-school treat, a teacher’s gift, or just because apples are your jam, these cookies hold a little something special. They’re approachable, fun, and honestly, a bit addictive to make.
Why You’ll Love This Recipe
Baking these apple-shaped sugar cookies was a real game-changer for me, and I’m betting you’ll feel the same once you try this recipe. Here’s why it stood out from the dozens of cookie recipes I’ve tried:
- Quick & Easy: From mixing to decorating, these cookies come together in under 2 hours, perfect for when you want festive treats without the fuss.
- Simple Ingredients: You probably have all the essentials in your pantry—flour, sugar, butter, eggs, and a few basics for royal icing.
- Perfect for Occasions: They’re a charming choice for fall celebrations, teacher gifts, or even a fun weekend project with the kids.
- Crowd-Pleaser: The balance of buttery sweetness and smooth royal icing makes these cookies a hit with kids and adults alike. I’ve lost count of how many times friends have asked for more.
- Unbelievably Delicious: The cookie texture is tender but holds its shape perfectly, while the royal icing adds that professional finish without being overly sweet.
What sets this recipe apart? The dough’s buttery flavor has a subtle hint of cinnamon that feels like a hug in cookie form. Plus, the royal icing technique I use gives you that smooth, shiny finish that dries hard but still melts in your mouth. I tweaked the cooling times and piping tips to help you get that flawless apple outline every time. Honestly, it’s the kind of cookie that makes you pause, close your eyes after the first bite, and smile a little.
If you’re curious about other baking adventures, you might enjoy how I mastered easy homemade potato cheese pierogi—it’s another recipe where a little patience transformed the process into something simple and rewarding.
What Ingredients You Will Need
This recipe uses straightforward, wholesome ingredients to give you that classic sugar cookie taste with a fun twist. Most are pantry staples, and I’ve included a few tips for picking the best versions.
- For the Sugar Cookie Dough:
- 2 ¾ cups (345 g) all-purpose flour (I prefer King Arthur for consistency)
- 1 teaspoon baking powder
- ½ teaspoon salt
- 1 teaspoon ground cinnamon (optional, but adds cozy warmth)
- 1 cup (227 g) unsalted butter, softened (use good quality for richer flavor)
- 1 ½ cups (300 g) granulated sugar
- 1 large egg, room temperature
- 1 teaspoon pure vanilla extract (fresh is best, but imitation works fine too)
- 2 tablespoons whole milk (or dairy-free alternative)
- For the Royal Icing:
- 3 cups (360 g) powdered sugar, sifted
- 3 tablespoons meringue powder (Wilton brand is reliable)
- 6 tablespoons warm water (adjust as needed for consistency)
- Food coloring gels: red, green, and brown (gel colors give vibrant hues without watering down the icing)
- Optional Decorations:
- Edible gold dust or shimmer for a special touch
- Mini chocolate chips or edible pearls for seeds or accents
For a gluten-free option, swapping the flour with almond flour won’t give the same crisp edges but does give a lovely texture—just reduce the cinnamon slightly to avoid overpowering. If you prefer vegan icing, replace meringue powder with aquafaba, but note that drying times will be longer.
Equipment Needed
Here’s what you’ll want on hand to make decorating these apple-shaped sugar cookies smooth and enjoyable:
- Mixing bowls: Medium and large sizes for dough and icing
- Electric mixer: Stand or hand mixer to cream butter and sugar effortlessly
- Rolling pin: A non-stick or lightly floured pin works best for dough rolling
- Apple-shaped cookie cutters: Preferably 3 to 3.5 inches (7.5–9 cm) wide for ideal size
- Baking sheets lined with parchment paper or silicone mats for even baking
- Piping bags and assorted tips: #2 or #3 round tips for outlining and flooding the icing
- Toothpicks or scribe tools for smoothing icing and fixing details
- Cooling rack: Helps cookies cool evenly and prevents sogginess
If you don’t have a cookie cutter, a sharp knife and a printed apple template can do the trick—just be patient with cutting shapes. For piping, disposable bags are easy cleanup, but reusable silicone ones are eco-friendlier. I’ve found that having a small angled spatula makes spreading icing easier when you’re just starting out.
Preparation Method
- Mix dry ingredients: In a medium bowl, whisk together 2 ¾ cups (345 g) all-purpose flour, 1 teaspoon baking powder, ½ teaspoon salt, and 1 teaspoon ground cinnamon. Set aside.
- Cream butter and sugar: Using an electric mixer, beat 1 cup (227 g) softened unsalted butter with 1 ½ cups (300 g) granulated sugar until light and fluffy, about 3-4 minutes. This step is key for tender cookies.
- Add egg and vanilla: Beat in 1 large egg, then 1 teaspoon pure vanilla extract. Mix until combined, scraping down the bowl as needed.
- Combine wet and dry: Gradually add the dry ingredients in thirds, alternating with 2 tablespoons whole milk. Mix on low speed until dough just comes together. Avoid overmixing to keep cookies tender.
- Chill the dough: Flatten dough into a disk, wrap in plastic, and refrigerate for at least 1 hour (or up to overnight). This prevents spreading and helps with rolling.
- Preheat oven: Set oven to 350°F (175°C). Line baking sheets with parchment or silicone mats.
- Roll and cut: On a lightly floured surface, roll out dough to about ¼ inch (6 mm) thickness. Use your apple-shaped cookie cutter to cut shapes and transfer to the baking sheets, spacing about 1 inch (2.5 cm) apart.
- Bake: Bake for 10-12 minutes until edges are just turning golden. Watch carefully—overbaking dries cookies out.
- Cool: Let cookies rest on the baking sheet for 5 minutes before transferring them to a wire rack to cool completely.
- Prepare royal icing: In a bowl, combine 3 cups (360 g) sifted powdered sugar, 3 tablespoons meringue powder, and 6 tablespoons warm water. Beat on high for 5-7 minutes until stiff peaks form. Adjust water or sugar to get the right piping consistency.
- Color your icing: Divide icing into separate bowls and tint with gel food colors: red for apples, green for leaves, and brown for stems.
- Outline and flood: Using piping bags fitted with #2 round tips, outline each apple cookie with red icing. Let dry 10 minutes. Then flood inside the outline with thinner red icing for a smooth surface.
- Add details: Pipe on green leaves and brown stems once the base is dry. Use a toothpick to smooth edges or add tiny veins.
- Dry completely: Allow decorated cookies to dry at room temperature for at least 4 hours or overnight for best results.
Tip: If your icing cracks or shrinks, it likely dried too quickly—try adding a bit more water next time for a smoother finish. And don’t skip chilling the dough, or you’ll end up with misshapen apples.
Cooking Tips & Techniques
Royal icing can be intimidating, but a few tricks make it approachable. First, always sift your powdered sugar to avoid lumps that clog your piping tip. When mixing your icing, start with less water and add gradually; it’s easier to thin than thicken. I’ve learned the hard way that overly runny icing bleeds outside outlines, so patience helps.
When outlining cookies, steady hands are your best friend. If you find piping tricky, try resting your elbow on the counter for stability. For flooding, a quick zigzag with your piping bag and then a toothpick to nudge icing into corners works wonders. Let your outlines dry before flooding to prevent colors from mixing.
Don’t forget to cool cookies fully before decorating—warm cookies melt icing and cause pooling. I usually bake batches in the morning and decorate in the evening, giving me time to relax and enjoy the process.
Another tip: if you want shiny icing, add a drop of clear vanilla or lemon extract after mixing. It gives a subtle gloss that looks professional. Lastly, store your decorated cookies in an airtight container layered with parchment to keep them crisp.
Variations & Adaptations
You can easily switch up this recipe to fit different tastes or dietary needs. Here are a few ideas I’ve tried myself:
- Flavored twist: Add a teaspoon of almond extract to the dough for a nutty undertone that pairs beautifully with the apple shape.
- Gluten-free option: Use almond or oat flour blends for the dough. The texture is a bit softer but still delightful.
- Vegan royal icing: Replace meringue powder with aquafaba (chickpea water) whipped to stiff peaks. It takes longer to dry but works well for allergy-friendly treats.
- Seasonal decoration: Swap red icing for pastel colors during spring or gold accents for holiday cookies—makes them versatile year-round.
- Different shapes: If you want to try other fruit shapes, the same dough and icing work beautifully for pear or pumpkin cookies. I often use the same royal icing method for Christmas tree cookies too, much like the ones featured in my Fluffy Injera Flatbread post where precision matters.
Serving & Storage Suggestions
These apple-shaped sugar cookies are best served at room temperature, ideally a few hours after decorating to let the icing fully set. They make a charming addition to any dessert tray or lunchbox surprise.
Pair them with a warm cup of cinnamon tea or apple cider for a cozy snack that feels just right for fall or back-to-school moments. For a festive touch, arrange them on a platter with fresh apple slices and a sprinkle of cinnamon.
To store, keep cookies in an airtight container layered with parchment paper to prevent sticking. They last up to a week at room temperature. For longer storage, freeze undecorated cookies in a single layer and decorate after thawing. Decorated cookies freeze well too but do better with careful wrapping to avoid icing damage.
Reheat briefly in a low oven (250°F / 120°C) for 5 minutes if you want them slightly warm and soft. The flavors mellow after a day or two, so if you can wait, they taste even better the next day!
Nutritional Information & Benefits
Each decorated apple-shaped sugar cookie contains approximately:
| Calories | 150 |
|---|---|
| Fat | 7g (mostly from butter) |
| Carbohydrates | 20g |
| Protein | 1g |
| Sugar | 12g |
The recipe uses real butter and eggs, providing some essential nutrients like vitamin A and protein. The cinnamon adds a hint of antioxidants and a warm flavor that’s satisfying without extra sugar needed. While these cookies are a treat, the portion size and simple ingredients make them a balanced indulgence.
For those mindful of allergens, this recipe contains gluten, dairy, and eggs, but can be adapted with gluten-free flour and vegan substitutes. The royal icing, made with meringue powder, is egg-based, so aquafaba is a good alternative for egg allergies.
Conclusion
Making these Perfect Apple-Shaped Decorated Sugar Cookies with Royal Icing turned out to be one of those happy accidents that brightened my baking routine. They’re approachable enough for weekday baking yet pretty enough to impress guests or gift to loved ones. The combination of tender cookie and smooth, shiny icing feels like a little celebration in every bite.
Feel free to tweak the flavors, colors, or shapes to your liking—baking should be fun and personal. I hope this recipe inspires you to get creative with your cookies, whether you’re a novice or a seasoned baker.
If you try them, I’d love to hear how your apple cookies turned out—drop a comment or share your decorating tips! There’s something so rewarding about sharing these sweet moments.
And if you’re interested in more comforting recipes with a twist, you might enjoy my hearty one-pot Hungarian goulash soup, another recipe that warms the soul after a busy day.
FAQs
- Can I make the dough ahead of time?
Yes! The dough keeps well wrapped in the fridge for up to 3 days or frozen for up to 1 month. Just thaw and roll as usual. - How do I store decorated sugar cookies?
Store them in an airtight container with parchment paper layers at room temperature for up to a week. Avoid stacking before icing dries completely. - What if my royal icing is too thick or thin?
Add a few drops of water to thin it or a bit more powdered sugar to thicken. The right consistency should hold a soft peak and spread smoothly. - Can I use powdered egg whites instead of meringue powder?
Yes, powdered egg whites work similarly. Just follow package instructions for amounts. - How do I fix cracked or shrinking icing?
This usually means the icing dried too fast or was too thick. Try flooding with slightly thinner icing and avoid drafts or direct sunlight while drying.
Pin This Recipe!
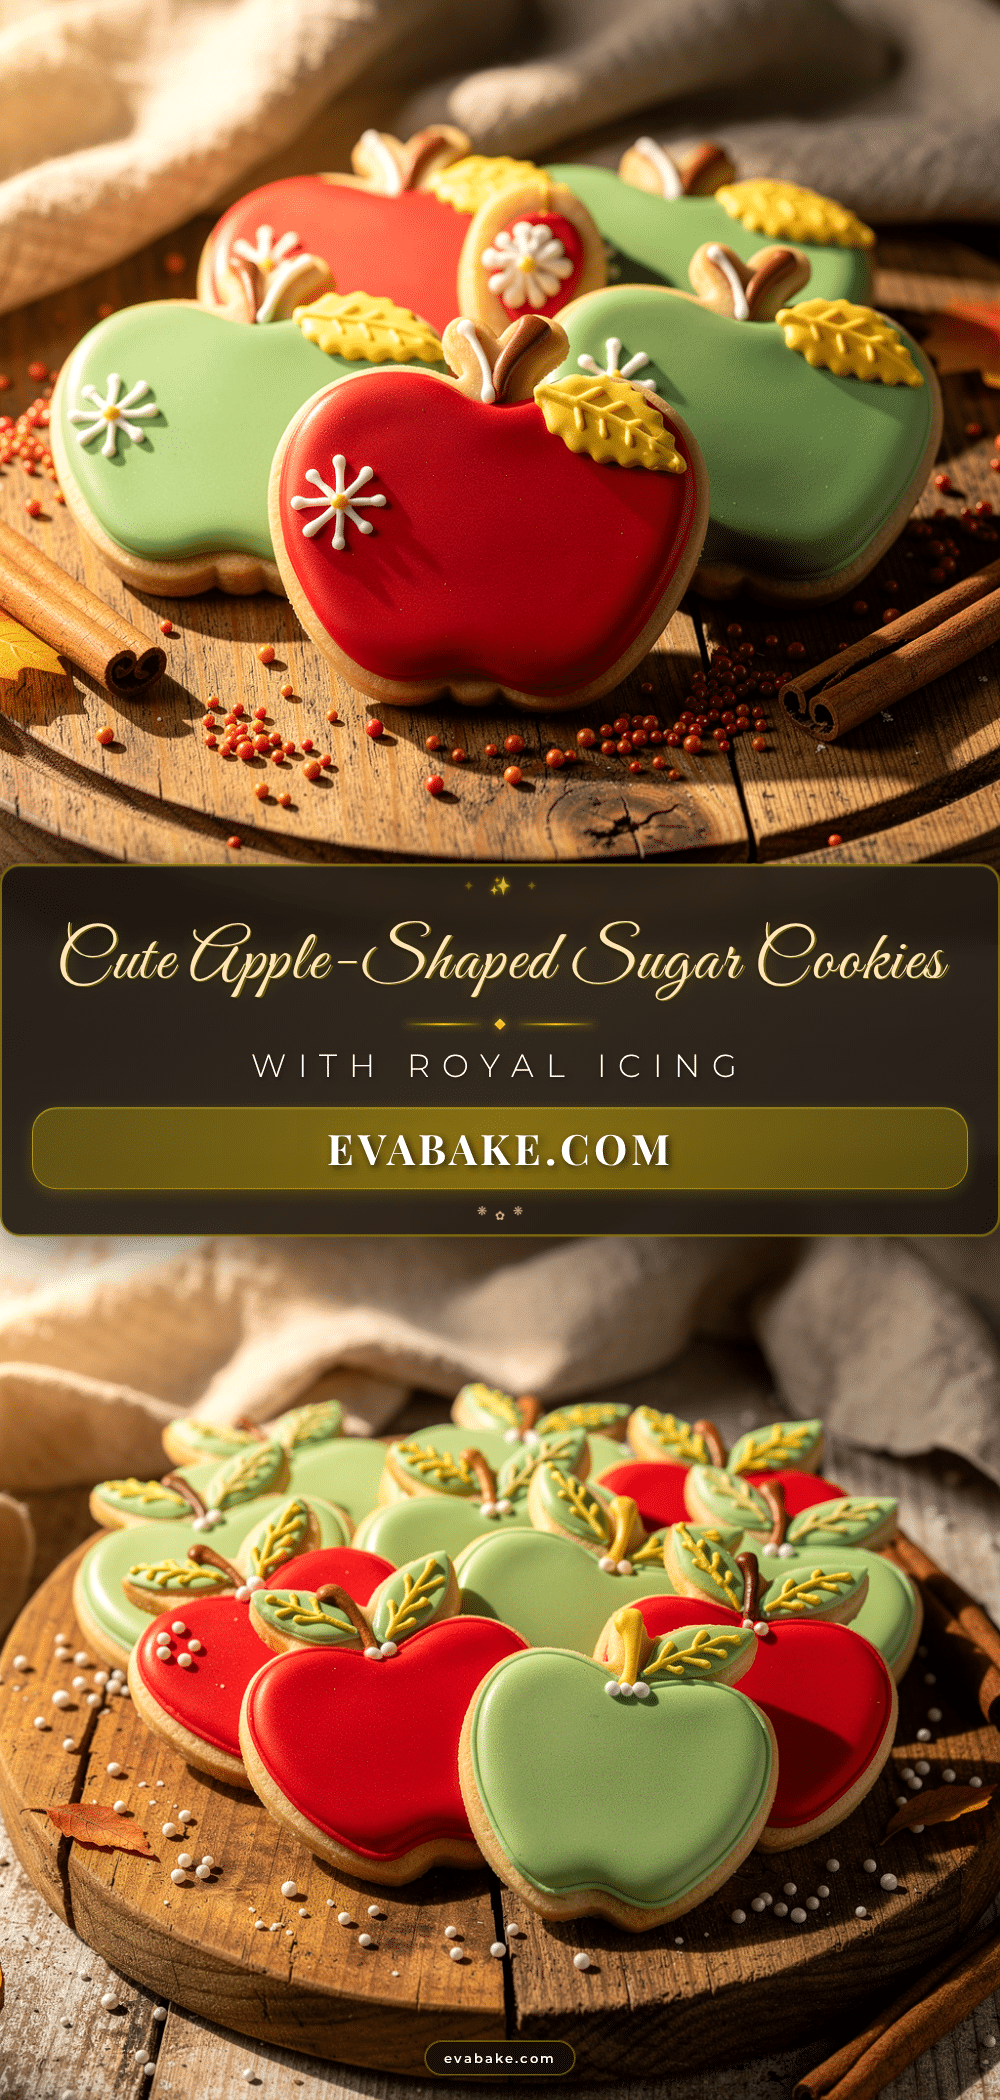
Perfect Apple-Shaped Decorated Sugar Cookies with Royal Icing

Tender, buttery sugar cookies shaped like apples and topped with smooth, glossy royal icing that sets beautifully without cracking. Perfect for fall celebrations, gifts, or fun baking projects.
- Prep Time: 20 minutes
- Cook Time: 12 minutes
- Total Time: 1 hour 40 minutes
- Yield: 24 cookies 1x
- Category: Dessert
- Cuisine: American
Ingredients
- 2 ¾ cups (345 g) all-purpose flour
- 1 teaspoon baking powder
- ½ teaspoon salt
- 1 teaspoon ground cinnamon (optional)
- 1 cup (227 g) unsalted butter, softened
- 1 ½ cups (300 g) granulated sugar
- 1 large egg, room temperature
- 1 teaspoon pure vanilla extract
- 2 tablespoons whole milk (or dairy-free alternative)
- 3 cups (360 g) powdered sugar, sifted
- 3 tablespoons meringue powder
- 6 tablespoons warm water
- Food coloring gels: red, green, and brown
- Optional decorations: edible gold dust or shimmer, mini chocolate chips or edible pearls
Instructions
- In a medium bowl, whisk together flour, baking powder, salt, and cinnamon. Set aside.
- Using an electric mixer, beat softened butter with granulated sugar until light and fluffy, about 3-4 minutes.
- Beat in the egg and vanilla extract until combined.
- Gradually add dry ingredients in thirds, alternating with milk, mixing on low speed until dough just comes together. Avoid overmixing.
- Flatten dough into a disk, wrap in plastic, and refrigerate for at least 1 hour or up to overnight.
- Preheat oven to 350°F (175°C). Line baking sheets with parchment paper or silicone mats.
- Roll dough on a lightly floured surface to about ¼ inch (6 mm) thickness. Cut apple shapes using cookie cutter and place on baking sheets about 1 inch apart.
- Bake for 10-12 minutes until edges are just turning golden. Let rest on baking sheet for 5 minutes, then transfer to wire rack to cool completely.
- Prepare royal icing by combining powdered sugar, meringue powder, and warm water. Beat on high for 5-7 minutes until stiff peaks form. Adjust consistency as needed.
- Divide icing into bowls and tint with gel food colors: red for apples, green for leaves, brown for stems.
- Outline each apple cookie with red icing using a piping bag fitted with #2 round tip. Let dry 10 minutes.
- Flood inside the outline with thinner red icing for a smooth surface.
- Pipe green leaves and brown stems once base is dry. Use a toothpick to smooth edges or add details.
- Allow decorated cookies to dry at room temperature for at least 4 hours or overnight.
Notes
Chill dough to prevent spreading and help with rolling. Sift powdered sugar for smooth icing. Adjust icing consistency by adding water or powdered sugar. Let outlines dry before flooding to prevent color bleeding. Store decorated cookies in airtight container with parchment layers. For shiny icing, add a drop of clear vanilla or lemon extract. Dough can be made ahead and refrigerated or frozen.
Nutrition
- Serving Size: 1 decorated cookie
- Calories: 150
- Sugar: 12
- Fat: 7
- Carbohydrates: 20
- Protein: 1
Keywords: apple shaped sugar cookies, royal icing cookies, fall cookies, decorated sugar cookies, easy sugar cookies, holiday cookies